In the realm of enterprise applications, a deep understanding of distributed caching intricacies and adherence to best practices are essential to building enterprise applications that are scalable and high performant. You can choose from the popular distributed caching frameworks, such as Memcache, NCache, Redis, and Hazelcast. In this article, I'll discuss distributed caching, its benefits and use cases, and then teach you how to implement it in ASP.NET Core.
If you're to work with the code examples discussed in this article, you need the following installed in your system:
- Visual Studio 2022
- .NET 8.0
- ASP.NET 8.0 Runtime
If you don't already have Visual Studio 2022 installed on your computer, you can download it from here: https://visualstudio.microsoft.com/downloads/.
In this article, I'll examine distributed caching, its features and benefits, the challenges, and how you can implement distributed caching using NCache and MemCached.
What Is Caching? Why Is It Needed?
Caching is a proven technique used to collect frequently used data in a transient data store, known as a cache, for subsequent retrieval when requested by the application. This data store can reside in a transient storage such as memory, or in a permanent storage such as in a file, or even inside a database.
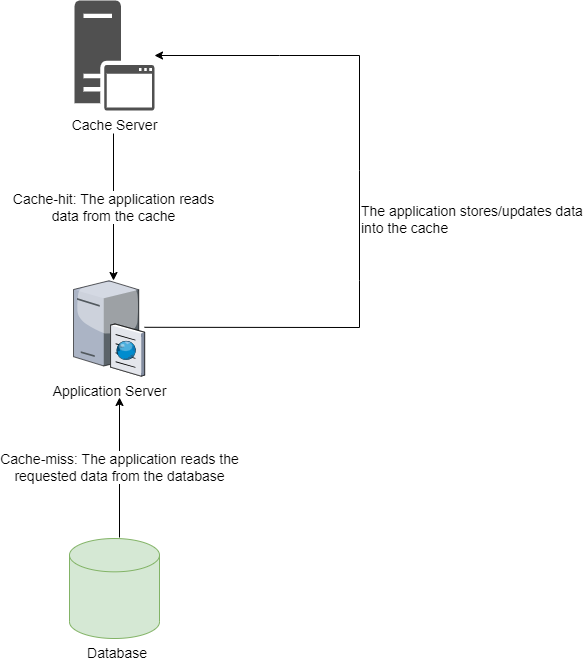
It should be noted that when a request for data is made, the caching system first attempts to determine whether the requested data already exists in the cache before attempting to retrieve it. If the data is available in the cache, you should be able to get it from there rather than accessing the data from the original source. A major benefit of this is that data can be retrieved from faster cache storages in a significantly shorter period of time instead of slower storage devices, such as remote databases or hard drives. (See Figure 1.)
Caching strategies need to consider trade-offs between cache size, cache eviction policies, and data consistency. Optimal performance requires a balance between cache utilization, data freshness, and data access patterns. There are several caching types, such as in-memory caching, distributed caching, and client-side caching. In the case of in-memory caching, the data is stored in a transient storage, i.e., the memory for faster access to the cached data for all subsequent requests. In distributed caching, data is stored on multiple nodes, i.e., the cached data is spread across several systems. In client-side caching, the cached data is stored on the client computer, such as on the web browser.
An Overview of Distributed Caching
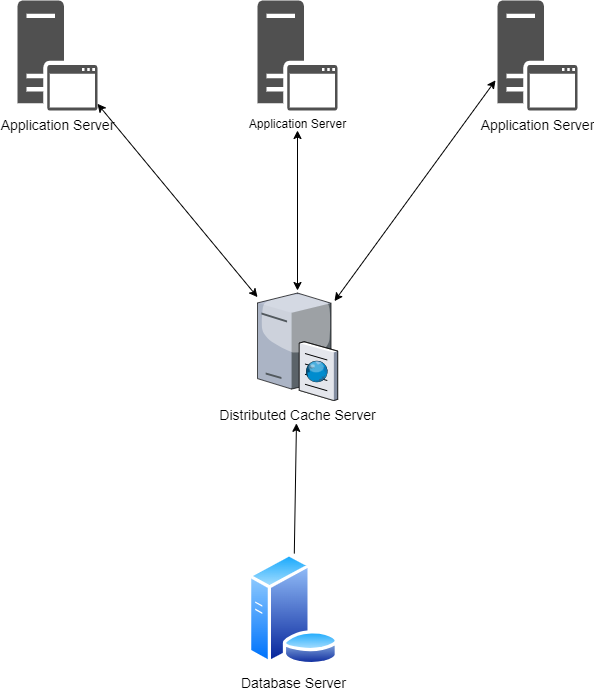
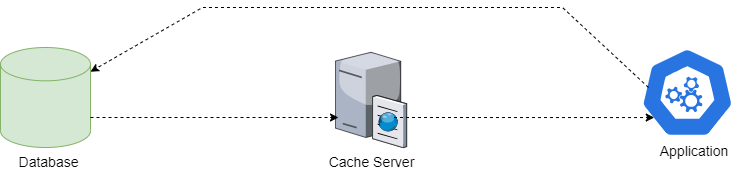
An extension of caching called distributed caching is the process of distributing the cache across several servers or machines. In a distributed caching environment, the cache servers are spread across multiple nodes or machines, allowing for scalability and improved performance. The main purpose of distributed caching is to store frequently accessed data in memory, rather than fetching it from the hard drive or a remote database. This improves the speed of data access because retrieving data from memory is faster than disk access. (See Figure 2.)
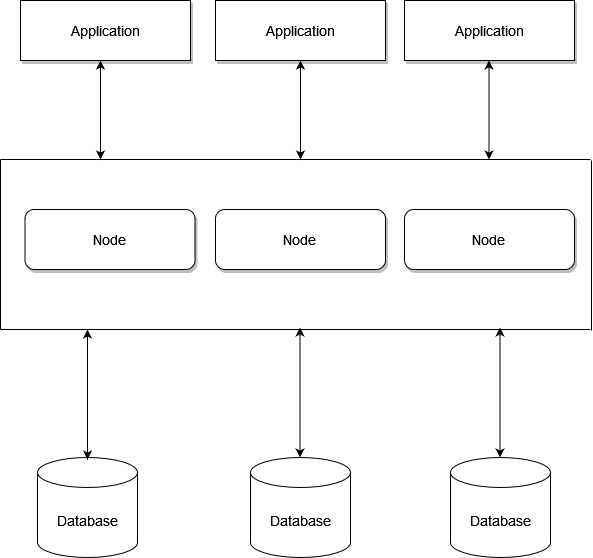
Distributed cache systems combine the memory of several networked computers into a single memory store for fast data access. This explains why distributed caches aren't constrained by the limit of available memory of a single computer or hardware component. They may go beyond these boundaries by connecting numerous computers, forming a distributed architecture or distributed cluster, enabling increased processing power and storage capacity. (See Figure 3.)
Note that a distributed cache is based on DHT, an acronym for Distributed Hash Table. In this DHT, the data is stored as key-value pairs. Each participating node can retrieve the value using a key. DHT allows distributed caches to be scaled dynamically by continuously managing additions, deletions, and node failures.
Some typical examples of widely used distributed caching systems include NCache, Redis, and Memcached. These systems leverage distributed cache mechanisms and offer APIs for faster data storage and retrieval.
Benefits
Distributed caching offers several benefits, including:
- Scalability: With a surge in traffic for an application, you can add additional cache servers to the distributed cache system without disrupting existing operations.
- Reduced latency: With distributed caching, cached data is usually stored in an in-memory data store, enabling blazing fast access and reducing latency caused by fetching data from the disk or any remote services.
- Performance: A distributed caching system reduces the latency associated with fetching frequently accessed data from disks or remote services by caching frequently accessed closer to the application.
- Reliability: Distributed caching promotes reliability by storing data across multiple servers. If a cache server fails, the remaining servers can still serve the cached data, ensuring data availability.
- High availability: Distributed caching systems can easily handle increased traffic by adding servers, enabling the systems to scale dynamically without disrupting the existing operations, hence ensuring high availability of the cached data.
- Resilience: Caching provides enhanced resilience against temporary traffic spikes or database outages. The cache data can be accessed quickly, providing a smoother user experience.
Building a Simple Distributed Application in ASP.NET Core
It's time for writing some code. Let's now examine how to build a simple ASP.NET Core 7 Web API application using GraphQL.
Create a New ASP.NET Core 8 Project in Visual Studio 2022
You can create a project in Visual Studio 2022 in several ways. When you launch Visual Studio 2022, you'll see the Start window. You can choose “Continue without code” to launch the main screen of the Visual Studio 2022 IDE.
To create a new ASP.NET Core 8 Project in Visual Studio 2022:
- Start the Visual Studio 2022 IDE.
- In the Create a new project window, select ASP.NET Core Web API and click Next to move on.
- Specify the project name as DistributedCachingDemo and the path where it should be created in the Configure your new project window. If you want the solution file and project to be created in the same directory, you can optionally check the Place solution and project in the same directory checkbox. Click Next to move on.
- In the next screen, specify the target framework and authentication type as well. Ensure that the Configure for HTTPS, Enable Docker Support, and the Enable OpenAPI support checkboxes are unchecked because you won't use any of these in this example.
- Because you won't be using minimal APIs in this example, remember to leave the Use controllers (uncheck to use minimal APIs) checkbox checked.
- Click Create to complete the process.
I'll use this project in the subsequent sections of this article.
Distributed Caching Use Cases
There are several use cases of distributed caching across different domains and industries. Here are a few common scenarios where distributed caching can help:
- High-traffic websites: Distributed caching can be used to store frequently accessed web pages, HTML fragments, or static content. By caching these elements on distributed cache servers closer to the users, they can be served quickly and reduce the load on back-end servers, improving website performance and scalability.
- Database caching: Distributed caching can be employed to cache frequently accessed database queries or result sets. By storing this information in memory, you can quickly respond to requests avoiding the need for possibly expensive database queries or redundant database hits.
- Microservices architecture: In a typical microservices architecture, there can be many different services communicating with each other, which can increase latency due to network roundtrips. By using distributed caching, frequently accessed data or computed results can be cached, minimizing the need for repeated remote calls and reducing latency.
- Content delivery networks (CDNs): CDNs leverage distributed caching to persist and also serve static content that includes images, JavaScript, and CSS files. By caching content in multiple edge servers located geographically closer to users, CDNs can deliver content faster, reducing latency and improving the user experience.
- Real-time analytics: In data-intensive applications, distributed caching can be used to store preprocessed or computed data that is frequently accessed for real-time analytics. By caching this data, applications can retrieve insights quickly, avoiding the latency associated with reprocessing vast amounts of raw data.
- Geographically distributed applications: In globally distributed applications, distributed caching can be used to store and serve frequently accessed data closer to users in different regions. This decreases the amount of time that's otherwise needed to access data across long network distances, improving performance and reducing latency.
Distributed Caching Best Practices
Implementing distributed caching requires adherence to several best practices:
- Cache invalidation: Decide on a cache invalidation strategy ensuring that the cached data remains up to date. Consider options like time-to-live (TTL) based expiration, explicit cache invalidation, or event-driven invalidation mechanisms based on data changes or updates.
- Eviction policies: Choose appropriate eviction policies for your distributed cache. Cache eviction policies help manage cache data and determine how and when they're removed from the cache. There are three types of eviction policies: least recently used (LRU), least frequently used (LFU), and fixed size evictions.
- Cache sizing and capacity planning: Estimate the cache size and capacity requirements based on the volume of data and expected workload. Consider factors like memory availability, cache server capabilities, and future growth to ensure that the cache can handle the anticipated load.
- Proper key design: Design cache keys with care. Use meaningful and unique keys that are easy to generate and parse. Avoid overusing complex objects or dynamic data as keys, as it can negatively impact cache performance.
- Monitor and tune performance: Regularly monitor and measure the performance of your distributed cache to identify bottlenecks, cache hit ratios, and review other performance indicators. Adjust cache configuration, eviction policies, or cache server capacity, if necessary, to optimize performance.
- Implement failover and replication: Ensure high availability and fault tolerance by implementing failover mechanisms and data replication across cache servers in case of failures. This helps maintain consistency and ensures uninterrupted access to cached data.
- Security considerations: Pay attention to security aspects, such as access control, authentication, and encryption, to protect sensitive data stored in the distributed cache.
- Appropriate data selection: Not all data is suitable for caching. Identify data that's frequently read but infrequently updated, as this type of data benefits most from caching. Avoid caching data that changes very frequently.
- Cache invalidation strategy: Implement a robust cache invalidation strategy to ensure data consistency. This could be time-based (e.g., TTL - time to live), event-driven, or a combination of both. When a change occurs in the underlying data, it's recommended that you update the cache to ensure that your cached data is always in sync with the data residing in the data store.
- Data partitioning and sharding: Distribute data across different cache servers to balance the load and reduce risks of a single point of failure. Use sharding techniques to partition data effectively based on usage patterns or other relevant criteria.
- Handling cache misses: Design your system to handle cache misses gracefully. When the data requested by the application isn't available in the cache, it's known as a cache miss. Optimizing this fallback mechanism is essential for maintaining performance.
- Load balancing: Employ load balancing to distribute requests evenly across cache servers, thus ensuring use of resources.
- Scalability: Ensure that your caching solution can scale horizontally. As the demand increases, you should be able to add more cache servers to the system without significant changes to the existing infrastructure.
- Data security: You should establish the necessary security measures by implementing security measures that include encryption of data in transit and at rest, proper access controls, and authentication mechanisms, etc.
- Monitoring and analytics: You should monitor the performance of your cache system on a regular basis. In this regard, you can take advantage of metrics such as cache hit, miss rates, and load patterns to optimize your caching strategy.
- Data synchronization: Ensure that the cache is synchronized across all nodes in distributed environments. To maintain data integrity, you can take advantage of techniques such as distributed locking or atomic operations.
- Selecting the right tool: Selection of the right caching solution that satisfies the requirements of your application is extremely important. Redis, Memcached, and Hazelcast are popular tools with varying features and capabilities.
- Avoid cache stampede: Implement strategies like staggered TTLs, pre-computation, or using a probabilistic early expiration to avoid a cache stampede, where multiple instances try to compute and store the same data in the cache simultaneously.
Distributed Caching Patterns
Cache patterns are an approach to application design that emphasizes caching techniques to improve scalability, performance, and responsiveness. These patterns provide valuable insights and suggestions for implementing caching techniques. Typically, these patterns are used with distributed caching systems that include NCache or Memcached. You can take advantage of these patterns to reduce latency and improve your application's workload processing capabilities.
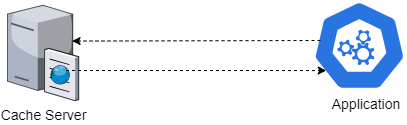
One such pattern is called cache aside (see Figure 4). The cache aside pattern adopts a lazy loading approach and is the most used caching strategy. Here's how this pattern works:
- When a request arrives, the application searches for the data in the cache.
- If the data is available, the application returns the cached data. This phenomenon is also known as a cache-hit.
- On the other hand, if the data that has been requested is unavailable in the cache, the application retrieves data from the database and then populates the cache with this data.

There are a few benefits of this approach:
- The cache contains only the data the application has requested, thus ensuring that the cache size is optimal and cost-effective.
- This strategy is simple and can provide immediate performance benefits.
The downsides to this approach include:
- Because the data is loaded into the cache only in the event of a cache miss, the initial response time increases because of the additional roundtrips required to the database and the cache.
- Using this approach, the data is stored directly in the database, which may result in discrepancies between the database and the cache.
Another pattern is called read through (see Figure 5). In this pattern, the application queries the cache first. The cache then interacts with the underlying database on a lazy load basis. If the data requested by the application is unavailable in the cache, it's called a cache miss. In this case, the application retrieves the requested data from the data store (i.e., a database or a service, etc.), stores this data into the cache, and then returns it.

The cached copy of the same data is then served for all subsequent requests for the same piece of data.
Another pattern is write through (see Figure 7). This pattern is similar to read through, but instead of reading data from the back-end system, it writes data to the cache. In other words, when using a write through cache, the order in which the cache is populated is reversed. After a cache miss, the cache is not lazy loaded. Instead, it's proactively updated immediately following an update to the database. Using this approach makes sense when writing operations are frequent and application performance is paramount.

Another pattern is write around (see Figure 8). In the write around approach, the data is written directly to the data store without storing it in the cache. When the application performs a read operation, the data is placed in the cache. This strategy is a good choice if your application doesn't need to reread frequently written data.
Another pattern is write behind or write back (see Figure 9). In the write back approach, data is written directly to the cache alone instead of the data store. The data store is updated with this cached data after specific intervals of time, or based on certain pre-defined conditions. Although this approach is beneficial in write-intensive applications due to low latency and high throughput capabilities, there are risks of data loss in the event of a system crash etc.

Cache Eviction Strategies
Cache eviction involves the removal of cache entries or data from a cache based on specific conditions or rules being satisfied. In distributed cache systems, cache eviction algorithms are used to provide space for new data and prevent the cache from going beyond its capacity. There are various cache eviction strategies available for removal of cache entries. Here are the key cache eviction strategies you can explore:
- Least recently used (LRU): Per this strategy, the cache item that's been accessed the least recently is removed from the cache when the cache reaches its maximum capacity. Note that this approach assumes entries that have been the least used will not be used again in the near future.
- Most recently used (MRU): Cache entries that have been accessed most recently are evicted when the cache is full. As per this assumption, entries that have been used more recently are less likely to be used again in the near future.
- Least frequently used (LFU): This policy stipulates that when the maximum cache capacity is reached, the cache element accessed least frequently within a certain period is removed. It asserts that entries used less often are unlikely to be accessed in the future.
- Time-to-live (TTL): This policy defines the duration for which a cache entry should remain valid in the cache. A cache entry is removed when its time-to-live (TTL) expires. You can employ this method when the data in your application has a short duration, like session data or refreshed data. It can prove beneficial in scenarios where your application relies on data that has a short lifespan such as session data or data that undergoes frequent updates.
Distributed Caching Challenges
Although there are benefits, distributed caching poses certain challenges as well:
- Data consistency: The main challenge with distributed caching is maintaining data consistency. Caches may have different data versions or may experience replication delays, leading to data inconsistency.
- Cache invalidation: Implementing proper cache invalidation and synchronization mechanisms or using eventual consistency models can help mitigate this challenge. Invalidating caches can be challenging, especially when data is frequently changing or interdependent. Ensuring that the cache is refreshed, i.e., updated when underlying data changes, or employing strategies, such as cache expiration based on time, can help maintain cache validity.
- Cache coherence: Cache coherence refers to ensuring that all cache servers have consistent data. Achieving cache coherence can be challenging, especially in scenarios where data is updated frequently or when multiple cache servers are involved. Employing distributed cache solutions that provide strong consistency guarantees or using cache coherence protocols can help address this challenge.
- Cache warm-up: When a cache is empty or after a cache server restarts, it takes time to populate the cache with frequently accessed data. This initial period can result in cache misses and increased latency until the cache is warmed up. Proper cache warm-up strategies, such as preloading commonly accessed data or using warm-up scripts, can help minimize this issue.
- Cache eviction strategies: Since data access patterns may differ across the nodes, it is quite challenging to implement cache eviction strategies in a distributed cache environment. Careful consideration should be given to selecting an eviction strategy that aligns with your application's data access patterns and requirements.
- Scaling: As the application load and data volume increase, scaling the distributed cache can become a challenge. Proper planning and architecture should be in place to ensure that the cache can handle the added load effectively.
- Cache synchronization: In multi-level caching systems, where multiple caches, like local cache and distributed cache, are used, ensuring proper synchronization and consistency across different cache layers can be challenging. You can prevent inconsistencies in your data by implementing the right synchronization strategies.
- Network overhead: Distributed caching systems require communication and synchronization between cache servers, which introduces network overhead. High network latency or limited bandwidth can affect cache performance and overall application responsiveness.
- Complexity and maintenance: For the cache infrastructure to operate smoothly, it must be properly maintained, monitored, and troubleshot with proper expertise and resources. Implementation of a distributed caching system, in the application architecture introduces increased complexity in terms of implementation, management, and monitoring.
- Application compatibility: Some applications may not be designed to work seamlessly with distributed caching or may have dependencies that don't support caching effectively. Evaluate and modify the application to ensure compatibility with the distributed caching approach.
Distributed Caching in ASP.NET Core
Support for distributed caching is in-built in ASP.NET Core using the IDistributedCache interface. The IDistributedCache interface helps you to plug in any thirty-party caching frameworks. Listing 1 illustrates how the IDistributedCache interface looks.
Listing 1: The IDistributedCache Interface
public interface IDistributedCache
{
    byte[] Get(string key);
    Task<byte[]> GetAsync(string key);
    void Set(string key, byte[] value,
      DistributedCacheEntryOptions options);
    Task SetAsync(string key, byte[] value,
      DistributedCacheEntryOptions options);
    void Refresh(string key);
    Task RefreshAsync(string key);
    void Remove(string key);
    Task RemoveAsync(string key);
}
As evident from the source code of the IDistributedCache interface, its Get method returns byte[]. Nevertheless, the framework provides extension methods for working with string objects. In addition, you can implement custom extension methods to make it work with other data types.
Enabling Distributed Caching in ASP.NET Core
You can enable distributed caching in your ASP.NET Core application by adding the following code snippet in the Program.cs file:
builder.Services.AddDistributedMemoryCache();
You can now use the IDistributedCache interface to implement distributed caching in your ASP.NET Core application.
Implementing Distributed Caching Using NCache
NCache is a fast, open-source, cross-platform, distributed, in-memory caching framework. It's adept at enhancing the scalability and performance of your applications by caching frequently accessed data instead of storing to and retrieving the data and from the database. There are a variety of caching features in NCache, including object caching, SQL caching, full-text search, and distributed caching, and there are use cases such as web sessions, ASP.NET output caching, and enterprise caching. NCache supports Docker and Kubernetes and various caching topologies, including replicated, partitioned, and client-side caching.
Configuring NCache as an IDistributedCache Provider
To work with distributed caching using NCache, invoke the AddNCacheDistributedCache method in the Program.cs file to register NCache with the IoC container. Note that the AddNCacheDistributedCache() method in NCache is an extension method of the AddDistributedCache() method pertaining to ASP.NET Core.
builder.Services.AddNCacheDistributedCache
(configuration =>
{
    configuration.CacheName = "demoCache";
    configuration.EnableLogs = true;
    configuration.ExceptionsEnabled = true;
});
If you'd like to work with multiple caches, use the following code snippet to configure them in the Program.cs file:
builder.Services.AddNCacheDistributedCacheProvider(options =>
{
    options.CacheConfigurations = new NCacheConfiguration[] {
        new NCacheConfiguration() {
            CacheName = "myFirstCache",
            EnableLogs = true,
            ExceptionsEnabled = true
        },
        new NCacheConfiguration(){
            CacheName = "mySecondCache",
            EnableLogs = true,
            ExceptionsEnabled = true
        }
    };
});
Setting Up NCache in ASP.NET Core
To setup NCache in your system, follow these steps:
- Download the NCache installer to your computer.
- Open a command prompt window as administrator and run the
msiexec.exeutility to install NCache.
msiexec /i "<<Specify the path of the NCache installer
 in your computer>>"\ncache.ent.net.x64.msi"
- Once the installer is launched, you can observe three different installation types: Cache Server, Developer/QA, and Remote Client.
- Select CacheServer and click Next to move on.
- Specify the license key for the version of NCache you're installing in your system.
- If you don't have a valid license key with you, click on the Get Installation Key button to get an installation key.
- You're prompted to enter your name, your organization's name, and your email address.
- Specify the location in your computer where NCache should be installed. Click on Next to move on to the next step.
- Select the IP address to bind the NCache server. You can stick to the default here.
- Specify the account to run NCache in your system. Select the Local System account and click Next to move on.
That's all you have to do to install NCache on your computer.
Store and Retrieve an Object Using NCache
Consider the following class:
public class Author
{
    public int AuthorId { get; set; }
    public string? FirstName { get; set; }
    public string? LastName { get; set; }
    public bool IsActive { get; set; }
}
Listing 2 illustrates how you can leverage NCache to store and retrieve an object:
Listing 2: Store/Retrieve data using the IDistributedCache interface
app.MapGet("/Test", async (IDistributedCache cache,
  IHttpClientFactory httpClientFactory) =>
{
    const string cacheKey = "Test";
    List<Author>? authors = null;
    var cachedData = await cache.GetStringAsync(cacheKey);

    if (!string.IsNullOrEmpty(cachedData))
    {
        authors = System.Text.Json.JsonSerializer.Deserialize
          <List<Author>>(cachedData);
    }

    else
    {
        Author user = new Author()
        {
            AuthorId = 1,
            FirstName = "Joydip",
            LastName = "Kanjilal",
            IsActive = true
        };

        authors = new List<Author>();
        authors.Add(user);

        await cache.SetStringAsync(cacheKey,
          System.Text.Json.JsonSerializer.Serialize(authors),
          new DistributedCacheEntryOptions
        {
            AbsoluteExpirationRelativeToNow = new TimeSpan(0, 0, seconds: 60)
        });
    }

    return authors;
});
Note that for the sake of simplicity, I've used a minimal API only to demonstrate how NCache works. I've added only one record here for the sake of brevity. When you execute the application and browse the /test endpoint, the author record is displayed in the web browser. When this endpoint is hit the first time, the author record is stored in the cache. For all subsequent requests to this endpoint, the data is fetched from the cache based on the expiration time set in the configuration. In this example, the data resides in the cache for 60 seconds.
The complete code listing of the Program.cs file is given in Listing 3 for your reference.
Listing 3: The Program.cs file
using Alachisoft.NCache.Caching.Distributed;
using Microsoft.Extensions.Caching.Distributed;

var builder = WebApplication.CreateBuilder(args);

// Add services to the container.

builder.Services.AddNCacheDistributedCache(configuration =>
{
    configuration.CacheName = "demoCache";
    configuration.EnableLogs = true;
    configuration.ExceptionsEnabled = true;
});

builder.Services.AddHttpClient();
var app = builder.Build();

app.MapGet("/Test", async(IDistributedCache cache,
  IHttpClientFactory httpClientFactory) =>
{
    const string cacheKey = "Test";
    List<Author>? authors = null;
    var cachedData = await cache.GetStringAsync(cacheKey);

    if (!string.IsNullOrEmpty(cachedData))
    {
        authors = System.Text.Json.JsonSerializer.
          Deserialize<List<Author>>(cachedData);
    }

    else
    {
        Author user = new Author()
        {
            AuthorId = 1,
            FirstName = "Joydip",
            LastName = "Kanjilal",
            IsActive = true
        };

        authors = new List<Author>();
        authors.Add(user);

        await cache.SetStringAsync(cacheKey, System.Text.Json.
          JsonSerializer.Serialize(authors),
          new DistributedCacheEntryOptions
          {
              AbsoluteExpirationRelativeToNow =
                new TimeSpan(0, 0, seconds: 60)
          });
    }

    return authors;
});

app.Run();

class Author
{
    public int AuthorId { get; set; }
    public string? FirstName { get; set; }
    public string? LastName { get; set; }
    public bool IsActive { get; set; }
}
Implementing Distributed Caching Using SQL Server
You can use SQL Server as a cache store as well. To get started on this, create the database table to store cached data in SQL Server.
You can take advantage of the sql-cache by creating a command to create a database table for storing cached data. If the sql-cache tool isn't installed on your computer, you can install it using the following command at the Developer Command Prompt window:
dotnet tool install --global dotnet-sql-cache
You can use the following command to create a database table for storing cached data in a SQL Server:
dotnet sql-cache create "Data Source=.;
Initial Catalog=MyCache;
Integrated Security=True;" dbo MyCacheData
To enable a distributed SQL Server cache service in an ASP.NET Core application, write the following piece of code in the Program.cs file:
builder.Services.AddDistributedSqlServerCache(options =>
{
    options.ConnectionString = builder.Configuration.
      GetConnectionString("MyDBConnectionString");
    options.SchemaName = "dbo";
    options.TableName = "MyCacheData";
});
Now refer to the DistributedCachingDemo ASP.NET Core project you created earlier. Create a new class called Product in a file named Product.cs and replace the default generated code with the following code:
public class Product
{
    public Guid Id { get; set; }
    public string Name { get; set; }
    public int Quantity { get; set; }
    public decimal Price { get; set; }
}
Create a new API controller named MySQLServerCacheDemoController in a file having identical name with a .cs extension and write the code found in Listing 4 there.
Listing 4: The MySQLServerCacheDemoController class
    [Route("api/[controller]")]
    [ApiController]
    public class MySQLServerCacheDemoController : ControllerBase
    {
        private readonly IDistributedCache _distributedCache;
        private readonly string key = "MySQLServerCacheDemo";
        public MySQLServerCacheDemoController
          (IDistributedCache distributedCache)
        {
            _distributedCache = distributedCache;
        }

        [HttpGet("GetProduct")]
        public async Task<Product> GetProduct()
        {
            byte[] cachedObject = await _distributedCache.GetAsync(key);

            if (cachedObject != null)
            {
                var cachedObjectAsJson = System.Text.Encoding.UTF8.
                  GetString(cachedObject);
                var product = JsonSerializer.Deserialize<Product>
                  (cachedObjectAsJson);
                if (product != null)
                {
                    return product;
                }
            }

            var result = new Product()
            {
                Id = Guid.NewGuid(),
                Name = "HP Envy Laptop",
                Price = 5000,
                Quantity = 1
            };

            byte[] serializedObject = JsonSerializer.
              SerializeToUtf8Bytes(result);
            var options = new DistributedCacheEntryOptions
            {
                 AbsoluteExpirationRelativeToNow
                   = new TimeSpan(0, 0, seconds: 60)
            };

            await _distributedCache.SetAsync
              (key, serializedObject, options);
            return result;
        }
    }
A Real-World Use Case: Implementing Distributed Caching Using MemCached
Memcached is an open-source, high-performance, distributed, in-memory caching system that aims to improve the scalability and performance of web applications by lessening the need to retrieve data from databases or other external resources. Memcached is mainly used to reduce the load on database servers and improve the overall efficiency of applications by storing the results of database queries and other computationally intensive results in memory. Data for subsequent redundant queries can be served from the cache by storing information in the cache, avoiding the database access time and computational overhead. This significantly improves performance and scalability compared to accessing the original data sources for every request.
In this section, you'll implement a simple OrderProcessing application. To keep things simple, this application only displays one or more order records. The source code of this application is comprised of the following classes and interfaces:
OrderclassIOrderRepositoryinterfaceOrderRepositoryclassOrdersControllerclass
Create the Model Clasess
In a typical order management system, you'll have several entity or model classes. However, for the sake of simplicity, I'll consider and use only one entity or model class here. Create a new class named Order in a file having the same name with a .cs extension and write the following code in there:
public class Order
{
    public int Order_Id { get; set; }
    public int Customer_Id { get; set; }
    public DateTime Order_Date { get; set; }
    public decimal Amount { get; set; }
}
Install NuGet Package(s)
The next step is to install the necessary NuGet Package(s). To install the required package(s) into your project, right-click on the solution and then select Manage NuGet Packages for Solution…. Now search for the package named EnyimMemcachedCore in the search box and install it.
Alternatively, you can type the command shown below at the NuGet Package Manager Command Prompt:
PM> Install-Package EnyimMemcachedCore
You can also install this package by executing the following commands at the Windows Shell:
dotnet add package EnyimMemcachedCore
Create the MemCacheProvider Class
Now you need a class that acts as a wrapper on IMemcachedClient so as to encapsulate all calls to store and retrieve data to and from the cache. This not only simplifies access to the cache, it also ensures that you don't need to write code to manage cache in your controller or repository classes. Now, create a class named MemCacheProvider and write the code from Listing 3 in there.
The MemCacheProvider class implements the IMemCacheProvider interface and wraps access to the cache using an instance of type IMemcachedClient. Here is the source code of the IMemCacheProvider interface:
public interface IMemCacheProvider
{
    T GetCachedData<T>(string key);
    void SetCachedData<T>(string key, T value, int duration);
}
Create the OrderRepository Class
The OrderRepository class uses an instance of type IMemCacheProvider to interact with the cache. This instance is injected in the constructor of the OrderRepository class. Now, create a new class named OrderRepository in a file having the same name with a .cs extension. Next, write the following code in there:
public class OrderRepository : IOrderRepository
{

}
The OrderRepository class implements the methods of the IOrderRepository interface. For the sake of simplicity, I have only one method called GetOrders. Here is how the IOrderRepository interface should look:
public interface IOrderRepository
{
    public Task<List<Order>> GetOrders();
}
The OrderRepository class implements the GetOrders method of the IOrderRepository interface. In this method, you first check whether the data requested is available in the cache. If the data is available in the cache, it's returned from there; otherwise, the data is retrieved from the database. Once the data is retrieved from the database, the cache is populated with this data. Lastly, this data is returned:
public async Task<List<Order>> GetOrders()
{
    var result = _memCacheProvider.GetCachedData<List<Order>>(key);

    if(result != null)
    {
        return result;
    }

    _memCacheProvider.SetCachedData<List<Order>>(key, orders, 600);
        return await
    Task.FromResult(orders);
}
The complete source code of the OrderRepository class is given in Listing 6.
Listing 6: The OrderRepository Class
    public class OrderRepository: IOrderRepository {
        private const string key = "MemCacheDemo";
        private readonly IMemCacheProvider _memCacheProvider;
        private readonly List <Order> orders = new List <Order> {
            new Order {
                Order_Id = 1,
                Customer_Id = 2,
                Amount = 125000.00 m,
                Order_Date = DateTime.Now
            },
            new Order {
                Order_Id = 2,
                Customer_Id = 1,
                Amount = 200000.00 m,
                Order_Date = DateTime.Now
            },
            new Order {
                Order_Id = 3,
                Customer_Id = 3,
                Amount = 750000.00 m,
                Order_Date = DateTime.Now
            }
        };
        public OrderRepository(IMemCacheProvider memCacheProvider) {
             _memCacheProvider = memCacheProvider;
        }
        public async
        Task <List <Order>> GetOrders() {
            var result = _memCacheProvider.GetCachedData <List<Order>> (key);

            if (result != null) {
                return result;
            }

            _memCacheProvider.SetCachedData
              <List<Order>> (key, orders, 600);
            return await Task.FromResult(orders);
        }
    }
Register and Configure the MemCached Instance
The following code snippet illustrates how an instance of type IOrderRepository is added as a scoped service to the IServiceCollection.
builder.Services.AddScoped<IOrderRepository, OrderRepository>();
Next, register and configure MemCached using the following piece of code in the Program.cs file:
builder.Services.AddEnyimMemcached(mc =>
{
    mc.Servers.Add(new Server
    {
        Address = "localhost",
        Port = 11211
    });
});
The complete source code of the Program.cs file is given in Listing 7 for reference.
Listing 7: The Complete Source of Program.cs file
using DistributedCachingDemo;
using Enyim.Caching.Configuration;

var builder = WebApplication.CreateBuilder(args);

// Add services to the container.

builder.Services.AddControllers();
builder.Services.AddScoped<IOrderRepository, OrderRepository>();
builder.Services.AddSingleton<IMemCacheProvider>(x =>
  ActivatorUtilities.CreateInstance <MemCacheProvider>(x));
builder.Services.AddEnyimMemcached(mc =>
{
    mc.Servers.Add(new Server
    {
        Address = "localhost",
        Port = 11211
    });
});

var app = builder.Build();

// Configure the HTTP request pipeline.

app.UseAuthorization();

app.MapControllers();

app.Run();
The OrderController Class
Finally, create a new API controller class named OrderController with the following code in there, as shown in Listing 8.
Listing 8: The OrderController Class
[Route("api/[controller]")]
[ApiController]
public class OrdersController : ControllerBase
{
    private IOrderRepository _orderRepository;
    public OrdersController (IOrderRepository orderRepository)
    {
        _orderRepository = orderRepository;
    }

    [HttpGet("GetOrders")]
    public async Task<List<Order>> GetOrders()
    {
        return await _orderRepository.GetOrders();
    }
}
The OrdersController class contains two action methods, namely, the GetOrders method that returns a list of Order instances. This action method calls the GetOrders method of the OrderRepository class respectively. Note how an instance of type IOrderRepository is injected in the OrdersController class using constructor injection.
When you run the application and browse the /getorders endpoint, the order data is displayed in the web browser. In the first call to this endpoint, the data is fetched from the database and it's fetched from the cache for all subsequent calls to this endpoint. The cache is invalidated after the specified timespan elapses.
Conclusion
Caching is a proven and established technique used to improve an application's performance, scalability, and responsiveness by storing frequently accessed data in transient storage, such as the memory or other permanent storage like a file or a database. In distributed caching, the cached data is spread across multiple nodes, often in different networks. As cached data is readily accessible, it ensures enhanced reliability during unexpected peaks or failures.