Real-time communication has become a crucial aspect of modern web applications, allowing users to interact with each other and receive immediate updates without the need for manual refreshes. In PHP Laravel, real-time communication can be achieved through various tools and technologies, including Long Polling, WebSockets, and Server-Sent Events.
This opens many possibilities for building dynamic and interactive web applications. Here are several applications that can significantly benefit from real-time communication:
- Chat applications: With Laravel's real-time communication capabilities, developers can create chat systems where messages are instantly delivered and displayed as soon as they're sent. Real-time updates ensure a seamless chat experience allowing users to engage without manual refreshes.
- Collaborative tools: There's no better example than this! Real-time communication is essential for collaborative tools such as document editors, project management systems, or whiteboards. The real-time feature enables simultaneous editing and immediate updates across multiple users ensuring a smooth collaborating experience. By eliminating delays, project teams become more efficient with minimal confusion and added productivity.
- Notifications and alerts: Applications that require real-time notifications and alerts can benefit significantly from Laravel's real-time communication capabilities. Whether notifying users about new messages, system updates, or other essential events, this ensures that notifications are delivered swiftly to users' interfaces, keeping them informed and engaged.
- Live streaming and broadcasting: Real-time communication is crucial for live streaming or broadcasting content applications. Whether live video streaming, commentary for sports events, or updates for financial markets, the real-time feature allows for data delivery and updates to users, creating immersive, dynamic, and engaging experiences.
- Real-time analytics and dashboards: Applications that provide real-time analytics, monitoring, or dashboards can leverage Laravel's instant communication to deliver live updates and visualizations. Real-time data processing and visualization allows key monitoring of metrics, event tracking, and making informed decisions to enhance the overall user experience.
- Social media feeds and activity streams: This is vital for social media applications that involve feeds and activity streams. With Laravel, developers can implement real-time updates for news feeds, social interactions, likes, comments, and other user tools. Users receive immediate updates on their feeds, ensuring that they stay up to date with the latest content and interactions.
These are just a few examples of applications leveraging real-time communication in Laravel. The flexibility and power of this feature open endless possibilities for creating interactive, dynamic, and engaging web applications across various industries and use cases.
Long Polling
Long Polling is a technique used in web development to achieve real-time or near real-time communication between a client (usually a web browser) and a server. It's an alternative to the traditional request-response model, where the client sends a request to the server and waits for a response. With Long Polling, the client sends a request to the server, but instead of the server immediately responding, it holds the request open until new data is available or a timeout occurs.
Figure 1 is a simplified overview of how Long Polling works for real-time communication.
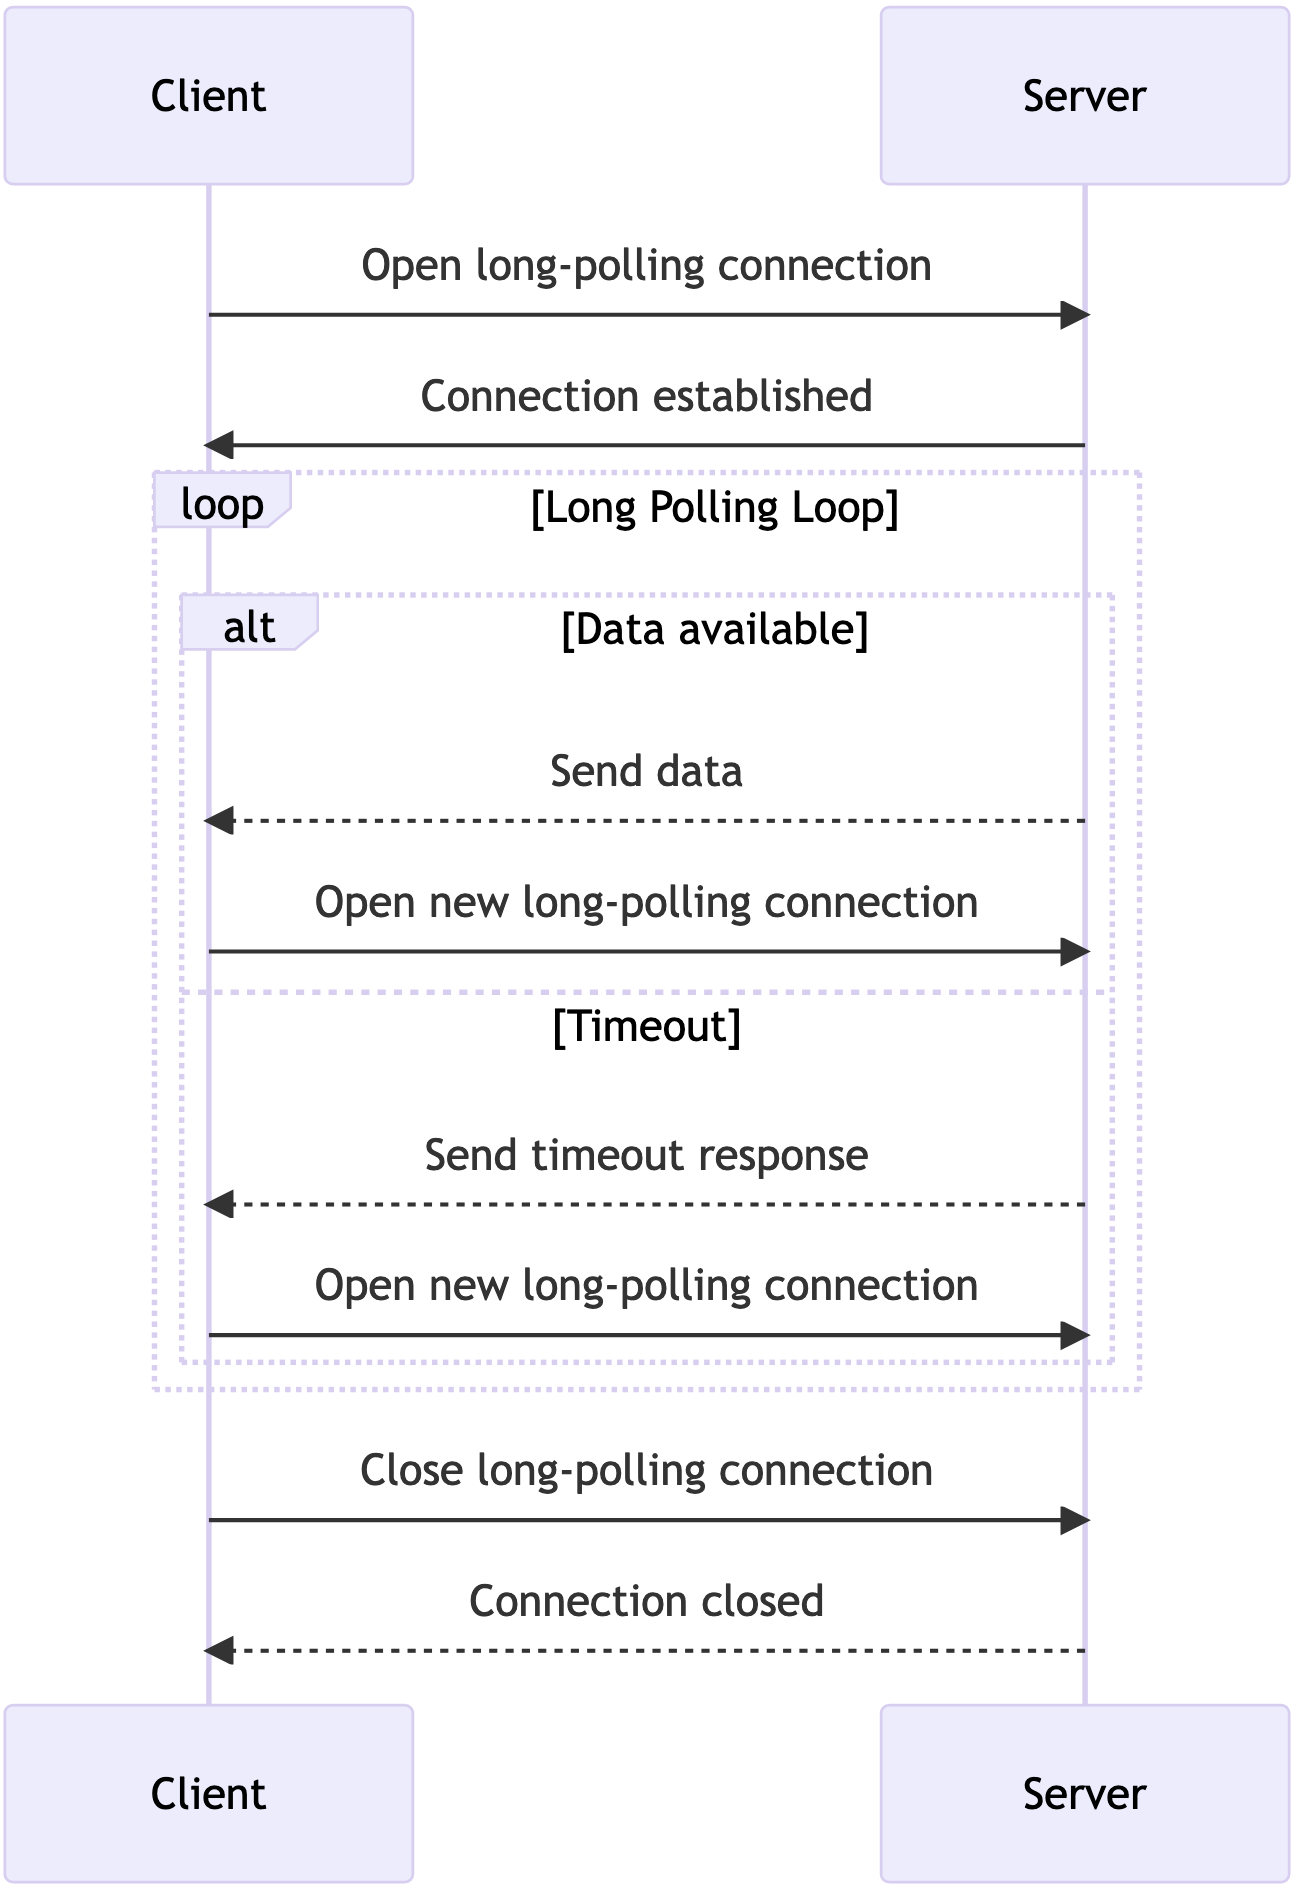
Here's what happens:
- The client initiates a long-polling connection with the server by sending a request.
- The server establishes the connection and waits for new data or a timeout.
- If data becomes available within the specified timeout period, the server sends the data to the client and the client opens a new long-polling connection to await further updates.
- If a timeout occurs before any data is available, the server sends a timeout response to the client and the client opens a new long-polling connection.
- The long-polling process continues in a loop until the client decides to close the connection. When the client requests this, the server acknowledges it and the long-polling connection is terminated.
WebSockets
WebSockets are a communication protocol that enables real-time, two-way communication between a client (typically a web browser) and a server. Unlike traditional HTTP requests that follow a request-response model, WebSockets provide a persistent connection between the client and the server, allowing efficient and instantaneous data exchange.
Figure 2 shows a simplified overview of how WebSockets work for real-time communication.
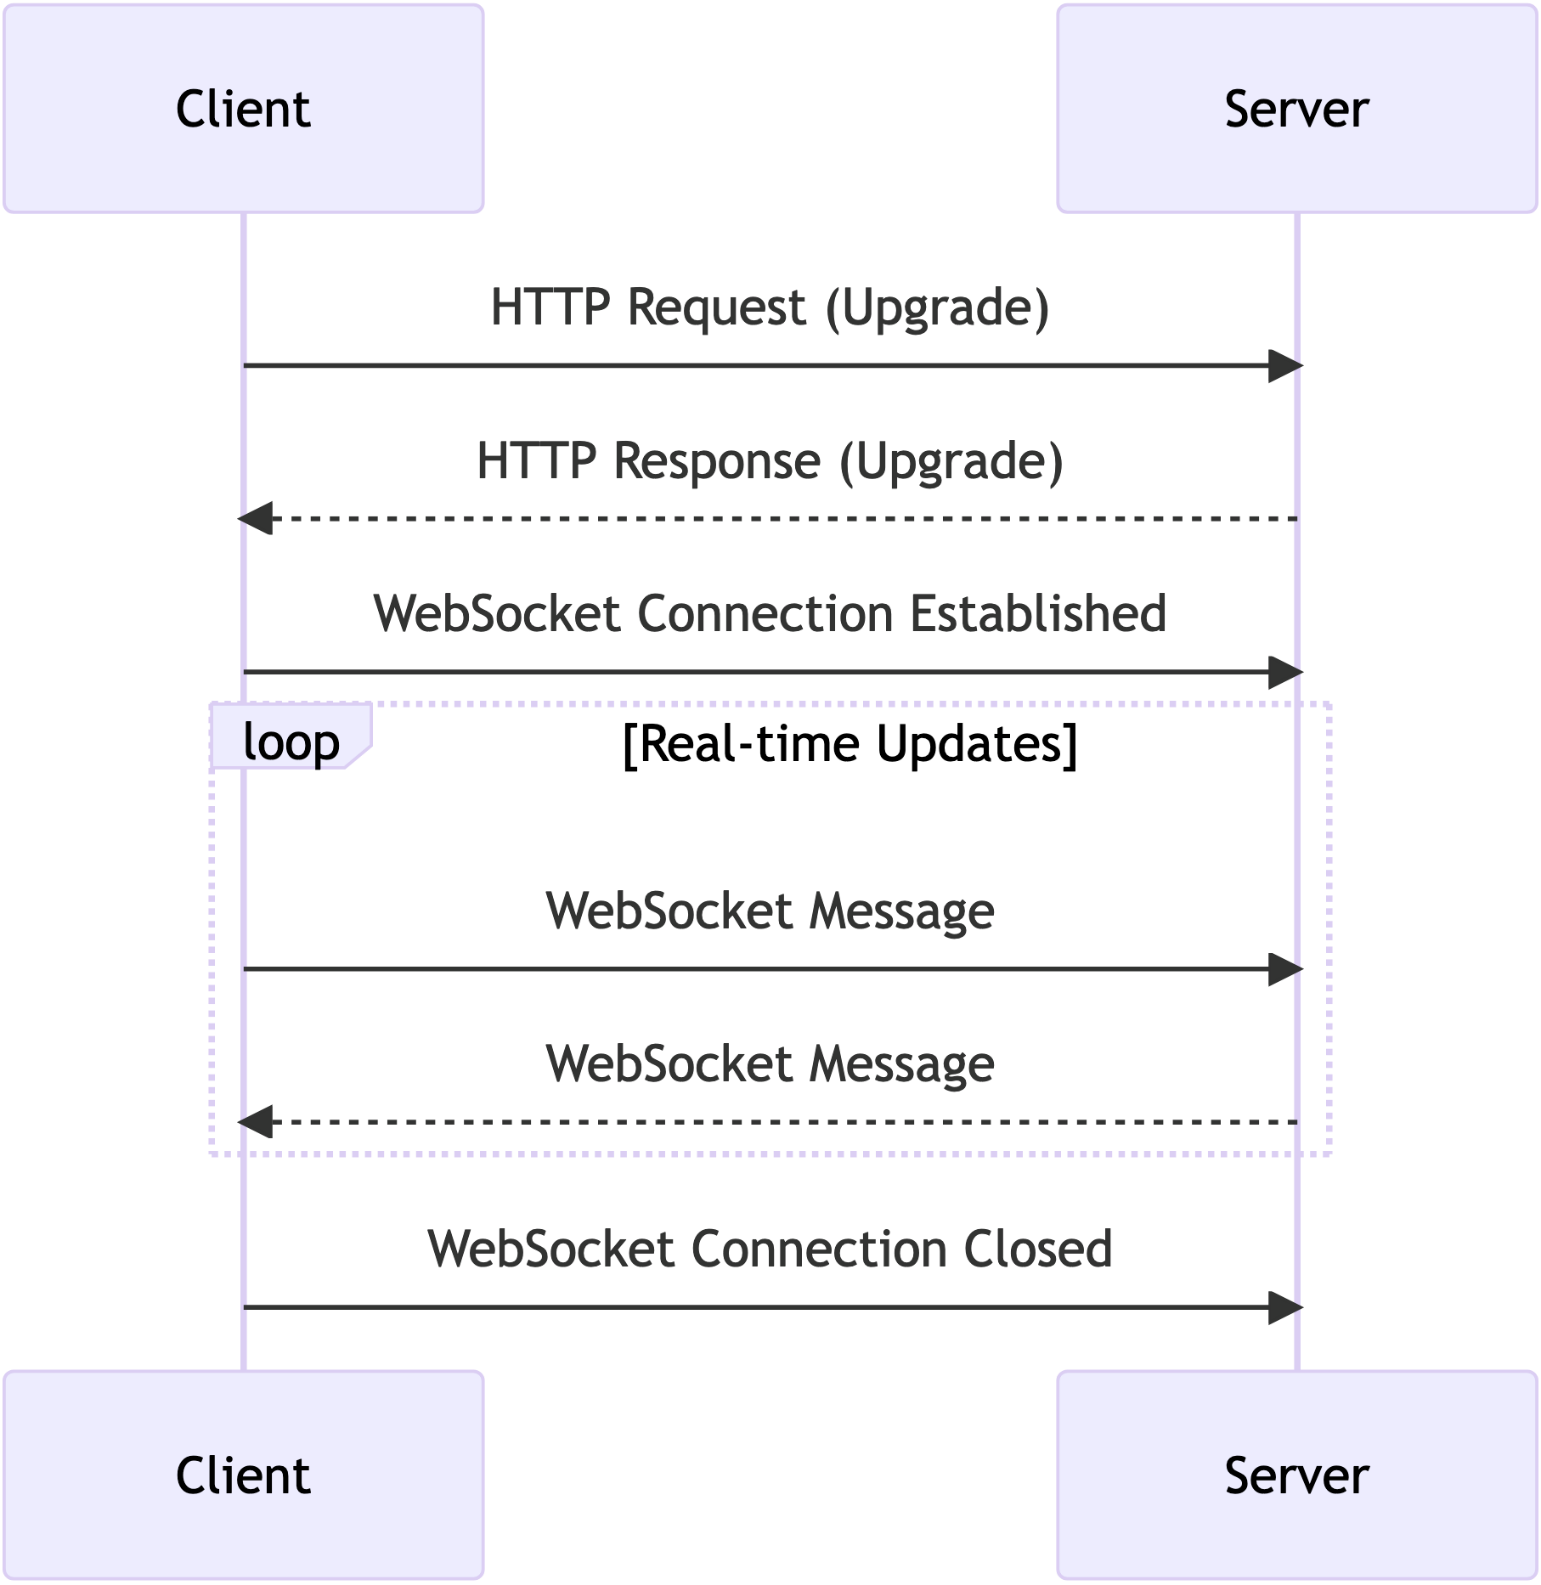
Here's what happens:
- The client initiates the WebSocket connection by sending an HTTP request with an upgrade header.
- The server responds with an HTTP response indicating a successful upgrade to a WebSocket connection.
- Once the connection is established, the client and server can exchange WebSocket messages back and forth.
- Real-time updates are achieved through the continuous exchange of WebSocket messages.
- Finally, the client or the server can close the WebSocket connection.
Server-Sent Events (SSE)
Server-Sent Events (SSE) is a technology that enables a server to send data updates to a client over a single, long-lived HTTP connection. It's typically used for real-time web applications where the server needs to push data to the client without the client having to poll for updates constantly.
Figure 3 is a simplified overview of how Server-Sent Events work for real-time communication.
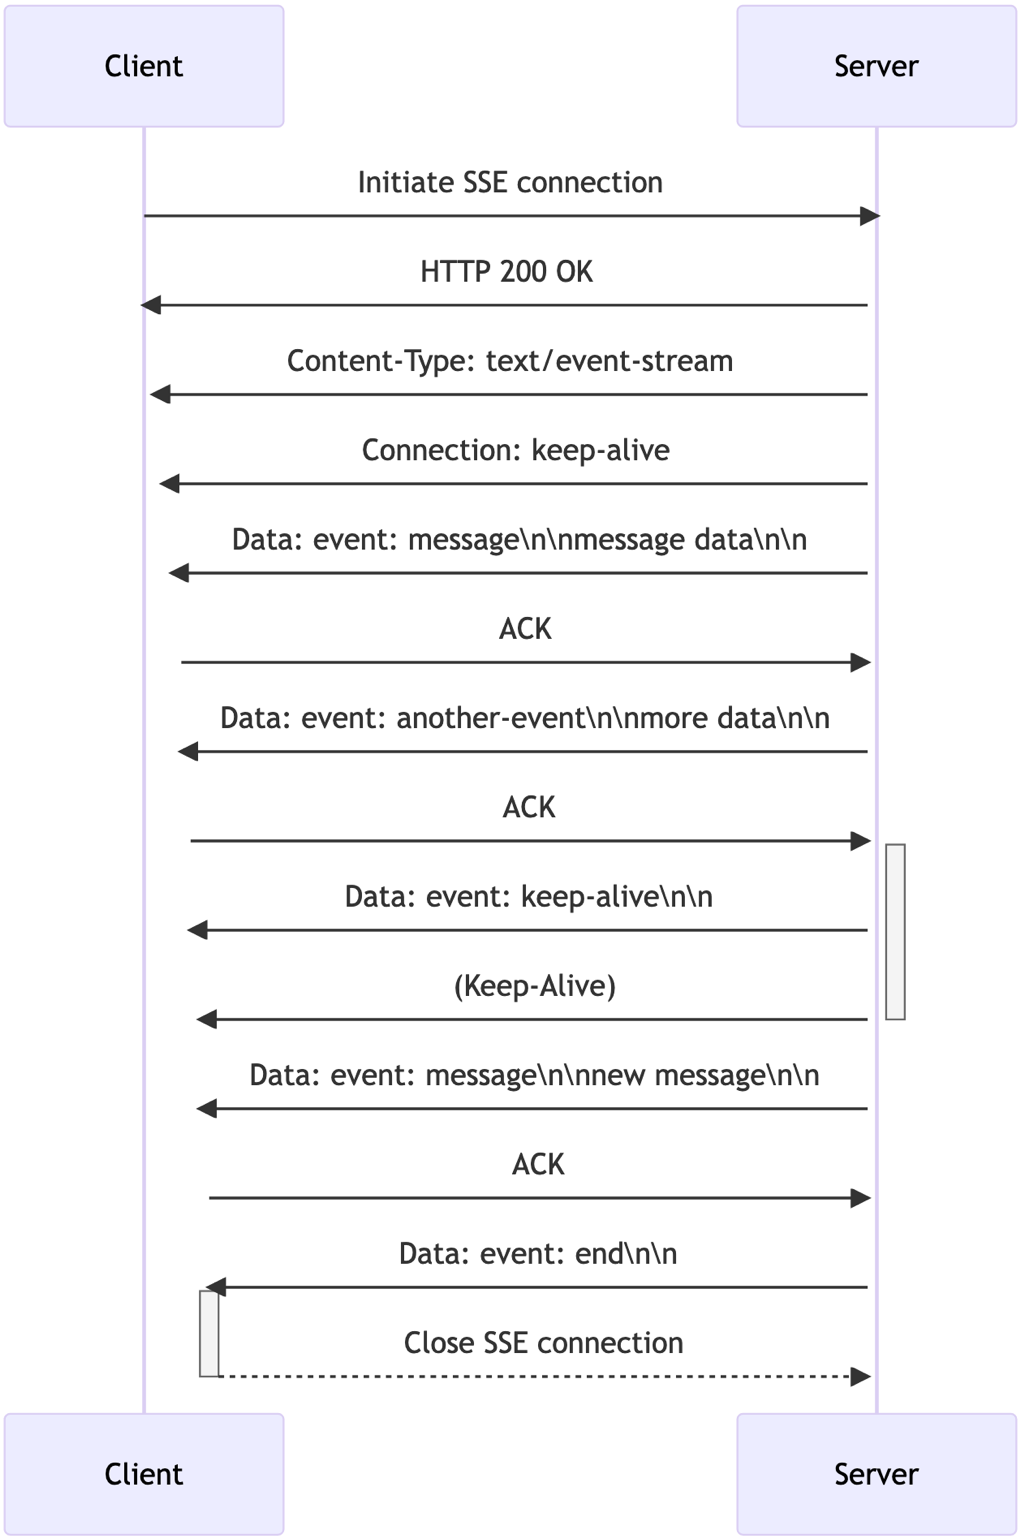
Here's what happens:
- The client initiates the SSE connection by sending a request to the server.
- The server responds with an HTTP
200 OKstatus code, indicating that the SSE connection has been established successfully. - The server sets the appropriate headers in the response, including the Content-Type as
text/event-streamand Connection askeep-alive, instructing the client to keep the connection open. - The server sends the initial data to the client by including the
Datafield in the response body. It uses theeventfield to specify the type of event (e.g., message) and includes the message data. - The client acknowledges the receipt of data by sending an
ACK(acknowledgment) to the server. - The server continues sending data to the client whenever there are updates. It uses the same format as before, including the
eventfield and the corresponding data. - Periodically, the server sends a
keep-alivesignal to ensure that the connection remains active. This helps prevent the connection from being closed due to inactivity. - The server keeps sending data and the client acknowledges each update.
- Eventually, the server ends the SSE connection and sends a final event of type “end.”
- The client receives the
endevent and closes the SSE connection.
In this article, I'll cover building real-time applications in Laravel using Server Sent Events in detail. Before I delve into the Laravel implementation, let's start building a simple PHP Server-Sent Event page to get into using Server-Sent Events.
PHP Server-Sent Events
To demonstrate the use of Server-Sent Events in PHP, let's build a PHP page and stream down some data.
Listing 1 shows the PHP code that goes under sse-server.php file. The code starts by setting the necessary headers for Server-Sent Events:
Listing 1: sse-server.php file
<?php

// Set the appropriate content type for SSE
header("Content-Type: text/event-stream");
header("Cache-Control: no-cache");
header("Connection: keep-alive");

// Simulate a continuous stream of events
$events = array(
    array(
       "event" => "message",
       "data" => "New message 1"
    ),
    array(
       "event" => "notification",
       "data" => "Notification 1"
    ),
    array("
       "event" => "message",
       "data" => "New message 2"
    ),
    array(
       "event" => "notification",
       "data" => "Notification 2"
    ),
);

// Send events to the client
foreach ($events as $event) {

   echo "event: " . $event["event"] . "\n";
   echo "data: " . json_encode($event["data"]) . "\n\n";

   ob_flush();
   flush();

   sleep(2);
}

// Send the "end" event to signal the end of streaming
echo "event: end\n";
echo "data: done\n\n";

ob_flush();
flush();

?>
- The
Content-Typeheader is set totext/event-streamto indicate that the response will contain SSE data. - The
Cache-Controlis set tono-cacheto prevent caching of the response. - The
Connection: keep-aliveindicates that the connection should be kept open.
Next, the code defines an array of events that will be sent to the client. Each event has an “event” field to specify the type of event and a “data” field to provide the associated data. These events are just examples and can be customized to each case. Inside this loop, the code iterates through the predefined events and sends them to the client.
The event and data fields are echoed as part of the SSE format. After each event is sent, flush the output buffers using ob_flush() and flush() functions to ensure that the data is sent to the client immediately. The sleep(2) is introduced to add a two-second delay between events, simulating real-time updates.
Flushing the output buffer immediately sends any buffered output to the client's browser or the output destination.
Flushing the output buffer sends any buffered output to the client's browser or the output destination immediately. This is particularly useful when you're working with Server-Sent Events (SSE) or other scenarios where you want to ensure that data is sent to the client in real-time.
Here's how you can use the ob_flush() function:
ob_flush();
This function flushes the output buffer and sends any buffered data to the client. It's important to note that calling ob_flush() alone might not be sufficient to ensure immediate delivery of data to the client. In some cases, you might also need to use the flush() function to flush the system's output buffer.
Here's an example of using both ob_flush() and flush() together:
ob_flush();
flush();
By calling both functions, you ensure that both the PHP output buffer and the system's output buffer are flushed, helping to ensure that the data is sent to the client immediately.
Back to Listing 1, after sending all the events, the code sends a special end event to signal the end of the SSE stream. This helps the client know that no more events will be sent. As before, the code flushes the output buffers to ensure that the end event is sent immediately.
Now that you have the PHP side ready, let's switch gears and build the front-end or client.
Listing 2 shows the JavaScript code to interact with the PHP SSE server. The code in Listing 2 is responsible for establishing a connection to the SSE server (PHP script) and handling incoming events. Let's go through it step by step:
Listing 2: PHP SSE: front-end code
<!DOCTYPE html>
<html>
<head>
    <title>SSE Example</title>

    <script type="text/javascript">

        const eventSource = new EventSource("sse-server.php");

        function handleDOM(type, message) {
            document.getElementById(type).innerHTML += message + "<br>";
        };

        eventSource.addEventListener('notification', function (event) {
            const data = JSON.parse(event.data);
            handleDOM(event.type + "s", data);
        });

        eventSource.addEventListener('message', function (event) {
            const data = JSON.parse(event.data);
            handleDOM(event.type + "s", data);
        });

        eventSource.addEventListener('end', function (event) {
            eventSource.close();
        });

    </script>
</head>
<body>
    <h2>Messages:</h2>
    <div id="messages"></div>

    <hr>

    <h2>Notifications:</h2>
    <div id="notifications"></div>
</body>
</html>
const eventSource = new EventSource("sse-server.php");
In this part, the code creates a new EventSource object by passing the URL of the SSE server script (sse-server.php). The EventSource API is a built-in browser API that allows you to establish a unidirectional connection for receiving real-time updates from the server.
function handleDOM (type, message) {
    document.getElementById(type).innerHTML
        += message + "<br>";
};
The handleDom() function takes two parameters: type and message. This function is responsible for updating the DOM to display the received events. It appends the received message to an HTML element identified by type (which corresponds to either notifications or messages).
eventSource.addEventListener('notification', function (event) {
    const data = JSON.parse(event.data);
    handleDOM(event.type + "s", data);
});
This code snippet adds an event listener to the EventSource object. When an event with the type notification is received from the server, the corresponding event listener is triggered. The received event's data is parsed as JSON using JSON.parse(). The parsed data is then passed to the handleDOM function along with the event type. This function updates the respective DOM element to display the new message.
eventSource.addEventListener('message', function(event) {
    const data = JSON.parse(event.data);
    handleDOM(event.type + "s", data);
});
The code defines another event listener for the message event type.
eventSource.addEventListener('end', function (event) {
    eventSource.close();
});
Finally, the code adds an event listener for the end event. When the server sends the end event, it indicates that the SSE stream is finished. In response to this event, the code closes the EventSource connection using eventSource.close() to stop further communication with the server.
I've deployed a version of this code online for you to try it out. Open this Replit https://replit.com/@BilalHaidar/SSE-Server-in-PHP and run the code.
Now, let's discuss the EventSource API in a bit more detail.
EventSource JavaScript API
The EventSource is a JavaScript interface that provides a simple and standardized way to receive Server-Sent Events (SSE) from a web server over an HTTP connection. It's used to establish a unidirectional, long-lived connection between the client (browser) and the server to receive real-time updates or notifications.
Key features of the EventSource API:
- Automatic reconnection: If the connection to the server is lost, the
EventSourceobject automatically attempts to reconnect. - Event listeners: You can set up event listeners to handle different types of events sent by the server.
- SSE format: The server sends events in the SSE format, which includes fields like event type, data, and an optional event ID.
- Closes gracefully: The connection can be closed manually using the
close()method or automatically when the server sends anendevent. - Cross-origin requests: SSE supports Cross-Origin Resource Sharing (CORS), allowing you to receive updates from a different domain.
Overall, the EventSource API simplifies the process of setting up real-time updates from the server to the client, making it a great choice for scenarios like notifications, live feeds, and more.
How EventSource Works
The following are the technical details of the EventSource class and how it works.
Creating an EventSource instance: Create an EventSource instance by instantiating the EventSource class and passing the URL of the server endpoint as a parameter. For example:
const eventSource = new EventSource('server_endpoint');
Server-Sent Events (SSE) format: The server sends events to the client using a specific format. Each event is a plain text string, typically in the following format:
event: eventType
data: eventPayload
id: eventId
In this case:
- event: Represents the type of the event
- data: Contains the payload data of the event
- id: An optional field that provides an identifier for the event
Each event is separated by two newline characters (\n\n). The browser automatically handles parsing this format.
Event Handling: The EventSource instance listens for different types of events and dispatches corresponding JavaScript events when new events are received from the server.
- onopen: This event is triggered when the connection to the server is successfully established.
- onmessage: This event is triggered whenever a new event is received from the server. You can access the event data using the
event.dataproperty.- The event message does a special job. It handles situations where events don't have a specific type mentioned and when events are marked with the type of message. It only works for these special types of events and won't work for any other types.
- In case you're using custom event names, you must define additional event handlers on the
EventSourceusingaddEventListener()function.
- onerror: This event is triggered if there's an error with the connection or if the connection is closed unexpectedly.
Automatic reconnection: The EventSource class handles automatic reconnection if the connection to the server is lost. It will attempt to reconnect at intervals determined by the browser.
Closing the connection: To close the connection, you call the close() method on the EventSource instance:
eventSource.close();
Cross-origin considerations: The same-origin policy applies to EventSource connections. This means that the server sending SSE must be hosted on the same domain as the client, or the server must include appropriate CORS headers to allow cross-origin connections.
Browser compatibility: EventSource is supported in most modern browsers, including Chrome, Firefox, Safari, and Edge.
Use cases: EventSource is often used in scenarios where real-time updates are needed, such as displaying live feeds, notifications, or other dynamic content that needs to be pushed from the server to the client without the client having to repeatedly poll the server.
The EventSource onmessage event handler can only handle events sent by the server with no event type or when the event type is message.
Overall, EventSource provides a convenient and efficient way to implement Server-Sent Events in web applications, enabling real-time communication without the complexity of full-duplex solutions like WebSockets. You can see how EventSource communicates with an SSE server in Figure 4.

You can read more about EventSource here: https://developer.mozilla.org/en-US/docs/Web/API/EventSource.
Now that you're familiar with SSE in PHP, let's start building an application to demonstrate using SSE for real-time communication in Laravel applications.
Setting Up a Laravel Application
I started by creating a new Laravel app. There are several methods for creating a new Laravel app. I chose the Docker-based one using the Laravel Sail package. You can read more about Laravel installation by following this URL: https://laravel.com/docs/10.x/installation.
Choose the method that best suits you. Before you start, make sure you have Docker running on your computer.
I'm using a MacBook Pro. I start by running this command:
curl -s \
"https://laravel.build/laravel-sse"\
| bash
This creates a new Laravel application on your computer under the directory named laravel-websockets.
Open the .env file and add the following environment variables:
APP_PORT=1012
FORWARD_DB_PORT=4008
FORWARD_MAILPIT_PORT=2012
FORWARD_MAILPIT_DASHBOARD_PORT=2013
FORWARD_MEILISEARCH_PORT=6012
FORWARD_REDIS_PORT=6013
VITE_PORT=1011
After the installer finishes, run the following commands.
Build up the Docker container.
./vendor/bin/sail up
Install the NPM packages.
./vendor/bin/sail npm install
Serve the application.
./vendor/bin/sail run dev
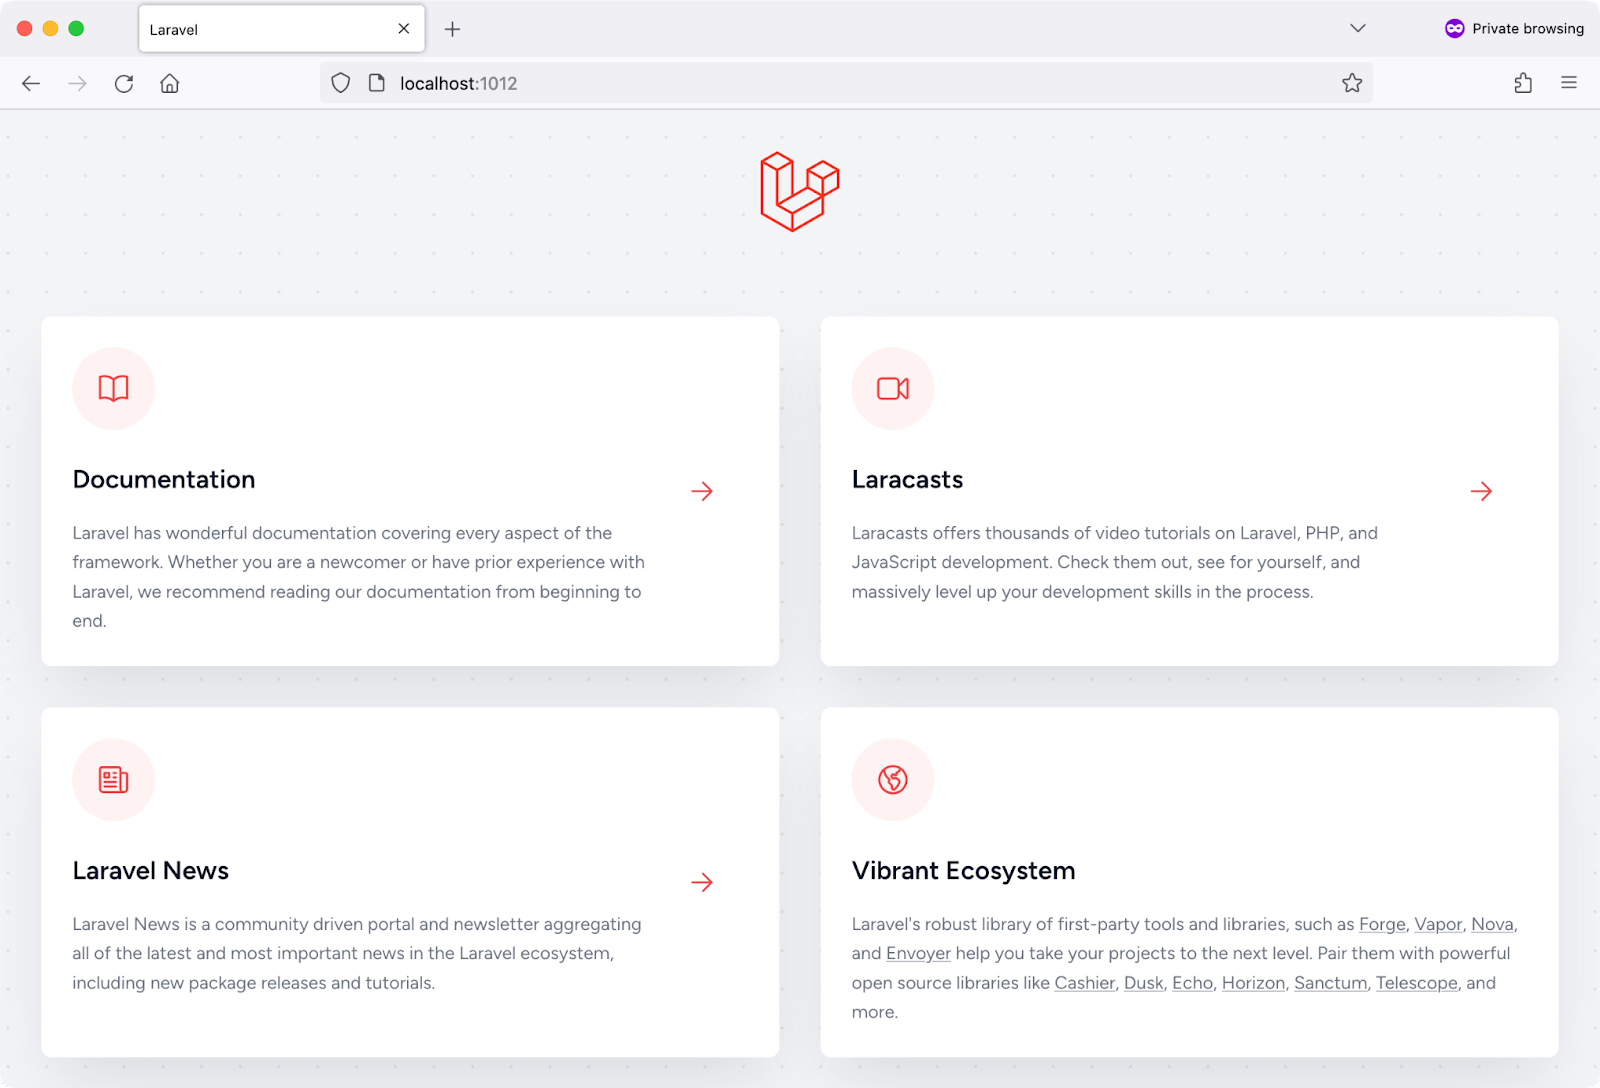
The application is now accessible at http://localhost:1012. Open the URL in the browser, and you'll see the same view as in Figure 5.
Next, let's install the Laravel Breeze starter kit. The Laravel team provides this starter kit for scaffolding Laravel authentication and Profile management. This is my ultimate choice when starting a new Laravel project. It saves you a lot of time! You can read more about Laravel Breeze here: https://laravel.com/docs/10.x/starter-kits#laravel-breeze.
Laravel Breeze Installation
Laravel Breeze comes in four flavors:
- Breeze & Blade
- Breeze & React
- Breeze & Vue
- Breeze & Next.js/API
I'll use Breeze & Vue for this article.
Run the following commands to install Laravel Breeze, VueJS, and InertiaJS together.
./vendor/bin/sail composer require \laravel/breeze --dev
./vendor/bin/sail artisan breeze:install vue
./vendor/bin/sail artisan migrate
./vendor/bin/sail npm install
./vendor/bin/sail npm run dev
By installing Laravel Breeze, you've installed many new things in your application. Let me list them briefly, but you can always check this repository commit titled “(install Laravel Breeze package)” to check every new file and configuration the package adds.
In addition to the Breeze Starter Kit, Laravel offers the JetStream Starter Kit, a more advanced option.
More importantly, Laravel Breeze does the following:
- Adds Vue, InertiaJS, and Tailwindcss
- Configures InertiaJS
- Configures Tailwindcss
- Scaffolds a front-end application using Vue/InertiaJS
- Adds Laravel Authentication controllers, views, and routes.
I've created a GitHub Gist to include all the steps above in one place. You may check it here: https://gist.github.com/bhaidar/f9d10004e64d53c7cc5fc79e3f938d72.
Now that you have your Laravel application up and running, let's start adding real-time communication.
Using Server-Sent Events in Laravel
Using Server-Sent Events in Laravel requires no extra packages.
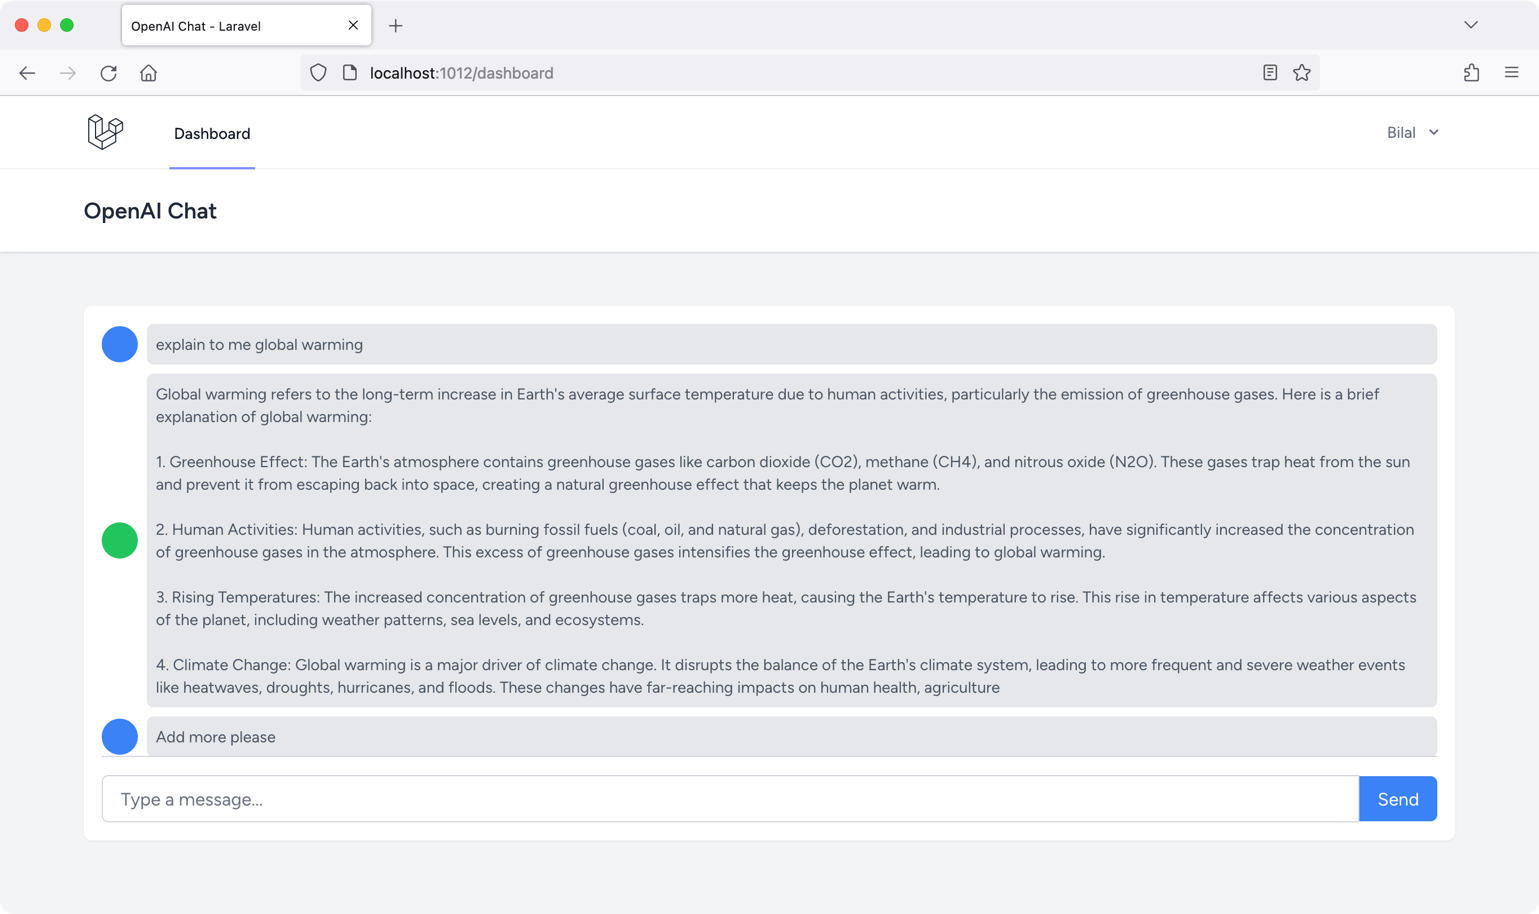
In this section, you'll build together an OpenAI Chat page that allows you to ask OpenAI questions and get a response, like how ChatGPT works, but in a more simplified manner. The final output of this application looks like Figure 6.
Let's start building this app!
Building the Front-End
I maintained a streamlined approach for the front-end user interface to prioritize functional aspects. The webpage's layout is divided into two distinct segments:
- The Messages section, which enumerates all messages initiated by the user and subsequently responded to by OpenAI
- The Input section, dedicated to user interaction, facilitating the entry of prompts
Listing 3 shows the HTML that renders the message input section.
Listing 3: Message Input section
<div>
   <div>
      <input v-model="prompt" type="text" >
      <button:disabled="processing" @click="askQuestion">
          Send
      </button>
   </div>
The code disables the Send button when there's an ongoing request with the server. In addition, this button has an event handler attached using the @click Vue directive. The askQuestion() function runs when the user clicks the button.
The input textbox is bound to the prompt ref variable. Whenever the value changes in the input field, the prompt ref variable gets updated with the latest text. You can read more about Vue3 ref() here: https://vuejs.org/guide/essentials/reactivity-fundamentals.html.
Listing 4 shows the source code for the askQuestion().
Listing 4: askQuestion() function source code
const askQuestion = async () => {

    const messageAdded = addMessage({
        role: 'user',
        content: prompt.value
    });

    // trigger a new chat stream
    if (messageAdded) {
        await storeChat(prompt.value);
        streamChatResponse();
    }

    // Reset input
    prompt.value = null;
};
Let's break down what's happening step by step:
const messageAdded = addMessage({
    role: 'user',
    content: prompt.value
});
The code starts by adding the new prompt value to the array of messages. The page keeps track of all incoming and outgoing messages using this array.
Listing 5 shows the source code for the addMessage() function.
Listing 5: addMessage() function source code
const chatMessages = ref([]);

const addMessage = ({ role, content}) => {

    const lastMessage = chatMessages.value[
        chatMessages.value.length - 1
    ];

    if (
        lastMessage &&
        lastMessage.role === 'user' &&
        role === 'user'
    ) return false;

    chatMessages.value.push({role, content});

    return true;
}
The page defines the chatMessages as a reactive array. The function receives an object with two properties: role and content. The role can take the value of either user or assistant. This way you can differentiate the user-typed messages and those coming from OpenAI assistant. The code then retrieves the last message in the chatMessages array. The function returns a value false without adding any new message into the chatMessages array if the following conditions resolve to true:
- The last message exists in the
chatMessagesarray - The last message belongs to the user
- The incoming message role belongs to the user.
This way, you guarantee that the user cannot add two consecutive messages at once. With every message the user types, a response should exist from the OpenAI engine. Otherwise, the function pushes the new message into the chatMessages array. Every message in the chatMessages array consists of two properties: role and content.
Finally, the message returns a true value signaling that the message was added successfully.
Back to Listing 4. If the new message is added successfully, the function calls on the storeChat() function.
const storeChat = async(prompt) => {
    return axios.post(route('chat.store'),
        {prompt}
    );
};
The storeChat() function sends a POST request to the route chat.store with a payload of the prompt message the user typed. Shortly, I'll look at the back-end side of this application and explore it in more depth.
In Listing 4, right after storing the new message on the server, the function calls on the streamChatResponse() function. This function is the bread and butter of the front-end side.
Listing 6 shows the source code for the streamChatResponse() function.
Listing 6: streamChatResponse() function source code
const processing = ref(false);

const streamChatResponse = () => {
    processing.value = true;

    let response = "";

    if ('EventSource' in window) {
        const eventSource = new EventSource(
            route('chat-stream.index'), {
                withCredentials: true
            }
        );

        const messageHandler = (event) => {
            let json = JSON.parse(event.data);

            // Append token to response
            response += json.content;

            updateResponse(response);
        }

        const stopHandler = () => {
            // Close the event source
            eventSource.close();

            processing.value = false;

            // Remove the event listeners
           eventSource.removeEventListener(
               'message', messageHandler
           );

           eventSource.removeEventListener(
               'stop', stopHandler
           );
        }

        eventSource.addEventListener(
            'message', messageHandler
        );

        eventSource.addEventListener(
            'stop', stopHandler
        );
    }
};
The page defines the processing reactive Boolean variable to keep track of the streaming operation. Remember that this variable is used to disable/enable the Send button on the page.
The function starts by checking if the EventSource API is available in the current browser. If it is, the function creates a new EventSource object and subscribes to the chat stream. The route chat-stream.index is responsible for streaming the response from the OpenAI API. This, among other back-end code, will be discussed shortly.
The function then defines two event handlers:
- messageHandler: Called whenever a new message is published to the chat stream. The handler parses the message as JSON and then appends the content of the message to the response variable.
- stopHandler: Called when the chat stream is closed, and the event type of the message received is named
stop. The handler closes theEventSourceobject and removes the event listeners.
Finally, the function attaches the messageHandler and stopHandler event listeners to the EventSource object.
Going inside the messageHandler() function, every time a new content is received from the Server-Sent Event server, it's appended to the response variable. Then consequently, the updateResponse() function is called to update the messages inside the chatMessages array. This, in turn, is reflected on the page right away. This is what gives you the typewriter-effect for the content being streamed from the server.
Listing 7 shows the updateResponse() function source code.
Listing 7: updateResponse() function source code.
const updateResponse = (response) => {

    let lastMessage = chatMessages.value[
        chatMessages.value.length - 1
    ];

    if (lastMessage?.role === 'user') {
        addMessage({
            role: 'assistant',
            content: response,
        });

        return;
    }

    lastMessage.content = response
}
The function in Listing 7 adds the new message to the chatMessages array in case the last message in the array belongs to the user. Subsequently, on every next call, it updates the last message in the array belonging to the role of assistant.
Because the chatMessages is a reactive array, every time its content changes, this change is reflected right away on the user interface.
Listing 8 shows the HTML snippet that's responsible for rendering the messages inside the chatMessages array.
Listing 8: Rendering messages on the UI
<div
    v-for="message in chatMessages"
    :key="message"
>
    <div>
        <div
            :class="message.role === 'user' ?
            'bg-blue-500' :
            'bg-green-500'"
        />
        <div>
            <div v-html="message.content" />
        </div>
    </div>
</div>
You loop over the chatMessages array and render each message content separately. The role of the message decides the color of the message icon, blue for user messages and green for assistant messages.
Back to Listing 6, going inside the stopHandler() function, whenever the server sends the stop event type, this function runs. It basically cleans up all event registrations you've done. It starts by closing the EventSource connection, followed by removing both event handlers you've attached on the EventSource, namely the messageHandler() and stopHandler() event handlers. This clean-up is required to protect the application from any memory leaks.
Finally, the page markup defines the following HTML div element right after the messages section:
<div ref = "scrollHere" id = "scroll-here"/>
This div element is always placed at the bottom right after the message's content. Also, this div element is bound to a reactive variable named scrollHere. This variable is defined as follows:
const scrollHere = ref(null);
In terms of Vue terminology, the scrollHere variable is referred to as a Template Ref. This variable gives you direct access to the DOM elements. You can read more about Template Refs here: https://vuejs.org/guide/essentials/template-refs.html.
Accompanied with the following Vue watcher, whenever a new content is pushed into the chatMessages array, you scroll the messages section to the bottom in order to show the latest messages on the fly.
Listing 9 shows the watch() function source code:
Listing 9: watch() function source code
watch(chatMessages, () => {
    nextTick(() => {
        scrollHere.value?.scrollIntoView({
            behavior:'smooth',
        });
    });
}, {
    deep: true,
    immediate: true
});
The watch() function in Vue allows you to watch for changes and react accordingly. The first parameter this function receives is the thing you're watching. In this case, you're watching any changes on the chatMessages array. The second parameter it receives is a callback that executes whenever the first parameter changes, which is whenever the chatMessages array changes.
Inside the callback, the code makes use of the nextTick() function that Vue offers. This function runs your code just after Vue has finished updating the DOM. Remember, Vue renders changes on the component asynchronously. Therefore, this function allows you to get notified whenever Vue finishes updating the DOM.
The nextTick() function accepts an arrow function. Inside this function, the code calls the scrollIntoView() method to bring the scrollHere DOM element into view. Hence, thievery bottom messages inside the messages section appear right away.
It's worth mentioning the second third parameter that the watch() function receives. It's an object with two properties:
- deep: true
- immediate: true
The deep property signals to Vue to track any change on any property inside any object contained inside the chatMessages array.
The immediate property signals to Vue to run this watcher the moment the Vue component is mounting and rendering.
You can read about the HTML DOM Element scrollIntoView() method here: https://developer.mozilla.org/en-US/docs/Web/API/Element/scrollIntoView. You can read about Vue nextTick() function here: https://vuejsdevelopers.com/2019/01/22/vue-what-is-next-tick/. You can read about Vue watch() function here: https://vuejs.org/guide/essentials/watchers.html.
This completes the front-end side of the OpenAI Chat page. Now let's delve into the back-end side and explore how Server-Sent Events are implemented in Laravel.
Setting Up the Back-End
Before I delve into the back-end source code, let's complete the back-end setup.
There are multiple PHP packages that you could use to connect to OpenAI API. I've chosen to use the openai-php/client package. To read more about this package, follow this URL: https://github.com/openai-php/client.
To install the package, run the following command on the terminal:
sail composer require openai-php/client
Or
composer require openai-php/client
Open the config/services.php file and add the section shown in Listing 10.
Listing 10: Environment variables
'openai' => [
    'api_key' => env('OPENAI_KEY'),

    'organization' => env('OPENAI_ORGANIZATION'),

    'model' => env('OPENAI_MODEL'),

    'max_response_length' => env('OPENAI_MAX_RESPONSE_LENGTH'),

    'temperature' => env('OPENAI_TEMPERATURE'),

    'timeout' => env('OPENAI_TIMEOUT'),
],
Those are the environment variables you'll need to use while connecting to OpenAI API. Inside the .env file, make sure to define those environment variables with valid values.
- You get the
api_keyfrom the OpenAI website after signing up for an account. - You get the
organizationfrom the OpenAI website. - The
modelyou'll use for this app is the gpt-3.5-turbo. - The
max_response_lengthyou'll use for this app is 256. - The
temperatureyou'll use for this app is 0.2. - The
timeoutyou'll set for this app is 600 seconds.
Next, add a new Service Provider and name it app/Providers/OpenAIServiceProvicer.php.
Start by letting the OpenAIServiceProvider implement the DeferrableProvider interface. You want to make the Service Provider a deferred provider that's only loaded by Laravel when it's needed and not before. It's an extra performance step you add to an application, especially when the service provider does nothing but register service in the Service Container.
If your provider is only registering bindings in the service container, you may choose to defer its registration until one of the registered bindings is needed.
Listing 11 shows the source code for the register() function. Paste this function inside the newly created service provider.
Listing 11: register() function source code
public function register(): void
{
    $this->app->singleton(
        Client::class,
        static function (): Client {
            $apiKey = config('services.openai.api_key');
            $organization = ...;

            return OpenAI::factory()
                ->withHttpClient(new \GuzzleHttp\Client([
                    'timeout' => ...
                ]))
                ->withApiKey($apiKey)
                ->withOrganization($organization)
                ->make();
        });

        $this->app->alias(Client::class, 'openai');
}
The function in Listing 11 defines a new singleton instance inside the Laravel Service Container for the Client::class defined inside the openai-php/client package. You can refer to my previous article on Dependency Injection and Service Container in Laravel.
Using the Factory::class from the openai-php/client package allows you to define additional options on the client, such as request timeout and others.
Finally, this method adds an alias for the Client::class named openai. This name can be used anywhere throughout the application to retrieve an instance of the Client::class.
In addition, you need to add the provides() function into the OpenAIServiceProvider::class to enable this service provider to be a deferred provider.
public function provides():array
{
    return [
        Client::class,
    ];
}
This tells the Laravel engine what services this service provider is providing. This is essential to make the service provider a deferred one. You can read more about deferred providers in Laravel here: https://laravel.com/docs/10.x/providers#deferred-providers.
Next, make sure to register the Service Provider inside the config/app.php. This new service provider should go under the Additional Autoloaded Providers section.
Finally, let's add the app/Facades/OpenAI.php to make it easier to access the methods on the openai-php/client package.
Listing 12 shows the entire source code for the OpenAI::class facade class.
Listing 12: OpenAI::class Facade
<?php

declare(strict_types=1);

namespace App\Facades;

use Illuminate\Support\Facades\Facade;
use OpenAI\Resources\Audio;
use OpenAI\Resources\Chat;
use OpenAI\Resources\Completions;
use OpenAI\Resources\Edits;
use OpenAI\Resources\Embeddings;
use OpenAI\Resources\Files;
use OpenAI\Resources\FineTunes;
use OpenAI\Resources\Images;
use OpenAI\Resources\Models;
use OpenAI\Resources\Moderations;

/**
 * @method static Audio audio()
 * @method static Chat chat()
 * @method static Completions completions()
 * @method static Embeddings embeddings()
 * @method static Edits edits()
 * @method static Files files()
 * @method static FineTunes fineTunes()
 * @method static Images images()
 * @method static Models models()
 * @method static Moderations moderations()
 */
final class OpenAI extends Facade
{.
   /**
    * Get the registered name of the component.
    */
   protected static function getFacadeAccessor(): string
   {
      return 'openai';
   }
}
You can read more about Laravel Facades here: https://laravel.com/docs/10.x/facades.
In general, a Laravel Facade defines the getFacadeAccessor() function that should return a string or a class name referring to the class that is registered in the Service Container.
In this case, the function returns the string openai. Remember that you have aliased the Client::class singleton instance with the string openai. That's how the Facade class will retrieve the Client::class from the Service Container and return it to the caller.
And by this, you finish setting up the back-end application and are ready to get your hands dirty with more coding!
Building the Back-End
Now that the front-end is up and running, you want to complete the puzzle and put some code on the server-side.
The front-end connects to the back-end through two main routes:
chat.storeroutechat-stream.indexroute
The former is responsible for storing the user's message and the latter sends the request to OpenAI API and starts streaming the response to the front-end. Let's dig for more details.
The chat.store route is defined as follows:
Route::post(
   '/chat',
   ChatStoreController::class
)->name('chat.store');
Let's open the ChatStoreController and study in detail.
Listing 13 shows the entire source code for the ChatStoreController class.
Listing 13: ChatStoreController class
class ChatStoreController extends Controller
{
    public function __invoke(ChatStoreRequest $request)
    {
        $prompt = $request->input('prompt');

        $existingMessages = collect(
             $request->session()->get(Auth::id(), [])
        );

        if ($existingMessages->count() === 0) {
            $existingMessages->push([
                'role' => 'system',
                'content' => 'You are a helpful assistant',
            ]);
        }

        $existingMessages->push([
            'role' => 'user',
            'content' => $prompt,
        ]);


        $request->session()->put(
            Auth::id(),
            $existingMessages
        );

        return response()->noContent();
    }
}
I define the ChatStoreController as an invokable controller with a single method __invoke(). You can read more about invokable controllers in Laravel here: https://laraveldaily.com/post/invokable-controllers-with-one-specific-action.
The controller starts by retrieving the message or prompt sent by the user. It then retrieves all stored messages in the Session with a key of the currently logged-in user. It stores the retrieved messages in the $existingMessages array.
For the sake of this article, I'm using the Session as a server-side storage for all messages in the same chat. In a more realistic application, I recommend using the database or redis to store this type of information.
The code then pushes a first helper message with the role of assistant, in case the $existingMessages array is empty. This is a required message by the OpenAI engine. It then pushes the user's message into the $existingMessages array. Finally, it stores back the $existingMessages array into the Session.
By this, you have the current user's chat messages all stored inside the Session keyed by the logged-in user's ID. That's all!
Let's now switch to the other route, the chat-stream.index one.
The chat-stream.index route is defined as follows:
Route::get(
   '/chat-stream',
   ChatStreamIndexController::class
)->name('chat-stream.index');
Let's open the ChatStreamIndexController and study in detail.
Listing 14 shows the entire source code for the ChatStreamIndexController class.
Listing 14: ChatStreamIndexController class
class ChatStreamIndexController extends Controller
{
    public function __invoke(Request $request)
    {
        $payload = $request->session()->get(Auth::id());
        $payloadText = Str::squish(json_encode($payload));

        $stream = OpenAI::chat()->createStreamed([
            'model' => config('services.openai.model'),
            'temperature' => ...,
            'max_tokens' => ...,
            'messages' => json_decode($payloadText, true),
        ]);

        return response()->stream(
            function () use ($request, $stream) {

                $messages = '';
                foreach ($stream as $response) {
                    $delta = $response->choices[0]->delta->content;

                    if (! $delta) {
                        continue;
                    }

                    $messages .= $delta

                    echo 'data: '.json_encode([
                        'content' => nl2br($delta)
                    ])."\n\n";

                    ob_flush();
                    flush();

                    if (connection_aborted()) {
                        break;
                    }
                }

                echo "event: stop\n";
                echo "data: stopped\n\n";

                $existingMessages = $request->session()->get(Auth::id());
                array_merge($existingMessages, [
                    'role' => 'assistant',
                    'content' => $messages,
                ]);

                $request->session()->put(Auth::id(), $existingMessages);

            }, 200, [
                'Cache-Control' => 'no-cache',
                'Content-Type' => 'text/event-stream',
                'Connection' => 'keep-alive',
                'X-Accel-Buffering' => 'no',
            ]);
    }
}

$payload = $request->session()->get(Auth::id());
$payloadText = Str::squish(json_encode($payload));
The first two lines in this controller retrieve all the save messages in the Session, JSON encodes the messages into a string, and then applies the Str:squish() function to remove all empty spaces. This is done so that you spend fewer tokens using the OpenAI API.
You can read more about tokens in OpenAI here: https://help.openai.com/en/articles/4936856-what-are-tokens-and-how-to-count-them.
Listing 15 shows the code that creates an OpenAI streaming chat request.
Listing 15: OpenAI streaming chat request
$stream = OpenAI::chat()
    ->createStreamed(
    [
        'model' => config('services.openai.model'),
        'temperature' => ...,
        'max_tokens' => ...,
        'messages' => json_decode($payloadText, true),
    ]
);
The createStreamed() function requires some parameters:
- Model name
- Model temperature name
- Model maximum tokens
- Message payload
Refer to the official OpenAI API documentation on sending streamed chat requests here: https://github.com/openai/openai-cookbook/blob/main/examples/How_to_stream_completions.ipynb.
Except for the messages payload, the other parameters are retrieved from the config file that I discussed in the Setting Up the Back-End section.
The createStreamed() function returns an instance of the StreamResponse class. This class implements the IteratorAggregate interface in PHP to loop over the stream content you receive from the OpenAI API. You can use this class inside a foreach statement to stream the content coming from OpenAI and deal with it.
You can read more about this class here: https://github.com/openai-php/client/blob/main/src/Responses/StreamResponse.php.
Back to Listing 14, the __invoke() function returns at this stage the response()->stream() function. You use the response()->stream() function in Laravel to stream responses to the client. The stream() function takes a callback function as its argument. This callback function is responsible for generating the content that will be streamed to the client.
Let's explore what's hidden inside this callback function.
$messages = '';
foreach ($stream as $response) {
    $delta = $response->choices[0]->delta->content;
}
The code loops over the streamed content coming from the OpenAI API:
$messages .= $delta;
Inside the foreach loop, append the received chunk of content to the $messages variable.
echo 'data: '.json_encode([
    'content' => nl2br($delta)
])."\n\n";
Then it echoes the latest chunk received, after encoding the chunk, inside a string with the format of data: content. This is one of the Server-Sent Events requirements on how to send data down to the client.
ob_flush();
flush();
Then, the code asks the PHP engine to flush the output buffer entirely down to the client (browser). At this moment, the new chunk of content is sent to the client to display under the Messages section on the page.
The foreach continues to loop until no more content streams from the OpenAI API.
echo "event: stop\n";
echo "data: stopped\n\n";
At this stage, you echo the stop event down to the client signaling that streaming has finished for this request/response. It's important to stick to the format of messages as dictated by Server-Sent Events requirements.
The callback ends by updating the Session with the latest response message coming from the OpenAI API. This way, you keep track of the message history for all messages in the current chat.
The stream() function returns a status of 200, i.e., a success status.
'Cache-Control' => 'no-cache',
'Content-Type' => 'text/event-stream',
'Connection' => 'keep-alive',
'X-Accel-Buffering' => 'no',
In addition, the code sets the value for a bunch of HTTP headers to facilitate the Server-Sent Events implementation in Laravel. The first two are the most important because they prevent the browser from caching the requests and responses. And setting the content-type header to text/event-stream is another requirement dictated by Server-Sent Events requirements.
For the above code to work, you need to enable output buffering in your PHP.ini file. This is done by adding the following line to the php.ini file:
output_buffering = On
That's all!
Start interacting with the application in the browser and notice how the responses are streamed chunk by chunk as they're received from OpenAI API.
Conclusion
Real-time communication in Laravel opens exciting possibilities for creating dynamic and interactive web applications. In this first article of my Laravel real-time communication series, you've immersed yourself in the realm of Server-Sent Events (SSE). SSE offers a streamlined approach to one-way real-time updates, making them a valuable tool for applications requiring instant data refresh. Throughout this piece, you've not only implemented SSE within Laravel but also grasped the core concepts driving this technology. SSE's unidirectional nature and seamless browser integration make them an elegant choice for scenarios like live feeds and notifications.
Stay tuned for my upcoming article on WebSockets in Laravel, where I'll dive deep into this fascinating topic and provide valuable insights and techniques to enhance your real-time communication capabilities further. Together, WebSockets and Server-Sent Events empower Laravel developers to build modern, cutting-edge applications that meet the demands of today's connected world.