Kubernetes is the holy grail of modern microservices architecture. It's software that makes the life of DevOps engineers and developers much easier. Many, if not even all, modern back-end applications use Kubernetes in one way or another, whether deployed in-house or hosted by a cloud provider. What is it that makes Kubernetes so valuable? Why does Kubernetes help us that much?
Kubernetes abstracts the entire infrastructure on which your services run. It doesn't matter whether your services run on bare-metal servers in-house or in a cloud environment. Developers don't have to change anything when switching from one to the other. This provides a lot of freedom. You move your cluster around as required. Scaling up your services also becomes trivial. If you need more services of a particular type to handle the workload - you just increase the number of Pods of that service and you're done. Of course, when you run out of physical resources, you must increase your worker nodes, but integrating them into the cluster is straightforward and Kubernetes takes care of scheduling new Pods to the new worker nodes.
That's great! Kubernetes provides a lot of flexibility to developers and DevOps engineers. Moving around the entire cluster, scaling up as necessary, there are so many good reasons to go for it. But what about security in this context? Is Kubernetes secure? Or, more precisely, did you set up your cluster in a secure way? Are there any loopholes?
Kubernetes provides a lot of configurations to make your cluster secure. The crucial thing is that you need to know about them. Let's look at a basic example. Think about a Kubernetes newbie who starts to configure the first deployments and services in a cluster. Because everything runs in a cluster, our newbie believes it's isolated from everything: the host, the network, the outside world, etc. Our newbie couldn't be more wrong.
By default, the Pods can reach the internet without restrictions. They can access HTTP servers and so on. They also don't have a read-only file system. Hence the application within the container of the Pod, or anyone else in the container (I'll talk about this later in length), can modify files. Further, Kubernetes maps, by default, the service account token of the user running the Pod into the container. That's a very handy tool for anyone inside a container because it serves as an authorization token to the Kubernetes API server. Using that token, anyone inside the container could potentially start new Pods, delete existing deployments, alter ConfigMaps, and so on. What a nice, insecure, cluster!
As you see, by default, your cluster is anything but secure. Depending on the application you run in the cluster, this poses a significant problem. Suppose your application deals with medical data or credit card information. Having such security issues in a cluster may even prevent admission to the market.
Luckily, you found this article, because I'm here to help you out. I'll cover the security baseline for a Kubernetes cluster. I'll first explain at a very high level how Kubernetes works, what it does, and what the purpose of it is. Then I'll elaborate on the common issues I usually come across in my daily work as a senior security consultant. They range from broken network isolation over insecure host path mounts to missing resource limitations, just to name a few. Independent of your level of expertise with regard to security in Kubernetes, I'll provide you with (hopefully new) insights into Kubernetes security.
Let's Have a Look at What Kubernetes Is
Before I talk about security in Kubernetes, I'll give a brief introduction to what Kubernetes, also known as k8s, is, what it does, and how it works.
What's Kubernetes?
Kubernetes orchestrates the deployment of containers on computers down the line. It manages the entire lifecycle of all containers running in such a cluster, including their creation and destruction, and also inter-container communication. For that purpose, the Kubernetes API server manages, uses, and controls worker nodes. Such nodes can be seen as computational resources, like servers in a data center. Worker nodes just run containers and set up the network routing to enable inter-container and external communication. Of course, under the hood, they perform many more tasks, but for understanding Kubernetes, it suffices to know that worker nodes run the containers. To know which containers the operator wants to run, the Kubernetes API server uses a database, the famous etcd database. The operator of the cluster defines, in terms of YAML (yet another markup language) files, which containers, services, or other resources should run within the cluster. The Kubernetes API server persists those into the etcd database. The Kubernetes API server reads that configuration from the database and spawns instances of the required resources on worker nodes.
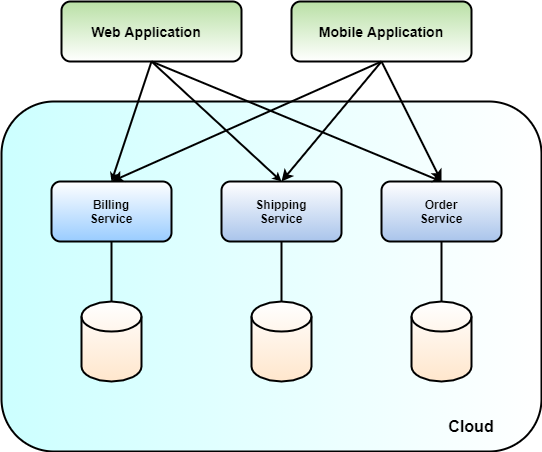
Let's walk through a concrete example to get more familiar with the terms. Suppose you develop a back-end system comprising three services, each of those corresponding to a single container. You have a billing service, a shipping service, and an order service. All three together make up your back-end application, as shown in Figure 1.
If you go with Kubernetes as your deployment infrastructure to run the entire back-end, you probably wrap each of your services first into a Deployment, DaemonSet, ReplicaSet, or similar resource. Those three types correspond to executable, small, individual applications that run in Kubernetes. The operator defines in a YAML file how the Deployment for instance looks. Specifically, the contents of this file tell Kubernetes where to find the container image(s) of the application, the ports it requires, the file system mounts, etc. The Kubernetes API server, in turn, runs such a Deployment as a Pod. A Pod corresponds to a running instance of a Deployment, DaemonSet, or ReplicaSet. Where do Pods run? They run on a worker node, have their own IP address, etc. You can think of them like having small virtual machines running on the worker node (abstractly speaking, since there is actually a big difference between a virtual machine and a container in terms of how they run on the host, but it makes it easier to understand). How does a Pod come to live?
The Kubernetes API server looks at the etcd database and checks whether all resources the operator configured run within the cluster. If some are missing, the Kubernetes API server orchestrates the creation of the missing resources to worker nodes. This corresponds to a control process, where the Kubernetes API server takes the role of both the observer and controller. The Kubernetes API server observes the current state of the entire cluster, and depending on that state, the server takes actions. Those actions could be spawning new Pods on worker nodes, for example, if there aren't sufficient Pods running. In fact, the Kubernetes API server also balances out the resource load of the entire cluster on the worker nodes to use all resources efficiently.
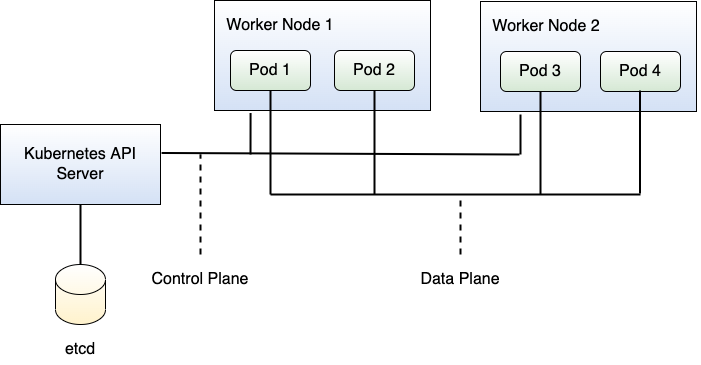
To better understand these processes in Kubernetes, it helps a lot to distinguish two planes, namely the control plane and the data plane. Kubernetes uses the control plane, which corresponds to a network connection between the Kubernetes API server and the worker nodes, to send control commands between the Kubernetes API server and the worker nodes. The deployed applications itself, in contrast, uses the data plane for communication. Of course, down the line, all of the traffic moves through the same network(s) between the Kubernetes API server and the worker nodes, but this distinction makes it easier to talk and think about Kubernetes. Figure 2 shows the situation.
What happens now when a Deployment requires three Pods running to handle all the workload, but they can't run on the same worker node due to a lack of resources? In the end, they should act like a single unit.
On top of Deployments and other Pod-creating resources (there are many more than just Deployment, DaemonSet, or ReplicaSet), operators define Services. Services group together Deployments containing a certain label, and they act as a load balancer to Pods comprising a Deployment. Services provide Pods with a single network identity, one that other Pods use for network connections. For a Service, it doesn't matter on which worker node the Pods run. Kubernetes forwards the traffic to Services that ultimately distribute the workload among their Pods. In total, there are four types of Services, including ClusterIP (only reachable within the same cluster) and LoadBalancer (reachable from outside the cluster).
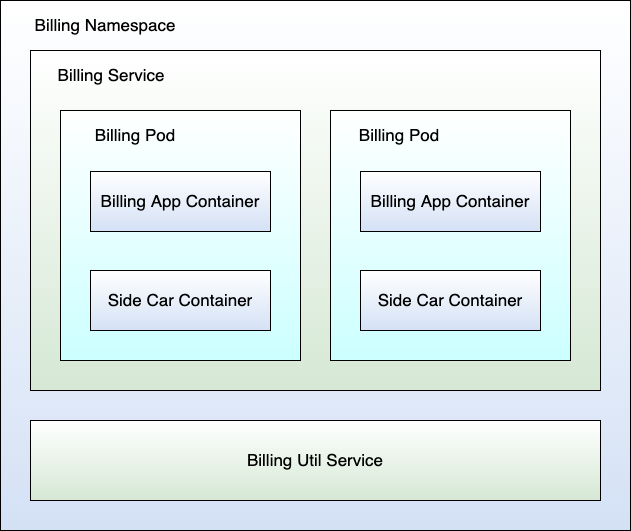
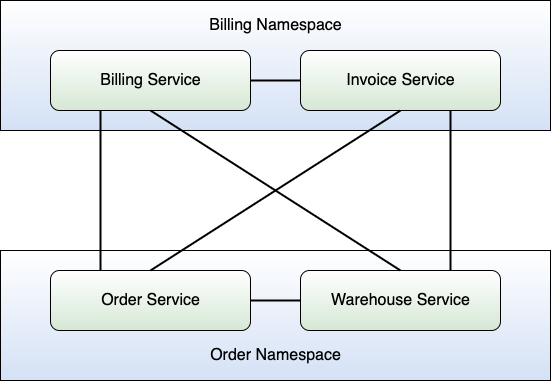
To separate services, Kubernetes allows operators to define Namespaces. A Namespace in Kubernetes groups together related services and other components into a larger resource. In big companies that run huge back-end applications, very often one team owns a single Namespace and all the services within it. Namespaces allow you to group together services forming a cohesive part of your entire back-end system. In the example from Figure 1, I identify three Namespaces: billing, shipping, and order. Figure 3 shows how the billing Namespace looks.
You now understand the basic deployable unit in Kubernetes, the Pod, a bit better. You know when they come to live and what happens if one of them crashes. Kubernetes takes care of recreating your lost Pod to restore the state of the cluster as the operator configured. But Kubernetes also defines other interesting resources. For example, most back-end applications require some form of configuration. Very often, operators configure services through config files, like the appsettings.json file when you run an ASP.NET Web API. Instead of baking an appsettings.json file into your container image, it would be great to have it configurable. That allows you to change the configuration of your service on-the-fly without rebuilding a new Docker image.
For that purpose, Kubernetes provides the ConfigMaps resource. Operators use ConfigMaps to persist configuration files, or other configurations to the etcd database of the Kubernetes API server. Deployments, for example, reference such ConfigMaps within their YAML file, and Kubernetes mounts them into the Pods of the Deployment. Yes, Kubernetes fully takes care of that. Even more, Kubernetes also allows you to store your secrets, like, for instance, a database password, in Secrets. Secrets work like ConfigMaps, but instead of storing them in plaintext like ConfigMaps, Kubernetes enables the encryption of Secrets to protect sensitive information through the use of cryptography.
Enough for the Kubernetes intro and how it works. Let's talk about why Kubernetes makes sense at all. First, Kubernetes abstracts the underlying infrastructure on which your services run. And that's very powerful because it gets almost trivial to move an entire back-end system from one place to another. Second, Kubernetes keeps your back-end application running 24/7, in case of service crashes. When Pods crash, Kubernetes recreates them for you. So you don't need to worry about whether Services crash or not because Kubernetes brings them back to life. Finally, it makes the development of services much faster and easier. Developers write the service applications and the CI/CD pipeline packs those applications into containers. That's it. Developers don't need to know where the services are running, what specs the servers have, or etc. They just write code.
But Now We Must Talk about Security My Dear…
I'm really a fan of Kubernetes and I use it myself. But we must talk about security. Before diving deep into individual, common security pitfalls in Kubernetes, I'll rough out a threat model for Kubernetes. The model potentially lacks some details, but I believe it provides a solid base to continue the security discussion here.
When developing a threat model, the first step is to identify the assets you want to protect. Let's have a look at the assets in a Kubernetes cluster.
You have the Pods as assets, as those run your application, right? Pods potentially depend on other resources, like, for example, ConfigMaps or Secrets. Those could contain sensitive information like passwords, database connection strings, or similar, so they are also valuable and you'd better protect them. On iterating this thought, you must realize that all configurations comprising your cluster correspond to assets.
After identifying the assets, you identify the threat actors. A threat actor corresponds to an entity. Such entities could be humans, but also services or other components or programs. A threat actor tries to obtain access to the assets, or even destroy them, depending on the asset. There are three different types of threat actors:
- External Attcker: An External Attacker attacks your Kubernetes cluster from the outside. This means that the attacker doesn't have direct access to the cluster and the only way for him to attack is through the public API, ending up in the data plane of your cluster.
- Internal Attacker with data-plane access: An Internal Attacker with data plane access is an attacker that manages to compromise a container. Very often, this happens through supply chain attacks in which an attacker manages to get a foot into a container through a malicious package in the third-party dependencies of an application. The malicious dependency opens a port and listens for incoming commands or performs automated malicious commands within the container. Depending on the configuration of your cluster, the attacker could even compromise the control plane of your cluster from there. More details about such an escalation later.
- Internal Attacker with control-plane access: An Internal Attacker with control-plane access has access to the Kubernetes API server and can interact with it, usually through the kubectl utility. Here, it depends a lot on the roles within your cluster what an attacker can do or not. In the case of very loose role-based access control (RBAC) rules, it could end up in a full cluster takeover.
Sometimes it helps a lot to distinguish among those threat actors to provide more precise statements about potential attacks. Observe that depending on the threat actor, the attack surface also changes totally. The External Attacker only sees the public-facing API but the attacker doesn't know anything about the internals of the cluster, which services run, etc. In contrast, the Internal Attacker with data-plane access already sits inside the cluster, even though the attacker doesn't have full access to the configuration of the cluster (for the moment). The attacker could certainly destroy the container he compromised, but the blast radius appears limited. Finally, the Internal Attacker with control-plane access poses a major security risk because the attacker could reconfigure your entire cluster, thereby destroying your entire back-end.
For most of the recommendations and issues I show, assume either an Internal Attacker with data-plane access or Internal Attacker with control-plane access.
Now, We Get Serious
Let's get your hands dirty and talk about the cool stuff. To demonstrate the security pitfalls, I'll use the microservices and cluster setup as shown in Figure 4 throughout the rest of the article.

As shown in Figure 4, there are, in total, three Namespaces in the cluster: billing, shipping, and order. The billing Namespace contains the billing and invoice service, the shipping Namespace contains the shipping and logistics service, and the order Namespace contains the order and warehouse service. In certain occasions, those Namespaces will contain further resources, like for example ConfigMaps.
You're all set with an example. I promised to provide you with a starter-kit for Kubernetes security, and here we go.
Pod Security Baseline
First up, I'll talk about Pod security. Recall that Pods correspond to the entity in Kubernetes tying together several containers, turning them into a manageable resource. They form cohesive execution units. In fact, Pods ultimately form your application. When Kubernetes brings a new Pod to life on a worker node, several things happen. Please note that I also use the term host to refer to the worker node of a Pod throughout the article, unless explicitly specified otherwise.
First, Kubernetes identifies that a Pod is missing. How? Controllers, running on the Kubernetes API server, observe that the state of the cluster doesn't match the configured state of the operator. Hence, a controller on the Kubernetes API server searches for a worker node and instructs the worker node to spawn a new Pod. For that, the worker node requires some context information, like the ServiceAccount running the Pod. Yes, Pods run in the context of a ServiceAccount that corresponds to some form of user in Kubernetes to give Pods an execution context. Furthermore, the controller also tells the worker node the file system and the file system mounts of the Pod, i.e., the external directories that the Pod requires to run. Lastly, because the Pod runs in terms of containers on the worker node, the worker node also needs to know which host user the container process should run (yes, container run as processes). Of course, there's much more to write about the creation of a Pod, but for our security starter kit, it's sufficient. So, what could go wrong here? Let's go through it step by step.
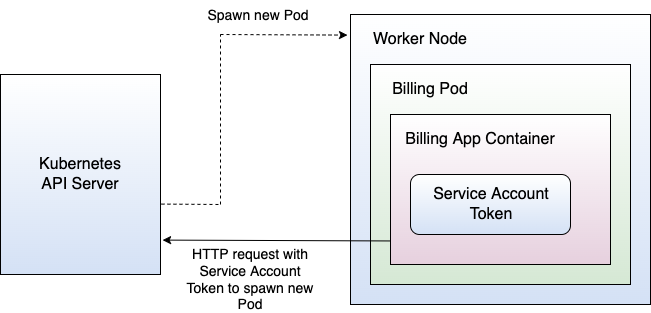
A ServiceAccount runs a Pod. For that, the Kubernetes API server creates a new ServiceAccount instance and associates it with the Pod. Kubernetes also creates a new ServiceAccountToken for the ServiceAccount running the Pod. That token enables communication with the Kubernetes API server and corresponds to a very valuable asset. By default, Kubernetes mounts the ServiceAccountToken into each Pod, specifically into the directory /var/run/secrets/kubernetes.io/serviceaccount. Why is Kubernetes doing that? Well, sometimes the containers of a Pod need to communicate with the Kubernetes API server to spawn new Pods or to read ConfigMaps or similar. In almost all cases, it's not required. Why am I telling you this?
There's a good reason for pointing the auto-mount of ServiceAccountTokens out. If you don't set up RBAC accordingly, those tokens turn into missiles, hitting you hard. Imagine that an attacker managed to compromise a single container and that Kubernetes maps the ServiceAccountToken into the container. The attacker can use the ServiceAccountToken to communicate directly with the Kubernetes API server from within the container by using, for instance, curl (if available and the Kubernetes API server is reachable). Depending on RBAC, this results in fatal consequences. Suppose that RBAC isn't set up properly, and that the actions allowed for a ServiceAccount aren't restricted. The attacker inside the compromised container could spawn new Pods, delete existing Deployments, read ConfigMaps, or alter them. The list goes on and on, but I guess you get an idea of the damage. Figure 5 shows the scenario.
Please note that in case RBAC isn't set up properly, a ServiceAccountToken is extremely powerful. So only map ServiceAccountTokens if you really require them. Otherwise, disable them by setting the automountServiceAccountToken flag for the ServiceAccount, Pod, or Deployment to false.
Don't auto-mount service account tokens unless you really require them.
Recall that when Kubernetes creates a new Pod, it spawns a new container. Spawning a new container involves the creation of the file system of the container. By default, Kubernetes makes the root file system of the container read- and writable. This means that the application inside the container can read and write to the root file system within the container. It sounds like every container requires that and it's absolutely normal for applications. Not necessarily. Of course, many applications require write access to a directory, such as to cache data in a file or so. However, is it really the best choice to have a fully writable root file system?
Again, let's assume for a second that the container got compromised by an attacker. In case of a read- and writable root file system, the attacker now has full control over the file system within the container (given the restrictions of the user running the container). Sounds bad, doesn't it? It enables the attacker to alter all the files accessible when the user runs the container. This could include the application executables itself, in the worst case. Therefore, depending on the capabilities within the container (build environment, etc.), an attacker could even alter the application inside the container. Figure 6 summarizes the situation.

I can provide you with a solution for that issue. Luckily, Kubernetes enables operators to declare the root file system of a container as read-only by using the readOnlyRootFilesystem flag. Setting that flag to true turns the root file system of your container into a read-only file system. But where to store data then? That's easy! Mount a volume into your container just for the data of your application. In case an attacker manages to compromise your container, the only affected asset of the container will be its data, not more.
Turn the root-file system of your containers read-only.
Finally, recall that I was talking about the user executing the container. To better understand this statement, I want to explain a bit how containers on Linux work. Containers correspond to small applications running on the host. How does it work in detail? Well, containers correspond to isolated processes on the host system, which is also in strong contrast to virtual machines. Virtual machines don't run natively directly on the host operating system, but they come with their own kernel, etc. Containers, in contrast, run directly on the host operating system. They share the same kernel with all other processes. In an ideal case, they run fully isolated from the host in terms of file system, networking, processes, etc. So, a container, in the best case, can't reach the host network or see other processes running on the same host. The container runtime strictly isolates the container from the host.
With that in mind, recall that Kubernetes needs to determine the user running the new container. By default, the user that runs the container corresponds to the default user, that is, most of the time, the root user. Hence, when running a container without taking any further precautions, the user executing your application is the root user. I believe it's clear where this is going now.
Suppose an attacker compromised your container. In case the container runs as root user, it immediately grants the attacker root privileges inside the container and that's a big problem. Depending on other configurations that I'll discuss briefly, this could allow the attacker to even compromise the host system. In case the host isn't reachable for the attacker, it's still very powerful, as for non-read-only root file systems, the attacker could still alter sensitive files in the container.
Never run Pods as root user.
The takeaway messages are the following:
- Never auto-mount
ServiceAccountTokensunless you really need them. - Make the root file system of your containers read-only whenever possible.
- Never run Pods as root user.
Of course, there are plenty more considerations, recommendations, and guidelines for how to make Pods secure, but it's a good starting point to have a first line of defense. For more information on how to configure it and how to set things up, I refer you to check out PodSecurityPolicies (for older clusters), the PodAdmissionController for newer versions of Kubernetes, and the securityContext attribute for Pods. An excerpt of a securityContext from a Deployment preventing many of the issues discussed here is shown in the snippet below.
[...]
spec:
  dnsPolicy: Default
  enableServiceLinks: false
  [...]
  automountServiceAccountToken: false
  securityContext:
     runAsUser: 1000
     runAsGroup: 3000
     fsGroup: 2000
  containers:
      securityContext:
          runAsUser: 1000
          [...]
          readOnlyRootFilesystem: true
Networking Issues in Kubernetes
Let's move on a bit and have a look at Kubernetes and networks. Pods never run fully isolated; they always communicate with some other services, client applications, or even external services. Hence, a Pod hardly ever runs in full isolation. Kubernetes is built for microservices, and those sometimes require a lot of communication. How does communication in Kubernetes really work? I don't want to go into all the details regarding networking in Kubernetes because that topic alone would probably fill an entire book. However, there are certain things to understand.
Recall that Pods in Kubernetes correspond essentially to (a collection of) containers. The container networking interface, CNI, oversees managing the networking considerations in Kubernetes. There are plenty of providers that implement CNI, such as Calico. The security goal of networking in a Kubernetes cluster could be described as follows:
- The cluster internal communication should be isolated from the host.
- The host communication should be isolated from the cluster.
- Hosts from the outside should not be able to reach Pods in the cluster unless permitted.
- Pods from inside the cluster should not be able to reach services outside unless permitted.
- Communications inside the cluster should be regulated and secured.
I know, I'm enforcing a rather strict view on Kubernetes networking here, but I have good reasons for that. Let's have a look at the situation in Kubernetes without any configuration by the operator.
By default, Kubernetes doesn't isolate Pods from different namespaces. This means that Kubernetes, by default, allows Pods from different namespaces to communicate with each other without any restrictions. You may be tempted to think “That's not an issue! Why shouldn't they be able to communicate?” and to be honest, I thought the same. But I have my reasons to think different now, and I'll share them with you.
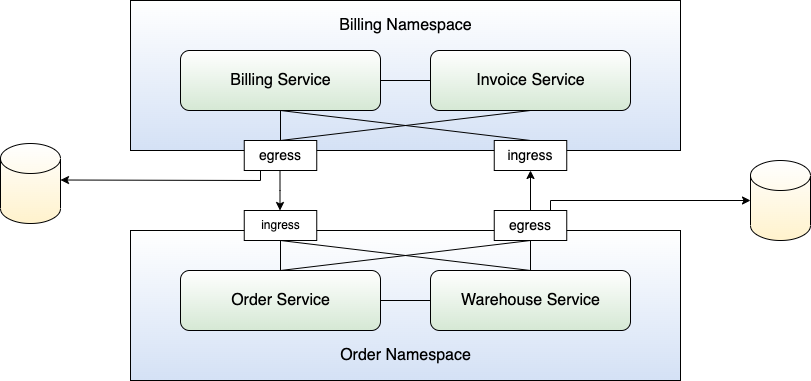
Suppose you have your billing Namespace and order Namespace. Recall that the billing Namespace comprises the billing and invoice Service and the order Namespace the order and warehouse Service. As explained, by default, Kubernetes allows for all kinds of communication inside the cluster. This means that the order Service, for example, can reach the invoice Service. However, imagine that the only service that really needs to talk to the invoice Service is the billing Service of the same Namespace. In that case, the order Service doesn't need to talk to the invoice Service at all, but it can. Figure 7 shows the situation.
Now suppose that an attacker managed to compromise the order Service, maybe through a vulnerability in a third-party dependency. Because Kubernetes doesn't restrict the communication pathways inside the cluster, the attacker can now move laterally through the cluster in terms of communication. The goal of the attacker is to acquire information about the invoices of customers. Because there's no network isolation, the attacker uses the compromised Pod of the order Service to query the invoice Service. Most of the time, the services in a Kubernetes cluster don't implement any authentication mechanism because authentication usually gets handled by an API gateway or similar in front of the cluster. Hence, the attacker can query the invoice Service without any restriction and obtain all the information he wants. Nice job by the attacker, bad for us.
Attackers can cause even more harm than gathering information. Suppose that the invoice Service contains endpoints to create new invoices for customers. In normal operation, the billing Service sends a request to the invoice Service with all the details about the invoice for a customer. The invoice Service generates an invoice for the customer and maybe even automatically charges the invoice. In case an attacker reaches the invoice Service, the attacker could generate invoices for arbitrary victims, resulting in financial damage to the victims. Of course, the attack assumes again when the back-end terminates authentication within an API gateway in front of the cluster. But yes, it's really a problem here.
Luckily, there's a way out. Kubernetes allows for the definition of NetworkPolicies. Such policies define the inbound and outbound traffic of Namespaces. For that purpose, operators define allowed ports and IP addresses (or even entire networks), either for inbound or outbound communication. Pods in the Namespace to which the NetworkPolicy applies obey those rules. Inbound network policies are often referred to as ingress NetworkPolicies whereas outbound network policies are often referred to as egress NetworkPolicies. In summary, NetworkPolicies allow to you to define rules for the communication into a Namespace, but also outside of the Namespace. Figure 8 shows the situation of the cluster after using NetworkPolicies.
When it comes to networking in Kubernetes, there's a further interesting consideration you should be aware of. NetworkPolicies regulate the traffic among namespaces. Recall that a container or Pod in Kubernetes, in the end, runs on a worker node, that has its own network interface and connects to a network, which I refer to as host network. Earlier, I talked about what happens if an attacker can reach other Pods in the same cluster, but what happens in case an attacker reaches the host network?
Use NetworkPolicies to isolate the networking of namespaces.
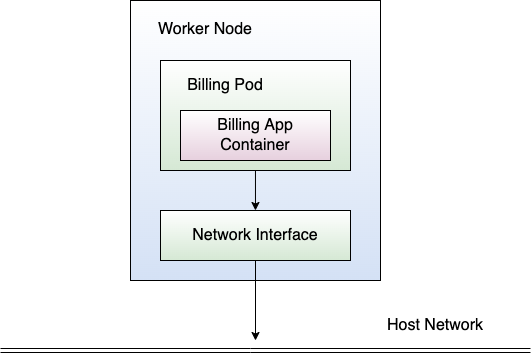
This opens a completely new attack surface for the attacker. Suppose an attacker managed to compromise a Pod of the billing Service and that the container of the Pod can reach the host network. Further suppose that there's a vault running on the host network, or a database intended to be used for internal purposes of your company only. Well, the attacker inside the billing Pod can reach those services and servers suddenly. Depending on the protection of those services, the attacker could run Denial-of-Service attacks, try to acquire sensitive information, or similar. As you can see, having access to the host network is extremely powerful for an attacker and should be circumvented in any case. Figure 9 shows the situation.
But attacks aren't only limited to computers on the host network. The worker node itself is also a very valuable target. Worker nodes in Kubernetes run kubelets that facilitate communication with the Kubernetes API server. Those kubelets connect to the Kubernetes API server and receive control commands from it. Suppose a worker node runs a compromised Pod. Further, assume that the compromised Pod can access the host network. In that situation, the Pod could try to reach kubelets of other worker nodes and cause harm to them. Therefore, in terms of network compromise, the situation corresponds to a real nightmare.
How do you prevent access to the host network interface of the host? That's easy. In Kubernetes, you can specify whether a Pod has access to the host network or not by simply using the hostNetwork flag. The flag can be used directly for Pods and other executable resources like, for instance, Deployment. Alternatively, you can specify the flag as part of a PodSecurityPolicy that applies to a multitude of Pods at the same time. That will save your operator a lot of time on configuration. Additionally, you should also consider putting a firewall or similar in place to really make sure traffic from within the cluster can't reach out to your local network of the worker nodes.
Don't allow Pods to access the host network unless absolutely necessary.
I'll summarize the networking considerations before moving on:
- NetworkPolicies allow you to define networking rules for Namespaces. For that purpose, use ingress rules for inbound traffic and use egress rules for outbound traffic. You can specify those rules for ports, specific IP addresses, or even entire networks.
- Accessing the host network from within a Pod can be very dangerous. Keep in mind that everything your worker node can reach can also be reached by a potentially compromised Pod, including network services on the same network as the worker node but also other worker nodes. Therefore, disable the access to the host network whenever possible and put firewalls or similar in place to prevent any unforeseen access from a Pod to the host network.
Using Mounts Can't Be that Bad, Right?
As I've shown before, sometimes Pods in Kubernetes require some external files or even entire folders. For instance, a Pod could require a ConfigMap that contains an appsettings.json file for initializing some variables, like port, TLS keys, or similar. To mount a ConfigMap into a Pod, you use the volumes attribute in the Pod specification. You specify the ConfigMap that Kubernetes mounts via the configMap attribute inside the volumes attribute. To mount the volume into the Pod now, you create a mount point in the container specification of the Pod through setting the volumeMounts attribute using the name of the ConfigMap in the volumes section and by providing the path for where to mount the ConfigMap. When starting the container of the Pod, Kubernetes takes care of creating the mount on the worker node for the container.
Kubernetes offers many more different kinds of Volumes, including, for instance, Volumes of type hostPath. These kinds of Volumes appear very interesting from a security perspective. Why? They provide an operator with the capability to mount an entire directory from the host into a container. Hence, they could be a good target for attacks, right?
Let's get a little bit more concrete about Volumes of type hostPath. I'll demonstrate now the real danger of such mounts. Suppose that a Pod requires, for mystical reasons, the /var/run directory of the host. In normal applications, this shouldn't be required, at all, but I was coming across such configurations quite often. Now, further assume that the application in the container even requires write access to /var/run, to write to files in that directory. Does it still not sound bad to you? Okay, let's have a look at what kind of files reside within /var/run on Linux to make the point.
A little bit of checking the internet reveals that many Unix sockets, like, for example, the sockets of Docker, reside within this directory. Furthermore, it contains .pid files of the host, also something valuable to an attacker. That directory certainly contains many more valuable files of the host. I believe you've got an idea of the sensitivity of the folder now.
To highlight the problem, assume now that an attacker managed to compromise a container with a mount of hostPath type for the /var/run directory of the host, with permission to write to it. Further, as we've seen before, very often, containers run as the root user of the underlying host. That's an explosive combination! The attacker suddenly has write access to a very sensitive directory of the worker node. What can the attacker use that for? Well, I mentioned things like Docker sockets earlier, but also other vital files for applications running on the worker node. The attacker now uses the hostPath mount to escape the container and write to files of the hosts /var/run directory, thereby potentially destroying applications running on the underlying host. Depending on the configuration and the setting, the attacker can communicate with services having sockets in /var/run and that results in the worst case in code execution on the host (for example, through spawning new containers using the Docker socket). Yes, that means game over! Figure 10 summarizes the issues for the example cluster.
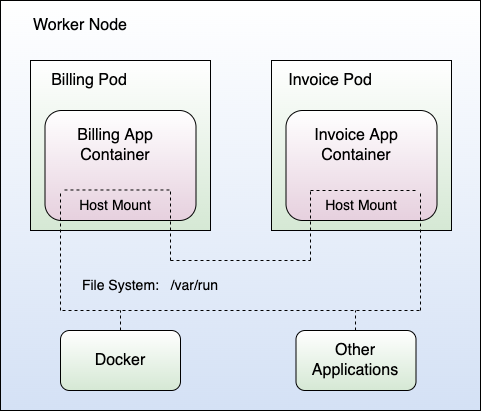
Observe that in the example of Figure 10, the billing Pod and the invoice Pod both mount the /var/run directory of the worker node. This implies that both Pods could write to and read from files in this directory. Hence, a compromised billing or invoice Pod poses a real danger to the worker node. Furthermore, if both Pods operate on the same files, one malicious Pod could corrupt the other Pod.
But that's not the only danger emerging from hostPath mounts. Suppose a container requires read access to some files in the /etc directory of the worker node. Again, you could immediately say “That doesn't make any sense. I can't imagine that someone really needs that.” Honestly, I also thought I'd never come across it, but it happened. Imagine that the operator grants read access to the entire /etc directory of the worker node instead of drilling down to the folders that the container really requires. By that, an attacker that compromised the container suddenly has full read access to the /etc directory of the host.
This constitutes a severe information leakage because this directory often contains passwords, keys, or other sensitive information. However, it gets even worse, combined with a broken network isolation to the host network. Why? Well, because the attacker could use the discovered secrets from /etc to communicate with services in the host's network that require the leaked credentials. Therefore, information leakage through read access to a sensitive host directory plus a broken network isolation of the Pod again means game over.
Be very careful with hostPath mounts.
You eliminate this issue by simply not using hostPath mounts if possible. In case an application really requires access to the host file system, you have two options:
- Only mount what the container really needs. Do not mount entire directories into a container when the container only needs some sub-directories or even specific files. Always narrow down the mount as far as possible, and never share what's not required by the container.
- Implement a proxy on the host. Sometimes it's also possible to implement a service running on the host node that proxies file system access. Of course, that itself poses a security risk and should be done very carefully. However, it potentially gives you more control over what's happening.
ConfigMaps, a Dangerous Resource
You've come across ConfigMaps multiple times throughout this article. But I wasn't explaining to you the danger that emerges from ConfigMaps when not used correctly. Don't get me wrong, ConfigMaps are awesome, and very useful, when used correctly. However, when used to simply parametrize everything that can be parametrized in a container, they turn into bullets against your cluster.
To justify this hard statement, I want to explain the effect of inappropriately using ConfigMaps with several examples. I'll start with the most severe case, using a ConfigMap that contains a script. It happens very often, unfortunately, especially in combination with containers that require some form of bootstrapping in terms of shell scripts.
Suppose a Pod runs an init script before starting the application in the container. Further, assume that Kubernetes mounts the init script from a ConfigMap into the Pod on container creation. Then, all operators or entities having write access to the ConfigMap can alter the init script. That essentially corresponds to a code execution vulnerability. An attacker could simply alter the ConfigMap in such a way that the intended application in the container doesn't start at all! Figure 11 shows an example.
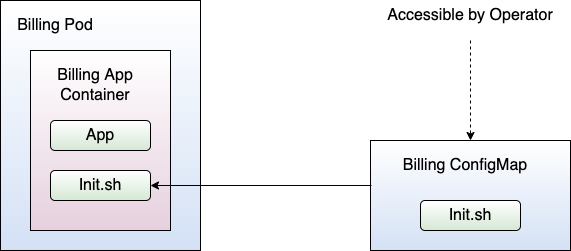
In Figure 11, there's the billing Pod. The billing Pod requires the billing ConfigMap, which contains a shell script named Init.sh. On startup, the billing app container launches the Init.sh script of the billing ConfigMap. If an attacker overrides the billing ConfigMap, the billing Pod gets compromised.
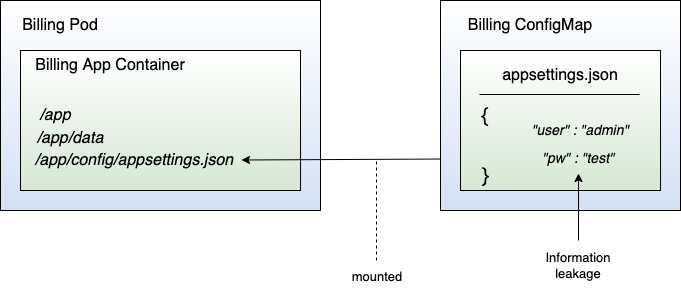
There are more reasons why ConfigMaps are dangerous. Very often, developers store sensitive information in settings files, like appsettings.json, for instance. Such sensitive information could be an API token, a database connection string containing username and password or other credentials. Hence, you have an information leakage through the ConfigMap. This kind of information leakage happens quite often because it's very convenient to retrieve the entire configuration, including sensitive information, from one location. However, from a security perspective, it poses a real danger because everyone with access to the ConfigMap can read out the sensitive information (remember the attacker with the ServiceAccountToken - this could also be such an attacker!). Figure 12 shows an example of the billing ConfigMap that contains a user with name “admin” and password “test” (yes, very secure, I know).
Scripts and secrets in ConfigMaps are a no-go!
The full ConfigMap is shown in the snippet below.
apiVersion: v1
kind: ConfigMap
metadata:
  name: billing-config
  namespace: billing
data:
  appsettings.json: |
    {
      "user": "admin",
      "pw": "test"
    }
What are alternatives? How do you solve the issue? For scripts, I recommend that you don't provide scripts in any form from the outside to a container. If possible, include the scripts within the container image, thereby not providing any chance to alter such scripts. Credentials should always be stored within Kubernetes Secrets, another resource type that I'll discuss next.
Are Your Secrets Secure?
Kubernetes provides you with resources of type Secrets. They constitute the perfect resource for storing credentials, passwords, keys, and other sensitive information. So, we use Secrets, and that's it? Our sensitive information is secure now? That would be nice, but no. Unfortunately, not.
By default, Kubernetes doesn't protect Secrets. It only applies a base64 encoding to them. Such an encoding doesn't offer any security. Hence, everyone with access to the Secrets can decode them and read them. Luckily, Kubernetes provides the option to encrypt Secrets by configuring an EncryptionConfiguration. You'd better turn on your EncryptionConfiguration to protect your secrets.
The EncryptionConfiguration resource comes with several options, including the following:
- identity: Leave the secrets as is and don't encrypt. This is not secure, so don't use identity.
- secretbox: Applies XSalsa20 and Poly1305. A strong solution.
- aesgcm: Applies AES in Galois Counter Mode. Requires a key rotation every 200k write operations.
- aescbc: Applies AES-CBC with PKCS#7 padding. Isn't recommended by official Kubernetes website due to known attacks against CBC.
- kms: This option allows to integrate the encryption scheme with a third-party Key Management System (KMS). The preferred choice, if possible.
As you see, there are several options available, and you'd better use one of those. The identity, aesgcm, and aescbc solutions I'd not consider, due to either no encryption, the necessity to manually rotate keys, or vulnerability to Padding Oracle attacks for CBC mode. Thus, you're left with either secretbox or kms. If possible, I'd go for the KMS integration, but secretbox also offers a strong protection.
Why is it important to protect your secrets at rest in the first place? Because everyone with access to etcd database can readout your secret data at rest, resulting in a security breach of your secrets.
Configure encryption for data at rest in your cluster.
Running Out of Resources Is a Bad Thing
I'm slowly approaching the end of the introduction to Kubernetes security. But before I'm done, I have two more things I want to point out. Let's have a look at the first one. Recall that Kubernetes essentially distributes the workload across worker nodes. That's the goal of Kubernetes. To be precise, the Kubernetes API server chooses worker nodes to spawn new Pods on them. To that end, the Kubernetes API server requires knowledge about the available resources on each worker node. Observe that the worker nodes have limited resources, as with every computational system.
So, what happens when you run out of resources? Suppose that the entire cluster eats up too many resources of your worker nodes to spawn new Pods. Well, in that case, you have a Denial-of-Service situation, because the cluster can't maintain and run the cluster as the operator specified. Of course, the trivial solution to that is to increase computational power. However, for the existing resources that a cluster uses, it's also vital to manage and use them properly.
For that purpose, Kubernetes defines two different kinds of resource types, namely ResourceQuotas and LimitRanges. ResourceQuotas limit the resources that a single Namespace uses. In contrast, LimitRanges limit the resources that a single Pod uses. Both provide a powerful tool to balance out the resources of the cluster. I illustrate the importance of them with two examples. Let's start with the first one.
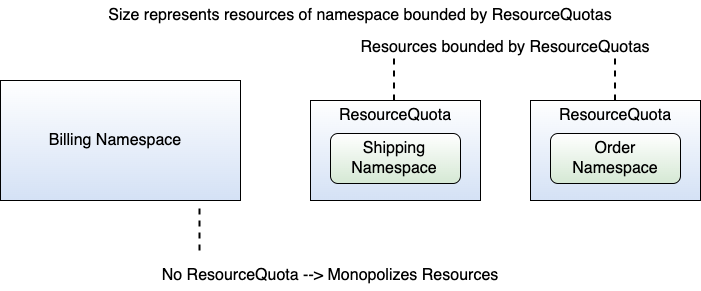
Consider the setting that Figure 13 shows. The figure shows the example cluster with three Namespaces, namely the billing, shipping, and order Namespace. The shipping and order Namespaces both have ResourceQuotas resources in place, essentially limiting the overall resources of all Pods within each of those Namespaces. By resources, I mean the sum of all CPU resources or the sum of the entire memory that all Pods of a Namespace occupy together. However, note that the billing Namespace doesn't have a ResourceQuota resource in place. That essentially allows the billing Namespace to bind all of the available resources of the cluster! So, in case an attacker manages to take over a Pod (whose resources are unconstrained through LimitRanges or similar) or even more within the billing Namespace, the attacker could monopolize all the physical resources of the cluster, thereby bringing the entire cluster into a Denial-of-Service situation due to resource exhaustion. That's bad for a cluster, because the goal of Kubernetes is to have your microservices up and running 24/7. Figure 13 depicts the situation.
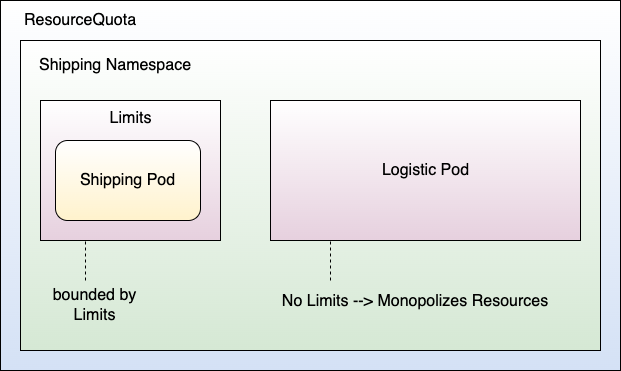
That was for entire Namespaces. Now let's have a look at one individual Namespace. Consider the shipping Namespace that has a ResourceQuota resource in place to limit the overall resources within the entire Namespace. Recall that there were two Services running in the shipping Namespace, the shipping Service, and the logistic Service. Suppose each of those Services contains one Pod. Now, let's assume that the shipping Pod has a Limits configuration (in the Pod definition) in place, whereas the logistic Pod does not. Well, that's a quite asymmetrical situation. If an attacker now manages to take over the logistic Pod, the attacker could monopolize all the resources of the shipping Namespace using the logistic Pod, thereby bringing the shipping Pod into an interesting situation when it comes to acquiring CPU or memory. It potentially results in a Denial-of-Service situation for the Services running in the shipping Namespace. In contrast to the previous example with ResourceQuotas, here, only the shipping Namespace will be affected. It's still quite a severe situation for the entire cluster if one Namespace isn't working as it should. Figure 14 shows the situation.
In summary, you'd better take care of the resources within your cluster. Worker nodes and their resources are precious because in Kubernetes, it's all about how to distribute workload across available resources in a smart way. The code snippet below shows the definition of a ResourceQuota.
apiVersion: v1
kind: ResourceQuota
metadata:
  name: mem-cpu
  namespace: order
spec:
  hard:
    requests.cpu: "1"
    requests.memory: 1Gi
    limits.cpu: "2"
    limits.memory: 2Gi
Use ResourceQuotas and LimitRanges to limit the resources that a namespace or Pods uses, at most.
Finally, There Are Also Users in Kubernetes
Kubernetes always requires operators in one or the other form to set up the cluster or intervene if something isn't working as it should. Operators specify the Services running in the cluster, the ConfigMaps that Pods require, and so on. How does Kubernetes now manage the permissions an operator has?
For that, Kubernetes uses Role-based Access Control (RBAC) through Roles and ClusterRoles resources. A Role applies to a particular Namespace within the Kubernetes cluster whereas a ClusterRole applies to the entire cluster. Such resources, i.e., Roles and ClusterRoles, are additive, and there are no “deny” rules. Both serve a single purpose. The operator setting up RBAC defines the permissions a certain Role or ClusterRole has regarding resources within the cluster. For instance, suppose you want to define that engineers with access to the shipping Namespace can create new Pods. In that case, the operators define an Engineer Role for the shipping Namespace that grants the verb create to the resource type Pod.
Roles and ClusterRoles build around resources and verbs. The resource corresponds to the resources of a certain type that the cluster runs, like, for example, Pods, ConfigMaps, or other kinds of Kubernetes resources. The verbs specify the action a certain Role or ClusterRole is allowed to perform for that resource. Verbs include “get” or “list,” but also “create,” for example. If a certain Role or ClusterRole should be able to read Secrets, you grant the “get” verb on Secrets. To associate a certain Role or ClusterRole with an operator, you specify RoleBindings or ClusterRoleBindings. Those two resources associate subjects, like a user, with a Role or ClusterRole. As you see, it's straightforward to set up the access control for your cluster.
However, there's a catch. If you set it up with very permissive Roles and ClusterRoles, really bad things can happen. Suppose you didn't set up RBAC properly and an attacker manages to take over an account of your cluster. Depending on the Roles and ClusterRoles associated with the account, the attacker could destroy your cluster. Figure 15 shows an example of what could happen.
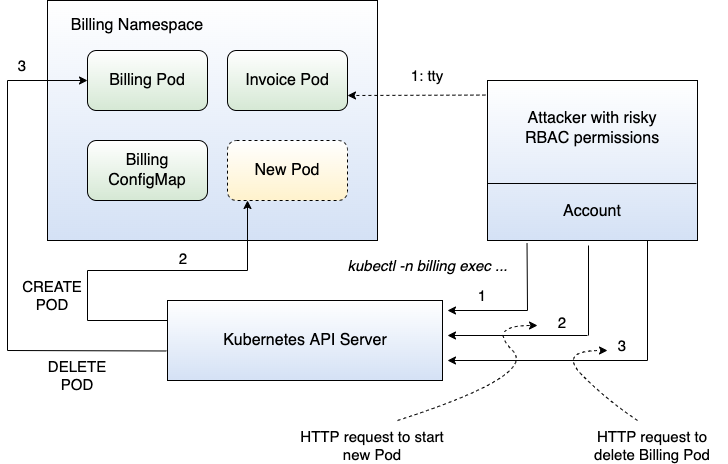
In Figure 15, the attacker managed to take over an account of the billing Namespace. The permissions for this account appear very risky, because the attacker can exec into a Pod using the exec command in Kubernetes. This allows the attacker to open a remote shell into the invoice Pod through a command to the Kubernetes API server, thereby having shell access to the Pod. But the attacker could also create a new Pod because the Role of the account the attacker took over allows the verb “create” for the resource Pod. Finally, the attacker could even delete existing Pods due to the permissions granted by the Role.
As you see, having proper RBAC set up is extremely important for a cluster, because it could lead to a full cluster or Namespace compromise.
Only allow verbs and resources on Roles and ClusterRoles that operators really require.
Let's Summarize
We've come a long way. Now it's time to wrap it up. What did we learn from all this? First, I gave a brief introduction to what Kubernetes is, how it works, and what it does. I talked about different kinds of attackers and their capabilities. Next, I provided an overview of different Pod security considerations, like auto mounting service account tokens, for instance, or running a Pod as root user. Then I gave an overview of network security in Kubernetes, where NetworkPolicies play an important role. From there, I continued the security investigation with dangerous host directory mounts. As you've seen, a lot of issues can be mitigated by simply isolating the worker nodes from your Pods. ConfigMaps also turned out to be a potential problem when not used properly. They could contain scripts or secret information. Then I talked about Denial-of-Service situations in a cluster due to missing resource limits and how to mitigate such scenarios. Finally, I provided you with some insights into RBAC in Kubernetes, and the danger when not used properly.