Data annotations are not only for use in ASP.NET web applications. Any type of .NET application can use data annotations for validating data. It only takes about 10 lines of code to programmatically validate data annotations attached to entity classes. There are many built-in data annotations supplied by Microsoft that can validate your data quickly and it's easy to create your own data annotation attributes to apply to your entity classes. If you have some very specific validation needs, you may implement the IValidatableObject interface for your entity classes. If you're developing multilingual applications, you can even move your error messages into resources and specify the name of those resources on each of your attributes.
In this article, you're going to explore most of the data annotations supplied by Microsoft. You're going to develop a few custom validation attributes to check dates and numeric values. You'll also learn to create a custom validation attribute to compare the values between two different properties. You're also going to see how to implement the IValidatableObject interface to tackle more complicated validation scenarios. Finally, you'll set up a couple of resource files and see how easy it is to localize your error messages.
Traditional Validation Methods
In the distant past, to validate the data a user inputs into a form would be done directly in the code-behind the form. The appropriate messages were displayed on the input form to tell the user what they did wrong. As object-oriented programming (OOP) became the norm, developers moved that input data into properties of a class and wrote a Validate() method to perform the validation. A collection of messages is returned from the Validate() method and those messages were bound to the input form to be displayed. Let's first look at the traditional way of validating data before we move onto using data annotations.
Create a Console Application
To follow along with this article, open Visual Studio and create a console application with the name Samples. You may use either .NET 6 or .NET 7 for the samples in this article. Most of the code will work just as well in earlier versions of .NET too. Once you have the application created, right mouse-click on the project and add a new folder named EntityClasses. Right mouse-click on the EntityClasses folder and add a class named Product, as shown in Listing 1, to this project.
Listing 1: Create a Product entity class to test out validation
#nullable disable

namespace Samples;

public partial class Product
{
    public int ProductID { get; set; }
    public string Name { get; set; }
    public string ProductNumber { get; set; }
    public string Color { get; set; }
    public decimal? StandardCost { get; set; }
    public decimal? ListPrice { get; set; }
    public DateTime SellStartDate { get; set; }
    public DateTime? SellEndDate { get; set; }
    public DateTime? DiscontinuedDate { get; set; }

    public override string ToString()
    {
        return $"{Name} ({ProductID})";
    }
}
There are several properties in the Product class that should be validated, such as making sure the Name property is filled in and that it has 50 characters or fewer in it. You might also verify that the value in the ListPrice property is greater than the value in the StandardCost property. You should also ensure that the value in the SellStartDate property is less than the value in the SellEndDate property.
To report error messages to the user, you need a class to hold the property name in error, and the error message to display to the user. Right mouse-click on the project and add a new folder named ValidationClasses. Right mouse-click on the ValidationClasses folder and add a new class named ValidationMessage. This class is shown in the code snippet below.
#nullable disable

namespace Samples;

public class ValidationMessage
{
    public string PropertyName { get; set; }

    public string ErrorMessage { get; set; }

    public override string ToString()
    {
        if (string.IsNullOrEmpty(PropertyName))
        {
            return $"{ErrorMessage}";
       }
       else
       {
           return $"{ErrorMessage} ({PropertyName})";
       }
    }
}
Create a Product View Model Class
If you've been doing MVC or WPF programming for a while, you quickly learned that using a Model-View-View-Model (MVVM) design pattern makes your coding easier and more reusable. Let's create a view model class to encapsulate the Product class. Right mouse-click on the project and add a new folder named ViewModelClasses. Right mouse-click on the ViewModelClasses folder and add a new class named ProductViewModel as shown in the code below. Create a public property named Entity that's of the type Product. In the constructor, create a new instance of Product class into the Entity property. Create a Validate() method in which you add code to test for valid Product data. This method returns a list of ValidationMessage objects.
namespace Samples;
public class ProductViewModel
{
    public ProductViewModel()
    {
        Entity = new();
    }

    public Product Entity { get; set; }

    public List<ValidationMessage> Validate()
    {
        List<ValidationMessage> msgs = new();

        // Insert Validation Code Here

        return msgs;
    }
}
Within the Validate() method, where the comment says to Insert Validation Code Here, write the code shown in Listing 2 to test each of the Product properties for valid data. If the data in a property isn't valid, create a new instance of the ValidationMessage class and put the property name into PropertyName property, and the message you want to convey to the user in the Message property.
Listing 2: Write code to test each property in the Entity object
if (string.IsNullOrWhiteSpace(Entity.Name))
{
    msgs.Add(new ValidationMessage()
    {
        ErrorMessage = "Product Name Must Be Filled In.",
        PropertyName = "Name"
    });
}
else
{
    if (Entity.Name.Length > 50)
    {
        msgs.Add(new ValidationMessage()
        {
            ErrorMessage = "Product Name Must Be 50 Characters or Less.",
            PropertyName = "Name"
        });
    }
}

if (Entity.StandardCost == null || Entity.StandardCost < 0.01M)
{
      msgs.Add(new ValidationMessage()
      {
          ErrorMessage = "Cost Must Be Greater Than Zero.",
          PropertyName = "StandardCost"
      });
}
if (Entity.ListPrice == null || Entity.ListPrice < 0.01M)
{
  msgs.Add(new ValidationMessage()
  {
      ErrorMessage = "Price Must Be Greater Than Zero.",
      PropertyName = "ListPrice"
  });
}
if (Entity.ListPrice < Entity.StandardCost)
{
    msgs.Add(new ValidationMessage()
    {
        ErrorMessage = $"Price must be greater than the Cost.",
        PropertyName = "ListPrice"
    });
}

if (Entity.SellStartDate == DateTime.MinValue)
{
    msgs.Add(new ValidationMessage()
    {
        ErrorMessage = $"Selling Start Date Must Be Greater Than '{DateTime.Now.AddDays(-5).ToShortDateString()}'.",
        PropertyName = "SellStartDate"
    });
}
Open the Program.cs file and add the code shown in Listing 3. In this code, you create an instance of the ProductViewModel class and fill in a few properties of the Entity property. Call the Validate() method on the ProductViewModel object and it returns a collection of ValidationMessage objects. Iterate over this collection and display each error message on the console.
Listing 3: Test the Product validation in the Program file
using Samples;

// Create view model and
// initialize the Entity object
ProductViewModel vm = new()
{
    Entity = new()
    {
        Name = "",
        ListPrice = 5,
        StandardCost = 15
    }
};

// Validate the Data
var msgs = vm.Validate();

// Display Failed Validation Messages
foreach (ValidationMessage item in msgs)
{
    Console.WriteLine(item);
}

// Display Total Count
Console.WriteLine();
Console.WriteLine($"Total Validations Failed: {msgs.Count}");

// Pause for Results
Console.ReadKey();
Try It Out
Run the program to see the error messages appear on the Console window, as shown in Figure 1.
Microsoft Data Annotations
Instead of writing validation code in your view model class as you did in Listing 1, you can add attributes above those properties in your Product class that you wish to validate. There are many standard data annotation attributes supplied by Microsoft such as [Required], [MinLength], [MaxLength], [StringLength], and [Range]. From the name of the attribute, you can infer what each of these attributes validates on a property. For a complete list of data annotation attributes, visit Microsoft's website at https://bit.ly/3TJICid.
Each of the data annotation attributes inherits from an abstract class named ValidationAttribute. This validation attribute class has properties that each of the inherited attribute classes can use. These properties are shown in Table 1.
The ErrorMessage Property
The ErrorMessage property is what you use to report back the error message to the user. You can use a hard-coded string or you can have placeholders in the string to automatically retrieve data from the property the attribute is decorating. The placeholders are what the String.FormatString() method uses where you add numbers enclosed within curly braces as shown in the following [Required] attribute.
[Required(ErrorMessage = "{0} Must Be Filled In")]
public string ProductNumber { get; set; }
The {0} placeholder is replaced with the name of the property the attribute is decorating. In the above example, the resulting string is “ProductNumber Must Be Filled In”. Next, look at the following code snippet that uses the [Range] attribute.
[Range(0.01, 9999, ErrorMessage = "{0} must be between {1} and {2}")]
public decimal? StandardCost { get; set; }
The {1} placeholder is replaced with the value in the first parameter to the Range attribute and the {2} placeholder is replaced with the value in the second parameter. If you have more parameters, then you keep on incrementing the placeholder accordingly.
The [Required] Attribute
Let's explore the [Required] attribute in a little more detail and see how to check any properties with this attribute applied. Open the Product.cs file and add the [Required] attribute just above the Name, ProductNumber, StandardCost, ListPrice, and SellStartDate properties as shown in the following code.
[Required]
public string Name { get; set; }

[Required]
public string ProductNumber { get; set; }

[Required]
public decimal? StandardCost { get; set; }

[Required]
public decimal? ListPrice { get; set; }

[Required]
public DateTime SellStartDate { get; set; }
If you're using ASP.NET and MVC, the data annotation attributes attached to the properties in a class are automatically validated. If you are using WPF, Windows Forms, or a console application, you need to manually validate those data annotations. There are three classes built into .NET you use to perform this validation. The ValidationContext, the Validator, and the ValidationResult classes are used to generate the error messages from the data annotations. In the example above, you want these classes to return a message that says the user needs to fill in data into those properties decorated with the [Required] attribute. Open the ProductViewModel.cs file, locate the Validate() method and replace all of the code with the code shown in Listing 4.
Listing 4: Use the ValidationContext and Validator objects to validate properties decorated with data annotations
public List<ValidationMessage> Validate()
{
    List<ValidationMessage> msgs = new();

    // Create instance of ValidationContext object
    ValidationContext context = new(Entity, serviceProvider: null, items: null);
    List<ValidationResult> results = new();

    // Call TryValidateObject() method
    if (!Validator.TryValidateObject(Entity, context, results, true))
    {
        // Get validation results
        foreach (ValidationResult item in results)
        {
            string propName = string.Empty;
            if (item.MemberNames.Any())
            {
                propName = ((string[])item.MemberNames)[0];
            }

            // Build new ValidationMessage object
            ValidationMessage msg = new()
            {
                ErrorMessage = item.ErrorMessage,
                PropertyName = propName
            };

            // Add validation object to list
            msgs.Add(msg);
        }
    }

    return msgs;
}
This code creates an instance of a ValidationContext object passing in the Entity property. Create an instance of list of ValidationResult objects so the TryValidateObject() method can fill in this list with all the ValidationResult objects.
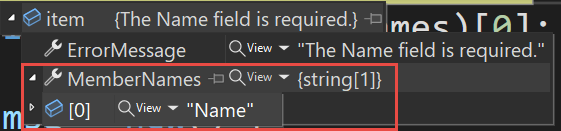
The TryValidateObject() method is responsible for checking all data annotations attached to each property in the entity object. If any validations fail, the appropriate error message, along with the property name, is returned in the results variable. Loop through the results collection and add a new ValidationMessage object to the ValidationMessages property. The ErrorMessage property is filled in with the ErrorMessage property from the current ValidationResult item. The property name is retrieved from the first element of the MemberNames property (see Figure 2) on the ValidationResult item. It's possible for a data annotation to have two properties to which it applies, but for most simple properties, you only need to grab the first property name.
Try It Out
Open the Program.cs file and modify the view model so the Entity object is initialized with an empty string for both the Name and ProductNumber properties as shown in the following code.
ProductViewModel vm = new()
{
    Entity = new()
    {
        ProductID = 1,
        Name = "",
        ProductNumber = ""
    }
};
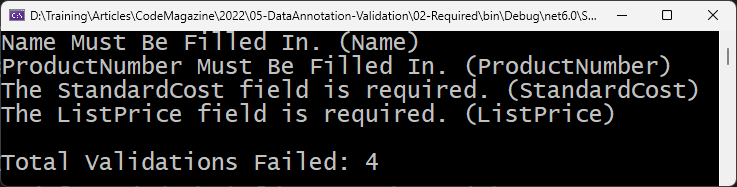
Run the application and you should see the output shown in Figure 3.
![Figure 3: The [Required] attribute creates a string with the property name in the error message.](https://codemag.com/Article/Image/2301031/image3.png)
Add ErrorMessage Property to the [Required] Attribute
If you want to change the default error message generated in the ValidationResult object, fill in the ErrorMessage property on the [Required] attribute. Open the Product.cs file and modify the [Required] attributes above the Name and ProductNumber properties to look like the following.
[Required(ErrorMessage = "{0} Must Be Filled In.")]
public string Name { get; set; }

[Required(ErrorMessage = "{0} Must Be Filled In.")]
public string ProductNumber { get; set; }
Try It Out
Run the application and you should see the Name and ProductNumber property error messages are different from the StandardCost and ListPrice property error messages as shown in Figure 4.
The [DisplayName] Attribute
Displaying the property name to the user is generally not a good idea. Sometimes the property name won't mean much to the user. It's better to use a more readable string, such as the same label displayed on an input form. You can accomplish this by adding the [DisplayName] attribute to any property in your class. Open the Product.cs file and add the [DisplayName] attribute above the properties shown in Listing 5. If the [DisplayName] attribute is attached to a property, the {0} placeholder in the ErrorMessage property uses the Name property from the [DisplayName] attribute instead of the actual property name.
Listing 5: Apply the [DisplayName] attribute to your properties to receive better error messages
[Display(Name = "Product Name")]
[Required(ErrorMessage = "{0} Must Be Filled In.")]
public string Name { get; set; }

[Display(Name = "Product Number")]
[Required(ErrorMessage = "{0} Must Be Filled In.")]
public string ProductNumber { get; set; }

[Display(Name = "Product Color")]
public string Color { get; set; }

[Display(Name = "Cost")]
[Required]
public decimal? StandardCost { get; set; }

[Display(Name = "Price")]
[Required]
public decimal? ListPrice { get; set; }

[Display(Name = "Start Selling Date")]
[Required]
public DateTime SellStartDate { get; set; }

[Display(Name = "End Selling Date")]
public DateTime? SellEndDate { get; set; }

[Display(Name = "Date Discontinued")]
public DateTime? DiscontinuedDate { get; set; }
Try It Out
After applying the [DisplayName] attribute, run the application and you should now see better error messages, as shown in Figure 5. The property name is displayed in the parentheses, so you can clearly see the difference.
![Figure 5: Using the [DisplayName] attribute provides more user-friendly error messages.](https://codemag.com/Article/Image/2301031/image5.png)
Create a Generic Helper Class
Most likely, you're not going to only have a single view model class in your application. Thus, you don't want to write a duplicate of the Validate() method in each of your view models. You can either inherit from a base view model class, or you can create a static class with a method to perform the validation for you. Right mouse-click on the ValidationClasses folder and create a new class named ValidationHelper. Into this new file, replace the code with the code shown in Listing 6.
Listing 6: Create a generic helper class to perform all the validation for your application
#nullable disable

using System.ComponentModel.DataAnnotations;

namespace Samples;

public static class ValidationHelper
{
    public static List<ValidationMessage> Validate<T>(T entity)
    {
        List<ValidationMessage> ret = new();

        ValidationContext context = new(entity, serviceProvider: null, items: null);
        List<ValidationResult> results = new();

        if (!Validator.TryValidateObject(entity, context, results, true))
        {
            foreach (ValidationResult item in results)
            {
                string propName = string.Empty;
                if (item.MemberNames.Any())
                {
                     propName = ((string[])item.MemberNames)[0];
                }

                ValidationMessage msg = new()
                {
                    ErrorMessage = item.ErrorMessage,
                    PropertyName = propName
                };

                ret.Add(msg);
            }
        }

        return ret;
    }
}
The code in Listing 6 is similar to the code in the Validate() method you wrote in the Product class, but the Validate() method in this code is generic and can accept any type. A new List<ValidationMessage> collection is built each time the Validate() method is called, and it's this list that's returned from this method.
Try It Out
Open the ProductViewModel.cs file and replace the code in the Validate() method with the following code.
public List<ValidationMessage> Validate()
{
    // Use Helper Class
    return ValidationHelper.Validate(Entity);
}
Run the application and you should see the same results as previously, but the validation is now happening in the Validate() method in the ValidationHelper class. Each view model class you create from now on just needs this very simple Validate() method. Of course, you can still create a view model base class and move this method into the base class, then have all your view model classes inherit from this base class.
Attributes for Length of Data
There are a few different attributes that you can use to check for the length of string data within your properties. Let's look at the most common data annotations that you're most likely to use.
The [MaxLength] Attribute
The [MaxLength] attribute allows you to specify what the total length the string data within a property should be. If the data within that string property exceeds the specified length, an appropriate error message is returned from the validation. Open the Product.cs file and decorate the ProductNumber and Color properties with the following code.
[Display(Name = "Product Number")]
[Required(ErrorMessage = "{0} Must Be Filled In.")]
[MaxLength(25)]
public string ProductNumber { get; set; }

[Display(Name = "Product Color")]
[MaxLength(15)]
public string Color { get; set; }
Try It Out
Open the Program.cs file and modify the initialization of the properties on the Entity object to look like the following.
ProductViewModel vm = new()
{
    Entity = new()
    {
        ProductID = 1,
        Name = "Product 1",
        ProductNumber = "A very long product name to illustrate the [MaxLength] property.",
        Color = "A very long color name."
    }
};
Run the application and you should see the appropriate error messages displayed for both the ProductNumber and Color properties.
The [MinLength] Attribute
Sometimes you need to ensure a minimum amount of string data is added to a property. For example, the product color shouldn't have any string data that is less than three characters, as there are no one- or two-letter colors. Add a [MinLength] attribute to the Color property in the Product class, as shown in the following code.
[Display(Name = "Product Color")]
[MinLength(3, ErrorMessage = "{0} Must Have {1} Characters or More.")]
[MaxLength(15)]
public string Color { get; set; }
Try It Out
Open the Program.cs file and modify the initialization of the Entity object to look like the following code:
ProductViewModel vm = new()
{
    Entity = new()
    {
        ProductID = 1,
        Name = "Product 1",
        ProductNumber = "PROD001",
        Color = "Re"
    }
};
Run the application and you should see the appropriate error message displayed for the Color property.
The [String Length] Attribute
If you don't want to apply both the [MinLength] and [MaxLength] attributes to a single property, you may use the [StringLength] attribute as it supports both maximum and minimum length properties. When adding the [StringLength] attribute, the first parameter is the maximum length, and then you can specify the MimimumLength as either the second parameter or as a named parameter, as I have done in the following code. Add the [StringLength] attribute above the Name property in the Product class.
[Display(Name = "Product Name")]
[Required(ErrorMessage = "{0} Must Be Filled In.")]
[StringLength(50, MinimumLength = 4, ErrorMessage = "{0} Can Only Have Between {2} and {1} Characters.")]
public string Name { get; set; }
Try It Out
Open the Program.cs file and modify the initialization of the Entity object to look like the following code.
ProductViewModel vm = new()
{
    Entity = new()
    {
        ProductID = 1,
        Name = "A"
    }
};
Run the application and you should see the appropriate error message displayed for the Name property. If you want to ensure the maximum length of the Name property also works, try setting the Name property to the following and then run the program again.
Name = "A very long product name used to illustrate [StringLength] attribute."
The Range Validator
If you have decimal or int properties in your class, you can use the [Range] attribute to check for a minimum and a maximum value that can be entered into those numbers. You may also use a DateTime with the [Range] attribute, but you need to add an additional parameter.
Use the [Range] Attribute with Numeric Values
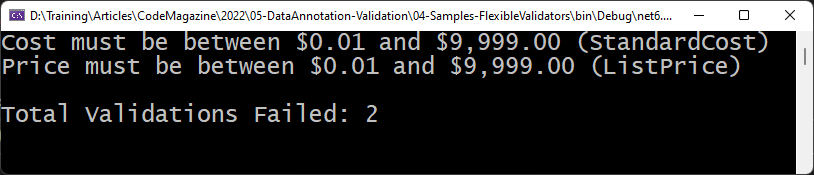
In the Product class, you have the StandardCost and the ListPrice properties that you should apply a [Range] attribute to. You don't want a cost or a price to be less than zero dollars. Open the Product.cs file and locate the StandardCost and ListPrice properties and add the [Range] attribute as shown below. Be sure to include the ErrorMessage property so you can format the cost as currency.
[Display(Name = "Cost")]
[Required]
[Range(0.01, 9999, ErrorMessage = "{0} must be between {1:c} and {2:c}")]
public decimal? StandardCost { get; set; }

[Display(Name = "Price")]
[Required]
[Range(0.01, 9999, ErrorMessage = "{0} must be between {1:c} and {2:c}")]
public decimal? ListPrice { get; set; }
Try It Out
Open the Program.cs file and modify the initialization of the Entity object to look like the following code.
ProductViewModel vm = new()
{
    Entity = new()
    {
        ProductID = 1,
        Name = "A New Product",
        ProductNumber = "PROD001",
        Color = "Black",
        StandardCost = 0,
        ListPrice = 10000,
        SellStartDate = DateTime.Now,
        SellEndDate = DateTime.Now.AddDays(+365)
    }
};
Run the application and you should see error messages that look like Figure 6.
Use the [Range] Attributes with DateTime
When using the [Range] attribute with numbers, you specify the minimum and maximum values as the first and the second parameters. When you wish to check a property for a date range, you must pass to the first parameter a typeof(DateTime) so the [Range] attribute class knows to check for a DateTime range. Open the Product.cs file and add a [Range] attribute to the SellStartDate and the SellEndDate properties.
[Display(Name = "Start Selling Date")]
[Required]
[Range(typeof(DateTime), "1/1/2000", "12/31/2030", ErrorMessage = "{0} must be between {1:d} and {2:d}")]
public DateTime SellStartDate { get; set; }

[Display(Name = "End Selling Date")]
[Range(typeof(DateTime), "1/1/2000", "12/31/2030", ErrorMessage = "{0} must be between {1:d} and {2:d}")]
public DateTime? SellEndDate { get; set; }
Try It Out
Open the Program.cs file and modify the initialization of the Entity object to look like the following code.
ProductViewModel vm = new()
{
    Entity = new()
    {
        ProductID = 1,
        Name = "A New Product",
        ProductNumber = "PROD001",
        Color = "Black",
        StandardCost = 1,
        ListPrice = 10,
        SellStartDate =  Convert.ToDateTime("1/1/1999"),
        SellEndDate = Convert.ToDateTime("1/1/2031")
    }
};
Run the application and you should see error messages that look like Figure 7.
![Figure 7: The [Range] attribute can be used with DateTime values as well as numeric values](https://codemag.com/Article/Image/2301031/image7.png)
Regular Expression and Compare Validators
In some classes, you may need the user to adhere to a specific format for the data. For example, phone numbers, social security numbers, etc. The [RegularExpression] attribute can enforce the formatting of data. You need to understand regular expressions to use this attribute, but luckily, there are many resources on the internet to help you with regular expressions. I like www.regexlib.com to look up all sorts of regular expressions. To try out a regular expression, right mouse-click on the EntityClasses folder and add a new class named User that looks like the following code.
#nullable disable

using System.ComponentModel.DataAnnotations;

namespace Samples;

public partial class User
{
    public int UserId { get; set; }
    public string LoginId { get; set; }
    public string Password { get; set; }
    public string ConfirmPassword { get; set; }
    public string EmailAddress { get; set; }
    public string Phone { get; set; }
}
Right mouse-click on the ViewModelClasses folder and add a new class named UserViewModel. This class is exactly like the ProductViewModel class in that encapsulates the User class as a property named Entity and has a Validate() method. Enter the code shown below into the UserViewModel.cs file.
namespace Samples;

public class UserViewModel
{
    public UserViewModel()
    {
        Entity = new();
    }

    public User Entity { get; set; }

    public List<ValidationMessage> Validate()
    {
        // Use Helper Class
        return ValidationHelper.Validate(Entity);
    }
}
The [RegularExpression] Attribute
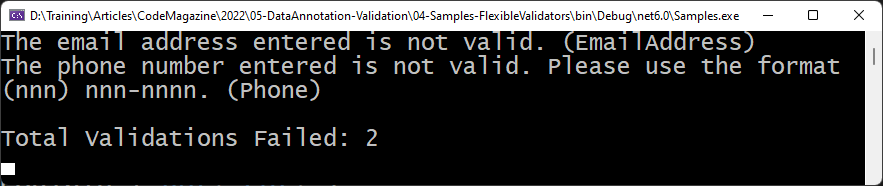
Let's add a [RegularExpression] attribute to both the EmailAddress and the Phone properties in the User class. When adding the regular expression, don't break them across two lines. I had to break them due to formatting limitations of this printed magazine. I'd highly recommend you include the ErrorMessage property, otherwise, it spits out the regular expression to the user.
[RegularExpression("^\\w+@[a-zA-Z_]+?\\.[a - zA - Z]{2, 3}$", ErrorMessage = "The email address entered is not valid.")]
public string EmailAddress { get; set; }

[RegularExpression("((\\(\\d{3}\\) ?)|(\\d{3}-))?\\d{3}-\\d { 4}", ErrorMessage = "The phone number entered is not valid. Please use the format (nnn) nnn-nnnn")]
public string Phone { get; set; }
Try It Out
Open the Program.cs file and create a new instance of the UserViewModel class and initialize the Entity property with the values shown in the code below so you can test the regular expressions.
UserViewModel vm = new()
{
    Entity = new()
    {
        UserId = 1,
        LoginId = "JoeSmith",
        Password = "Joe!Smith@2022",
        EmailAddress = "test!test.com",
        Phone = "xxx-xxx-xxxx"
    }
};
Run the application and you should see the error messages, as shown in Figure 8.
The [Compare] Attribute
A common business rule to enforce is when a user is setting up a new account and they need to put in a new password. It's best to ask them to input that password two times to ensure that they don't misspell the password. In the User class, there's both Password and ConfirmPassword properties. The [Compare] attribute lets you check to ensure that the data contained in both properties is an exact match. Apply the [Compare] attribute to one of the properties and pass in the name of the other property to compare the data to as shown in the following code. It's a best practice to use the nameof() operator so you can rename the property using the Visual Studio rename menu and it will get refactored correctly.
[Compare(nameof(ConfirmPassword))]
public string Password { get; set; }
Try It Out
Open the Program.cs file and modify the initialization of the Entity object to look like the following code. Notice the two different values within the Password and the ConfirmPassword properties.
UserViewModel vm = new()
{
  Entity = new()
  {
    UserId = 1,
    LoginId = "JoeSmith",
    Password = "JoeSmith@2022",
    ConfirmPassword = "JoeSmith",
    EmailAddress = "JoeSmith@test.com",
    Phone = "(999) 999-9999",
  }
};
Run the application and the error message you get tells you the names of the properties that don't match, as shown in Figure 9.
![Figure 9: The [Compare] attribute compares the data between two properties.](https://codemag.com/Article/Image/2301031/image9.png)
Standard Business Rule Validations
Microsoft realizes that working with regular expressions isn't always the easiest thing to do. They therefore added many attributes to help you enforce the most common business rules such as email, phone, URL, and credit cards. Open the User.cs file and remove the two [RegularExpression] attributes you added to the EmailAddress and Phone properties in the last section.
The [EmailAddress] Attribute
Apply the [EmailAddress] attribute to the EmailAddress property, as shown in the following code.
[EmailAddress]
public string EmailAddress { get; set; }
Apply the [Phone] attribute to the Phone property as shown in the following code.
[Phone]
public string Phone { get; set; }
Try It Out
Open the Program.cs file and modify the initialization of the Entity object to look like the following code. Notice that there's an invalid format for both the EmailAddress and Phone properties.
UserViewModel vm = new()
{
    Entity = new()
    {
        UserId = 1,
        LoginId = "JoeSmith",
        Password = "Joe!Smith@2022",
        ConfirmPassword = "Joe!Smith@2022",
        EmailAddress = " Joe!Smith.2022",
        Phone = "12.34.asdf"
    }
};
Run the application and you should see the appropriate error messages for both the email address and phone number properties.
The [Url] Attribute
If you have a URL property in your class, you can use the [Url] attribute to ensure the data contained within that URL is valid. Be aware that the URL entered into your property must start with http://, https://, or ftp://. If you don't want these prefixes, you won't be able to use the [Url] attribute. Open the Product.cs file and add a ProductUrl property and add a [Url] data annotation to it as shown below.
[Display(Name = "Product URL")]
[Url]
public string ProductUrl { get; set; }
Try It Out
Open the Program.cs file and create a new ProductViewModel object and instantiate the Entity property, as shown in the following code.
ProductViewModel vm = new()
{
    Entity = new()
    {
        ProductID = 1,
        Name = "A New Product",
        Color = "Black",
        StandardCost = 5,
        ListPrice = 10,
        ProductUrl = "asdf.test"
    }
};
Run the application and you should see the error message shown in Figure 10.
![Figure 10: The [Url] attribute must contain a valid internet prefix to be considered valid.](https://codemag.com/Article/Image/2301031/image10.png)
The [CreditCard] Attribute
Another common business rule is to check for valid credit card data entered by a user. To try this out, right mouse-click on the EntityClasses folder and add a new class named CreditCard. In the new CreditCard class add the code shown in Listing 7. Notice the use of the [CreditCard] attribute decorating the CardNumber property.
Listing 7: Create a CreditCard class to test the [CreditCard] annotation
#nullable disable

using System.ComponentModel.DataAnnotations;

namespace Samples;

public partial class CreditCard
{
    public string CardType { get; set; }
    public string NameOnCard { get; set; }

    [CreditCard()]
    public string CardNumber { get; set; }

    public string SecurityCode { get; set; }
    public int ExpMonth { get; set; }
    public int ExpYear { get; set; }
    public string BillingPostalCode { get; set; }
}
Right mouse-click on the ViewModelClasses folder and add a new class named CreditCardViewModel, as shown in the following code.
namespace Samples;
public class CreditCardViewModel
{
    public CreditCardViewModel()
    {
        Entity = new();
    }

    public CreditCard Entity { get; set; }

    public List<ValidationMessage> Validate()
    {
        // Use Helper Class
        return ValidationHelper.Validate(Entity);
    }
}
Try It Out
Open the Program.cs file and create a new instance of the CreditCardViewModel class and set the appropriate properties of the Entity property, as shown in the following code.
CreditCardViewModel vm = new()
{
    Entity = new()
    {
        CardType = "Visa",
        CardNumber = "12 13 123 1234",
        NameOnCard = "Joe Smith",
        BillingPostalCode = "99999",
        ExpMonth = 01,
        ExpYear = 2026,
        SecurityCode = "000"
    }
};
Run the application and you should see an error message informing you that the CardNumber property is not a valid credit card number.
Create Custom Validators Using the [CustomValidation] Attribute
There's no way that Microsoft can anticipate all the needs for business rule validation. They've provided a couple of different methods to create custom validation using attributes. The first method is to use the [CustomValidation] attribute. This attribute accepts two parameters, the first parameter is the type of a class in which you write a static method that returns a ValidationResult object. The second parameter is the name of that static method. Right mouse-click on the ValidationClasses folder and add a new class to your project named WeekdayOnlyValidator and to this new file add the following code:
#nullable disable

using System.ComponentModel.DataAnnotations;

namespace Samples
{
    public class WeekdayOnlyValidator
    {
        public static ValidationResult Validate(DateTime date)
        {
            return date.DayOfWeek == DayOfWeek.Saturday || date.DayOfWeek == DayOfWeek.Sunday ? new ValidationResult("Invalid date because it falls on a weekend"): ValidationResult.Success;
        }
    }
}
The Validate() method checks the date passed in to ensure that it doesn't fall on a Saturday or a Sunday. If the date does fall on a weekend, return a ValidationResult object with the error message inside. Otherwise, return a ValidationResult.Success from this method. Right mouse-click on the EntityClasses folder and add a class named Customer. Add the [CustomValidation] attribute to decorate an EntryDate property in the class as shown below.
using System.ComponentModel.DataAnnotations;

namespace Samples;

public class Customer
{
    [CustomValidation(typeof(WeekdayOnlyValidator), nameof(WeekdayOnlyValidator.Validate))]
    public DateTime EntryDate { get; set; }
}
Right mouse-click on the ViewModelClasses folder and add a new class named CustomerViewModel. Add the code shown in the code snippet below to this new file.
namespace Samples;
public class CustomerViewModel {
    public CustomerViewModel() {
        Entity = new();
    }
    public Customer Entity { get; set; }
    public List<ValidationMessage> Validate() {
        // Use Helper Class
        return ValidationHelper.Validate(Entity);
    }
}
Try It Out
Open the Program.cs file and add a new instantiation of the CustomerViewModel class that sets the EntryDate property of the Entity object to an invalid date.
CustomerViewModel vm = new()
{
    Entity = new()
    {
        EntryDate = DateTime.Parse("10/1/2022")
    }
};
Run this code and because the date 10/1/2022 falls on a weekend, the validation message “Invalid date because it falls on a weekend.” should appear on your console window.
Create Custom Validators by Inheriting from the ValidationAttribute Class
To me, a better method for performing validation is to inherit from the ValidationAttribute class rather than using the [CustomValidation] attribute. The main reason is that you can name your custom validation class something that's distinct, and easy to read and understand.
There's a common design pattern you use when creating your own custom validation attribute by inheriting from the ValidationAttribute class. The following list describes the things you must do in your validation class.
- Name your class to describe what the validation does.
- Pass to the constructor any parameter(s).
- Override the
IsValid()method. - Validate the data entered is correct.
- Return a
ValidationResultobject. - Add an error message if validation is not successful.
- Return
ValidationResult.Successif validation is successful.
Is Date Greater Than Minimum Date
A good use of a custom validation attribute is to determine if a date entered by a user is greater than or equal to a specific date. Below is an example of how you might use this attribute to enforce this business rule.
[DateMinimum("9/1/2022")]
public DateTime? DiscontinuedDate { get; set; }
Pass to this custom attribute the minimum date that the data entered by the user should be. If the date entered is this date or greater, then the data is valid. Otherwise, an error message is returned from this attribute, and you can display that message to the user.
Right mouse-click on the ValidationClasses folder and create a new class named DateMinimumAttribute. To this new file, add the code shown in Listing 8. The first thing you must do is to inherit your class from the ValidationAttribute class. The constructor needs to receive the string that represents the minimum date. You should then convert that string to a DateTime and store it into a read-only private field named _minDate. I'm not performing an error checking to ensure that the date passed is valid, but in production code, you should add error checking.
Listing 8: Create a DateMinimumAttribute class to test for a valid minimum date
#nullable disable

using System.ComponentModel.DataAnnotations;

namespace Samples;

public class DateMinimumAttribute: ValidationAttribute
{
    public DateMinimumAttribute(string minDate)
    {
        _minDate = Convert.ToDateTime(minDate);
    }

    private readonly DateTime _minDate;

    protected override ValidationResult IsValid(object value, ValidationContext vc)
    {
          if (value != null)
          {
              // Get the value entered
              DateTime dateEntered = (DateTime)value;

             // Get display name for validation message
             string displayName = vc.DisplayName;

             // If the date entered is less than or equal to the minimum date set return an error
             if (dateEntered <= _minDate)
             {
                 // Check if ErrorMessage is filled in
                 if (string.IsNullOrEmpty(ErrorMessage))
                 {
                     ErrorMessage = $"{displayName} must be greater than or equal to '{_minDate:MM/dd/yyyy}'.";
                 }

                 return new ValidationResult(ErrorMessage, new[] { vc.MemberName });
             }
          }

          return ValidationResult.Success;
    }
}
Override the IsValid() method to write the code you need to enforce your business rule in your validation class. In this case, I verify that the value passed in is not equal to null. If it isn't null, convert the value entered into the property to a DateTime object. Next, get the name of the property, or the value specified in the [DisplayName] property, so you can use this if you need to return an error message.
Check to see if the date entered is less than or equal to the _minDate field. If it is, return a new ValidationResult object. If the ErrorMessage property is not filled in, create a message to display. The first parameter to the ValidationResult constructor is the error message you wish to display. For the second parameter, create a new string array and fill in the MemberName from the ValidationContext. This MemberName property is the actual property name that this attribute is decorating. If there's no validation error, return a ValidationResult.Success from this attribute class to signify that the data was valid.
Try It Out
Open the Product.cs file and add the DataMinimum attribute to the DiscontinuedDate property, as shown below.
[DateMinimum("9/1/2022")]
Open the Program.cs file and create an instance of the ProductViewModel class and initialize the Entity property to the following code. Notice that the DiscontinuedDate property is set to a date less than the minimum date specified in the [DateMinimum] attribute.
ProductViewModel vm = new()
{
    Entity = new()
    {
        ProductID = 1,
        Name = "A New Product",
        ProductNumber = "PROD001",
        Color = "Red",
        StandardCost = 5,
        ListPrice = 12,
        SellStartDate = DateTime.Today,
        SellEndDate = DateTime.Today.AddYears(+5),
        DiscontinuedDate = Convert.ToDateTime("1/1/2020")
    }
};
Run the application and view the error message you get back from the DateMinimumAttribute class.
Is Date Less Than Maximum Date
If you want to try out another custom attribute, copy the DateMinimumAttribute.cs file to a new file in the ValidationClasses folder named DateMaximumAttribute.cs. Open this new file and change the name of the class to DateMaximumAttribute. Rename the _minDate field as _maxDate. Change the comparison operator from a less than or equal sign (<=) to a greater than or equal to sign (>=). Modify the error message to display “less than” rather than “greater than.” You now have another validation attribute that you can use to enforce business rules.
Try It Out
Open the Product.cs file and add to the SellEndDate property the [DateMaximum] attribute, as shown below.
[DateMaximum("12/31/2030")]
Open the Program.cs file and initialize the Entity property within the ProductViewModel class to the following code. Notice the SellEndDate property is set to a date greater than the maximum date specified in the [DateMaximum] attribute.
ProductViewModel vm = new()
{
    Entity = new()
    {
        ProductID = 1,
        Name = "A New Product",
        ProductNumber = "PROD001",
        Color = "Red",
        StandardCost = 5,
        ListPrice = 12,
        SellStartDate = DateTime.Today,
        SellEndDate = DateTime.Today.AddYears(+20),
        DiscontinuedDate = Convert.ToDateTime("12/15/2022")
    }
};
Run the application and view the error message you get back from the DateMaximumAttribute class.
Custom Validator: Dynamic Date Range by Year
The problem with the [Range] attribute when working with dates is that the minimum and maximum dates you enter must be hard-coded strings. What if you want to make the range a little more dynamic? For example, you might want to specify the minimum year the user may enter is two years prior to today's date. And the maximum year the user may enter is five years after today's date. To accomplish this, create a [DateYearRange] attribute class and pass in two integer values that specify the years prior and after that are valid for the date entered.
[DateYearRange(-2, 5)]
public DateTime SellStartDate { get; set; }
Right mouse-click on the ValidationClasses folder and add a new class named DateYearRangeAttribute. Into this file add the code shown in Listing 9. In the constructor, you accept the integer values and use those to calculate the two private read-only fields: _minDate and _maxDate.
Listing 9: Create a DateYearRangeAttribute class to test for a valid date within two date ranges by year
#nullable disable

using System.ComponentModel.DataAnnotations;

namespace Samples;

public class DateYearRangeAttribute: ValidationAttribute
{
    public DateYearRangeAttribute(int yearsPrior, int yearsAfter)
    {
        _minDate = DateTime.Now.AddYears(yearsPrior);
        _maxDate = DateTime.Now.AddYears(yearsAfter);
    }

    private readonly DateTime _minDate;
    private readonly DateTime _maxDate;

    protected override ValidationResult IsValid(object value, ValidationContext vc)
    {
        if (value != null)
        {
            // Get the value entered
            var dateEntered = (DateTime)value;

            // Get display name for validation message
            string displayName = vc.DisplayName;

            // Is date entered within the date range
            if (dateEntered < _minDate || dateEntered > _maxDate)
            {
                // Check if ErrorMessage is filled in
                if (string.IsNullOrEmpty(ErrorMessage))
                {
                    ErrorMessage = $"{displayName} must be between '{_minDate:MM/dd/yyyy}' and '{_maxDate:MM/dd/yyyy}'.";
                }

                return new ValidationResult(ErrorMessage, new[] { vc.MemberName });
            }
        }

        return ValidationResult.Success;
    }
}
Within the IsValid() method, retrieve the value entered from the user, then check to see if that date entered is less than the _minDate field or if it's greater than the _maxDate field. If either of these conditions fail, return a ValidationResult object with the error message telling the user the date range their input value must fall within.
Try It Out
Open the Product.cs file and add to the SellStartDate property the [DateYearRange] attribute, as shown below.
[DateYearRange(-2, 5)]
Open the Program.cs file and initialize the Entity property within the ProductViewModel class to the following code. Notice that the SellStartDate property is set to six years prior to today's date. This will cause the [DateYearRange] attribute to fail the validation.
ProductViewModel vm = new()
{
    Entity = new()
    {
        ProductID = 1,
        Name = "A New Product",
        ProductNumber = "PROD001",
        Color = "Red",
        StandardCost = 5,
        ListPrice = 12,
        SellStartDate = DateTime.Today.AddYears(-6),
        SellEndDate = DateTime.Today,
        DiscontinuedDate = DateTime.Today
    }
};
Run the application and view the error message you get back from the DateYearRange class.
Custom Validator: Is One Date Property Less Than Another
Earlier in this article, you learned about the [Compare] attribute, which allows you to check if the data in one property is equal to the data in another. Let's create a validation attribute that does something similar but checks to see if one date value is less than another value. For example, you might want check to see if the SellStartDate is less than the SellEndDate property in the Product class.
Right mouse-click on the ValidationClasses folder and add a class named CompareDateLessThanAttribute.cs. Replace all the code in this file with the code shown in Listing 10. The constructor accepts the name of the property to compare to as a string value. Place this value into a private read-only field named _propToCompare. Retrieve the value entered by the user from the value parameter passed in and convert it to a DateTime type. Use the GetProperty() method on the ValidationContext.ObjectType object to retrieve the actual address of where the property to compare to is located in memory. Once you have the PropertyInfo object call the GetValue() method to get the value in the property to compare to. If that value is not null, use that value to perform the comparison to the current value so you know whether to return an error message.
Listing 10: Create a CompareDateLessThanAttribute class to test for one date must be less than another date
#nullable disable

using System.ComponentModel.DataAnnotations;
using System.Reflection;

namespace Samples;

public class CompareDateLessThanAttribute: ValidationAttribute
{
    public CompareDateLessThanAttribute(string propToCompare)
    {
        _propToCompare = propToCompare;
    }

    private readonly string _propToCompare;

    protected override ValidationResult IsValid(object value, ValidationContext vc)
    {
        if (value != null)
        {
            // Get value entered
            DateTime currentValue = (DateTime)value;

            // Get PropertyInfo for comparison property
            PropertyInfo pinfo = vc.ObjectType.GetProperty(_propToCompare);

            // Ensure the comparison property value is not null
            if (pinfo.GetValue(vc.ObjectInstance) != null)
            {
                // Get value for comparison property
                DateTime comparisonValue = (DateTime)pinfo.GetValue(vc.ObjectInstance);

                // Perform the comparison
                if (currentValue > comparisonValue)
                {
                    return new ValidationResult(ErrorMessage, new[] { vc.MemberName });
                }
            }
        }

        return ValidationResult.Success;
    }
}
Try It Out
Open the Product.cs file and add to the SellStartDate property the [CompareDateLessThan] attribute, as shown below. The first parameter to the attribute is the name of the property you want to compare it to.
[CompareDateLessThan(nameof(SellEndDate), ErrorMessage = "Start Selling Date must be less than the End Selling Date.")]
Open the Program.cs file and initialize the Entity property within the ProductViewModel class to the following code. Notice that the SellEndDate property is set to one day prior to the SellStartDate. This causes the [CompareDateLessThan] attribute to fail the validation.
ProductViewModel vm = new()
{
    Entity = new()
    {
        ProductID = 1,
        Name = "A New Product",
        ProductNumber = "PROD001",
        Color = "Red",
        StandardCost = 5,
        ListPrice = 12,
        SellStartDate = DateTime.Today,
        SellEndDate = DateTime.Today.AddDays(-1),
        DiscontinuedDate = Convert.ToDateTime("1/1/2023")
    }
};
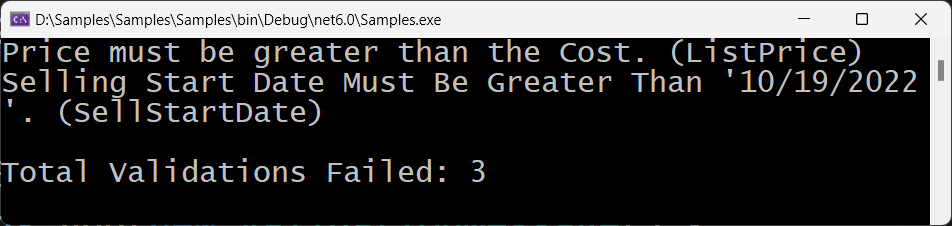
Run the application and view the error message you get back from the CompareDateLessThan class.
Custom Validator: Is One Numeric Property Less Than Another
If you want to check if a numeric property is less than another numeric property, copy the CompareDateLessThanAttribute.cs file to a new file named CompareDecimalLessThanAttribute.cs. Open this new file and change the name of the class to CompareDecimalLessThanAttribute. Change all instances of DateTime to decimal. You now have another validation attribute that you can use to ensure that one decimal property is less than another.
Try It Out
Open the Product.cs file and add to the StandardCost property the [CompareDecimalLessThan] attribute, as shown in the code below. The first parameter to the attribute is the name of the property you want to compare it to.
[CompareDecimalLessThan(nameof(ListPrice), ErrorMessage = "Cost must be less than the Price.")]
Open the Program.cs file and initialize the Entity property within the ProductViewModel class to the following code. Notice that the ListPrice property is set to a value less than the value in the StandardCost property. This causes the [CompareDecimalLessThan] attribute to fail the validation.
ProductViewModel vm = new()
{
    Entity = new()
    {
        ProductID = 1,
        Name = "A New Product",
        ProductNumber = "PROD001",
        Color = "Red",
        StandardCost = 5,
        ListPrice = 2,
        SellStartDate = DateTime.Today,
        SellEndDate = DateTime.Today.AddDays(+1),
        DiscontinuedDate = Convert.ToDateTime("1/1/2023")
    }
};
Run the application and view the error message you get back from the CompareDecimalLessThan class.
Implement the IValidatableObject Interface
If you have business rules that are very specific to a class, you may not want to inherit from the ValidationAttribute. Instead, you might want to keep the code that performs the validation within the class itself. To do this, implement the IValidatableObject interface on your class. Right mouse-click on the EntityClasses folder and add a new class named Employee. Replace all the code in this new file with the code shown in Listing 11.
Listing 11: Instead of using data annotations, you may implement the IValidatable interface to check properties on your entity classes
#nullable disable

using System.ComponentModel.DataAnnotations;

namespace Samples;

public partial class Employee : IValidatableObject
{
    public int EmployeeId { get; set; }
    public string FirstName { get; set; }
    public string LastName { get; set; }
    public decimal? Salary { get; set; }
    public DateTime StartDate { get; set; }
    public DateTime? TerminationDate { get; set; }

    public override string ToString()
    {
        return $"{LastName}, {FirstName}";
    }

    public IEnumerable<ValidationResult>Validate(ValidationContext vc)
    {
        List<ValidationResult> ret = new();

        if (FirstName.Length < 2)
        {
            ret.Add(new ValidationResult("First Name must have at least 2 characters.", new[] { nameof(FirstName) }));
        }
        if (LastName.Length < 3)
        {
            ret.Add(new ValidationResult("Last Name must have at least 3 characters.", new[] { nameof(LastName) }));
        }
        if (Salary < 1)
        {
            ret.Add(new ValidationResult("Salary must be greater than $1.00.", new[] { nameof(Salary) }));
        }

        string minStartDate = DateTime.Now.AddDays(-7).ToString("D");
        if (StartDate < DateTime.Parse(minStartDate))
        {
            ret.Add(new ValidationResult($"Start Date must be later than {minStartDate}.", new[] { nameof(StartDate) }));
        }
        if (TerminationDate.HasValue && TerminationDate < StartDate)
        {
            ret.Add(new ValidationResult($"Termination Date must be later than {StartDate}.", new[] { nameof(TerminationDate) }));
        }

        return ret;
    }
}
This Employee class defines several properties and implements the Validate() method. Within the Validate() method is where the business rules are implemented. This is a simple example, and these rules could have been implemented using data annotations, but I wanted to show you how this method works.
One thing to be aware of is that if you have both data annotations and this interface, the [Required] data annotations are validated first. Once all the [Required] annotations are resolved, other data annotations are then validated. The Validate() method on your class is not called until there are no ValidationResult objects passed back from the TryValidateObject() method in the ValidationHelper class. Then, and only then, is the Validate() method on your class called.
Right mouse-click on the ViewModelClasses folder and add a new class named EmployeeViewModel. This class contains an Entity property that's of the type Employee and has a Validate() method used to check the business rules of the Employee object.
namespace Samples;
public class EmployeeViewModel
{
    public EmployeeViewModel()
    {
        Entity = new();
    }
    public Employee Entity { get; set; }
    public List<ValidationMessage> Validate()
    {
        // Use Helper Class
        return ValidationHelper.Validate(Entity);
    }
}
Try It Out
Open the Program.cs file and instantiate the EmployeeViewModel class and set the appropriate properties on the Entity object as shown in the following code.
EmployeeViewModel vm = new()
{
    Entity = new()
    {
        EmployeeId = 1,
        FirstName = "A",
        LastName = "AA",
        Salary = 0.01m,
        StartDate = DateTime.Now.AddDays(-10),
        TerminationDate = DateTime.Now.AddDays(-11)
    }
};
Run the application and view the validation messages.
Localizing Error Messages
If you need to work with multiple languages such as English, Spanish, German, etc. You should not hard-code error messages in the data annotation attributes. Instead, move them to a resource file and use the ErrorMessageResourceName property on the data annotation instead of the ErrorMessage property. You also need to include the ErrorMessageResourceType property to specify the namespace and class where the resources are compiled. Let's look at how to set up resources, add both English and Spanish error messages, and connect those messages to data annotations.
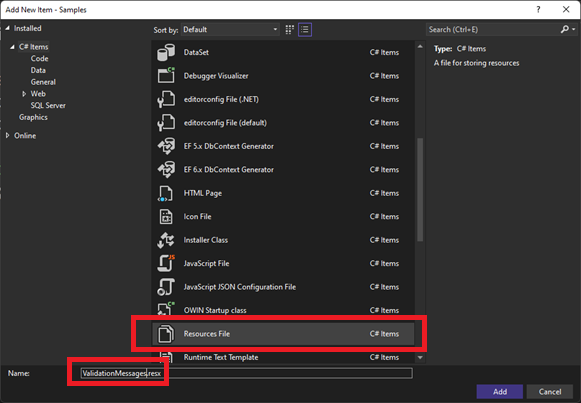
Create Resources
Add one resource file per language that you wish to support in your application. Right mouse-click on your project and create a new folder named Resources. Right mouse-click on the Resources folder and select Add > New Item from the menu. Locate the Resources File template and set the name to ValidationMessages.resx. Click the Add button to add the new resource file to the project, as shown in Figure 11.
After adding the resources file, you need to change the Access Modifier to Public, as shown in Figure 12. Once you set this modifier, a ValidationMessages class is generated by Visual Studio so you can access each resource as a property of that class.
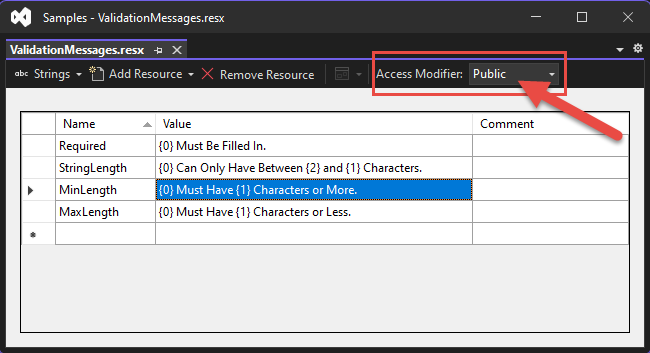
Table 2 is a list of the resources you need to add to the ValidationMessages file. Each of these resources correspond to the similarly named data annotation attribute. These resource names show up as properties in the ValidateMessage class.
Create a Spanish Version of Error Messages
You're going to learn how to assign the resource names to the data annotation attributes in your Product class, but before you do that, let's create the Spanish version of these error messages. Right mouse-click on the Resources folder and select Add > New Item from the menu. Locate the Resources File template and set the name to ValidationMessages.es-MX.resx. Click the Add button to add the new resource file to the project. Add the same names as you did in the first resource file you added. The Value property is what changes for each language. In Figure 13, you see the values you should enter for the Spanish error messages. Please excuse any bad Spanish grammar as I used “Google Translate.”
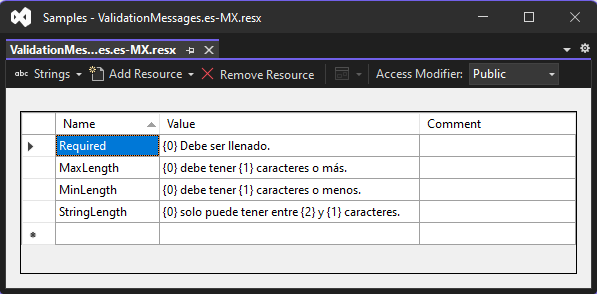
Why did you add the suffix of “.es-MX” on this file, but didn't use one on the other resource file? The resource file selected is based on two things; the culture running on the computer and the culture set on the current thread. If the two cultures match, the resource file without a suffix is chosen, otherwise the resource file that matches the culture on the current thread is selected.
Modify Product Class to Work with Resources
Let's now modify the Product class to use the values from the resource files instead of the hard-coded messages you've used throughout this article. Open the Product.cs file and add a Using statement at the top of this file. This Using statement is the namespace where the ValidationMessages class has been generated.
using Samples.Resources;
Locate the Name property and modify the [Required] and [StringLength] attributes. Remove the ErrorMessage property from each of these attributes and add the ErrorMessageResourceName and ErrorMessageResourceType properties, as shown in the following code:
[Required(ErrorMessageResourceName = nameof(ValidationMessages.Required), ErrorMessageResourceType = typeof(ValidationMessages))]
[StringLength(50, MinimumLength = 4, ErrorMessageResourceName = nameof(ValidationMessages.StringLength), ErrorMessageResourceType = typeof(ValidationMessages))]
public string Name { get; set; }
Next, modify the [MaxLength] attribute on the ProductNumber property to look like the following code:
[MaxLength(25, ErrorMessageResourceName = nameof(ValidationMessages.MaxLength), ErrorMessageResourceType = typeof(ValidationMessages))]
public string ProductNumber { get; set; }
Finally, modify the [MinLength] property on the Color property to look like the following:
[MinLength(3, ErrorMessageResourceName = nameof(ValidationMessages.MinLength), ErrorMessageResourceType = typeof(ValidationMessages))]
public string Color { get; set; }
Try It Out
Open the Program.cs file and instantiate the ProductViewModel class to look like the following:
ProductViewModel vm = new()
{
    Entity = new()
    {
        ProductID = 1,
        Name = "",
        ProductNumber = "A very long product number to show[MaxLength] Attribute",
        Color = "it",
        StandardCost = 2,
        ListPrice = 5,
        SellStartDate = DateTime.Today,
        SellEndDate = DateTime.Today.AddDays(+1),
        DiscontinuedDate = Convert.ToDateTime("1/1/2023")
    }
};
Run the application to see the English language messages from the resource file appear.
Modify the Culture on the Current Thread
Open the Program.cs file and add a using statement at the top of this file.
using System.Globalization;
Add a new variable named culture to set the current language.
string culture = "en-US";
Just before the call to the vm.Validate() method, set the current UI culture to the string contained in the culture variable. The culture set on the CurrentUICulture thread is the one used to determine which resource file to use.
Thread.CurrentThread.CurrentUICulture = new CultureInfo(culture);
Run the application again and you should see the same English language messages appear. After viewing the error messages, modify the culture variable to “es-MX” as shown below:
string culture = "es-MX";
Run the application again to see the Spanish language messages appear.
Modify the User Class to Work with Resources
In the User class, you added the [EmailAddress] and the [Phone] attributes. You should add the appropriate error messages for those two attributes to each of your resource files. Open the ValidationMessages.resx file and add the name/value pairs shown in Table 3.
Open the ValidationMessages.es-MX.resx file and add the name/value pairs shown in Table 4.
Open the User.cs file and add a using statement at the top of the file to bring in the namespace where the ValidationMessages class is located.
using Samples.Resources;
Add a [Required] attribute to the LoginId property to look like the following code:
[Required(ErrorMessageResourceName = nameof(ValidationMessages.Required), ErrorMessageResourceType = typeof(ValidationMessages))]
public string LoginId { get; set; }
Modify the [EmailAddress] attribute on the EmailAddress property to look like the code shown below:
[EmailAddress(ErrorMessageResourceName = nameof(ValidationMessages.Email), ErrorMessageResourceType = typeof(ValidationMessages))]
public string EmailAddress { get; set; }
Modify the [Phone] attribute on the Phone property as shown in the code below:
[Phone(ErrorMessageResourceName = nameof(ValidationMessages.Phone), ErrorMessageResourceType = typeof(ValidationMessages))]
public string Phone { get; set; }
Try It Out
Open the Program.cs file and instantiate the UserViewModel to look like the following:
UserViewModel vm = new()
{
    Entity = new()
    {
        UserId = 1,
        LoginId = "",
        Password = "Joe!Smith@2022",
        ConfirmPassword = "Joe!Smith@2022",
        EmailAddress = "test!test.com",
        Phone = "asfsadf"
    }
};
Be sure to set the culture variable back to “en-US” and run the application to see the English language messages from the resource file appear. After running the English version, change the culture variable to “es-MX” and run the application to see the Spanish language version of the error messages.
Summary
In this article, you learned about many of the data annotations available in .NET. There are more annotations than what I covered in this article, but I covered the ones you're going to use most often. There's great functionality that you get out of the data annotations available from Microsoft, but if they don't cover your needs, it's very easy to build your own validation attributes. The custom attributes illustrated in this article should provide you with a good start. Take advantage of resource files, even if you're not doing multilingual applications. They're great for ensuring that all your error messages stay consistent from one class to another.
Table 1: The common properties available to all data annotation attribute classes
| Property Name | Description |
|---|---|
| ErrorMessage | Get/Set the error message format string |
| ErrorMessageString | Gets the localized error message |
| ErrorMessageResourceName | Get/Set the error message resource name |
| ErrorMessageResourceType | Get/Set the error resource class type |
Table 2: Add a resource name and value for each message you wish to display in your application
| Name | Value |
|---|---|
| Required | {0} Must Be Filled In. |
| StringLength | {0} Must Have {1} Characters or Less. |
| MinLength | {0} Must Have {1} Characters or More. |
| MaxLength | {0} Must Have {1} Characters or Less. |
Table 3: Add resources for the `[EmailAddress]` and `[Phone]` attributes to the `ValidationMessages.resx` file
| Name | Value |
|---|---|
| The {0} Field is not a Valid Email Address. | |
| Phone | The {0} Field is not a Valid Phone Number. |
Table 4: Add resources for the `[EmailAddress]` and `[Phone]` attributes to the `ValidationMessages.es-MX.resx` file
| Name | Value |
|---|---|
| El campo {0} no es una dirección de correo electrónico válida. | |
| Phone | El campo {0} no es un número de teléfono válido. |