Power Apps are a great way to build business apps quickly and enable a citizen developer, who might be more familiar with understanding and solving business problems than the technical nuances associated with writing code, to quickly flesh out the design of an app and specify how it should function. Power Apps supports connectors that can integrate an app with a wide range of data sources and services that professional developers can author to enable these users to build specialized business apps quickly.
This article walks through how you can use .NET 6's new ASP.NET Core Minimal APIs to build an HTTP API and publish it to Azure App Service, then import the API into Azure API Management so you can integrate your API with multiple services and third parties, monitor it, and secure it with Microsoft Identity Platform. With the API imported into Azure API Management and running nicely in Azure App Service, it makes a fantastic back-end API for a mobile Power App.
The Business Problem
Some local entrepreneurs I know work in the construction and civil engineering space, photographing complex work sites like cellular towers that need reconfiguration. Using Bing Maps or Google Earth to look at the pictures they get from their field photographers to ascertain the location in which they were standing when they took their site pictures is time consuming. After spending hours reviewing the work site, mapping software and the images, they can usually - within a certain degree of success - figure out how to redesign the site's configuration in their imaging software.
When I heard about this conundrum, I thought what any app developer thinks: It's time to build an app to solve this problem! After learning that most of their customers use Office 365 for their communication and productivity, a Power App solution seemed like a great idea, because Power Apps and Office 365 work so well together. Our team was nearing the release of ASP.NET Core 6, and I was so excited about minimal APIs, I thought I'd put the two together to do some “Fusion Development” - putting .NET, Azure, and Power Apps together to churn out a useful app quickly.
Prerequisites
To build a minimal API, all you need is .NET 6. If you plan on building Power Apps that use Azure compute resources, you'll need all the items listed below.
- .NET 6: You can download .NET at https://dot.net/download.
- An Azure subscription: You can try Azure for free by signing up at https://azure.microsoft.com.
- The Azure CLI: This can be downloaded from https://docs.microsoft.com/cli/azure/install-azure-cli.
- A Power Apps subscription: You can set up your own Power Apps subscription at https://powerapps.microsoft.com.
- Visual Studio 2022: The recommended development environment for the tasks in this article. You can download it from https://visualstudio.com/preview.
Minimal APIs with ASP.NET Core 6
Minimal APIs, new in .NET 6, are a low-ceremony way to build Web apps, small microservices, or HTTP APIs using ASP.NET Core. Minimal APIs hook into all the hosting and routing capabilities you know in ASP.NET Core, but they're based on C# top-level statements from a code-cleanliness perspective. There are few subtle changes between the process of creating a minimal API and a Web API, but for getting started with a new API or for experimentation, minimal can't be beat.
The first difference you'll notice is that a minimal API project is indeed just that: the bare minimum amount of code and configuration you need to get going, and that there's no Startup.cs file. Figure 1 shows the simplicity of a minimal API project, or at least the minimum amount required to get going.

Minimal Means Less Ceremony Required to GET OK
Traditional Web API projects not only require you understand the project layout - Controllers folder, Startup.cs for some things, Program.cs for others - but there's a bit of ceremony involved to get an HTTP API outputting a string from a Web server. In a traditional Web API project's Controllers folder, you'd have a HelloWorldController.cs file. The HelloWorldController.cs file would represent a class in the compiled app, with a single method that responds when an HTTP request is made to the server's “/hello” endpoint.
using Microsoft.AspNetCore.Mvc;

namespace SideBySide.WebApi.Controllers
{
    [Route("hello")]
    [ApiController]
    public class HelloWorldController : ControllerBase
    {
        [HttpGet]
        public ActionResult<string> Get()
        {
            return new OkObjectResult("Hello World");
        }
    }
}
This controller wouldn't even respond without the also-requisite wire-up in a separate file, Startup.cs, that enables MVC controllers, which is what Web API is built upon.
public void ConfigureServices(IServiceCollection services)
{
    services.AddControllers();
}
This means that you have two files to edit (at a minimum), a few concepts to have to understand: the project structure, controllers, routing attributes, and so on. With minimal APIs, Microsoft has reduced the amount of code you'd need to write to respond to an HTTP request. Rather than create a controller file (and a class in your assembly), you simply build the host and route the traffic to your code.
var builder = WebApplication.CreateBuilder(args);
var app = builder.Build();

app.MapGet("/hello", () => "hello world");

app.Run();
With minimal APIs, you get the same result in four lines versus 18 lines across multiple files, concepts, and more. With that introduction and summary of how awesome minimal APIs are in ASP.NET Core with .NET 6, let's dive into how it's going to be easier for local entrepreneurs - who we'll call Contoso Construction for the purpose of this article - to make it easier for construction and civil engineering site managers to figure out how to interpret job site photography.
The Contoso Construction API
This app's API will need to support very few elements of data; you'll record the precise geo-coordinates of a job site and the images taken of that job site from various angles, along with the compass heading of each photo. With those elements of data, the site manager can be confident that they know exactly where each photo was taken. The API you build as a back-end for the Power App will need to support the following features:
- View all job sites.
- Create new job sites.
- Upload new photos of job sites, complete with the geographic and compass metadata.
- View photos of a job site, along with the geo-location of the photographer at the time of the shot, because the site artists value not only knowing the address of the work site, but the actual geolocation of each photo.
For the purposes of simplicity, I'll forego the potential advantages of integrating with the Microsoft Identity Platform or Microsoft Graph API to augment the API with organizational data for the employees in the Azure Active Directory tenant or to distribute job sites by user, but that'd be a great follow-up topic.
Creating the Azure Resources Using Azure Bicep
The API allows app users to upload images, which are stored in Azure blob containers. Metadata about the images - the geo-coordinates of their location and their compass heading data, to be specific - will be stored in an Azure SQL Database using Entity Framework Core. Key Vault securely stores connection strings, so an Azure Web App, in which my .NET 6 minimal API code will be hosted, can connect to the storage and database securely (and so I'll never accidentally commit secrets to source control).
Bicep, a domain-specific language (DSL) that uses declarative syntax to describe Azure resources, their configuration, and their relationships with one another, offers developers a syntax more elegant than JSON for creating and configuring cloud applications. The GitHub repository containing the sample code for this article (located here: https://github.com/bradygaster/Contoso.Construction) includes a Bicep file, deploy.bicep. It also contains a PowerShell script, setup.ps1, to run to create the entire Azure topology shown in Figure 2, then build the .NET source code, package it into a zip file, and publish it to Azure Web Apps.

Contoso's field app enables their field photographers to photograph job sites, so the essential technical requirements are to store uploaded images taken from a phone camera, along with some string or numeric data associated with each photo. From an app data flow perspective:
- The user uploads a photo taken by mobile phone camera.
- The image is stored in Azure Blob storage.
- A URL of image, geographic, and compass metadata associated with the image is stored in an Azure SQL Database.
The deploy.bicep file included with this article's sample code creates all the Azure resources required to host the minimal API code securely and enables use of it to the Job Site Power App, starting with the Azure SQL database and server, using the username and password parameters passed in as top-level parameters of the Bicep template file.
Resource sqlServer Microsoft.Sql/servers@2014-04-01'={
    name: '${resourceBaseName}srv'
    location: resourceGroup().location
    properties: {
        administratorLogin: sqlUsername
        administratorLoginPassword: sqlPassword
    }
}
Resource sqlServerDatabase 'Microsoft.Sql/servers/databases@2014-04-01'= {
    parent: sqlServer
    name: '${resourceBaseName}db'
    location: resourceGroup().location
    properties: {
        collation: 'SQL_Latin1_General_CP1_CI_AS'
        edition: 'Basic'
        maxSizeBytes: '2147483648'
        requestedServiceObjectiveName: 'Basic'
    }
}
The Azure Storage account and blob container get created once the SQL database server's creation completes.
Resource storage 'Microsoft.Storage/storageAccounts@2021-02-01'= {
    name: '${resourceBaseName}strg'
    location: resourceGroup().location
    kind: 'StorageV2'
    sku: {
        name: 'Standard_LRS'
    }
}
Resource storageBlobContainer
    'Microsoft.Storage/storageAccounts/
        blobServices/containers@2021-04-01'= {
    name: format('{0}/default/uploads', storage.name)
    dependsOn: [storage]
    properties: {
        publicAccess: 'Blob'
    }
}
Stored as secure secrets in an Azure Key Vault, the SQL and Storage connection strings can then be read at runtime by the .NET minimal API code. Because those credentials are stored in Key Vault, the API connects to SQL and Storage securely, and you never have to worry about leaking a connection string.
Resource sqlSecret'Microsoft.KeyVault/vaults/secrets= {
    parent: keyVault
    name: 'ConnectionStrings - AzureSqlConnectionString'
    properties: {
        value: 'Data Source=tcp:${sqlServer.properties.fullyQualifiedDomainName}, 1433;
            Initial Catalog=${resourceBaseName} db;
            UserId=${sqlUsername};
            Password=${sqlPassword};'
    }
}
Resource storageSecret
    'Microsoft.KeyVault/vaults/secrets@2021-06-01-preview'= {
    parent: keyVault
    name: 'AzureStorageConnectionString'
    properties: {
        value: format('DefaultEndpointsProtocol=https;
            AccountName=${storage.name};
            AccountKey=${listKeys(storage.name, storage.apiVersion).keys[0].value};
            EndpointSuffix=core.windows.net')
    }
}
A setup script, setup.ps1, wraps up behind the environment creation and deployment process. Executing setup.ps1 from the article's repository, providing the base resource name (in this article's case, contosodev), creates the Azure resources shown in Figure 2. It then compiles the .NET minimal API code, publishes it into a local self-contained build, and zips it up. The script then uploads the zip file to Azure Web Apps and starts up.
.\setup.ps1 -resourceBaseName<your-desired-name>
Now I'll step through each part of the .NET minimal API code - all of which you'll find in the Program.cs file of the repository for this article - to talk about how each of those Azure resources will be used by the .NET code.
Connect to Azure Resources via the Azure SDK
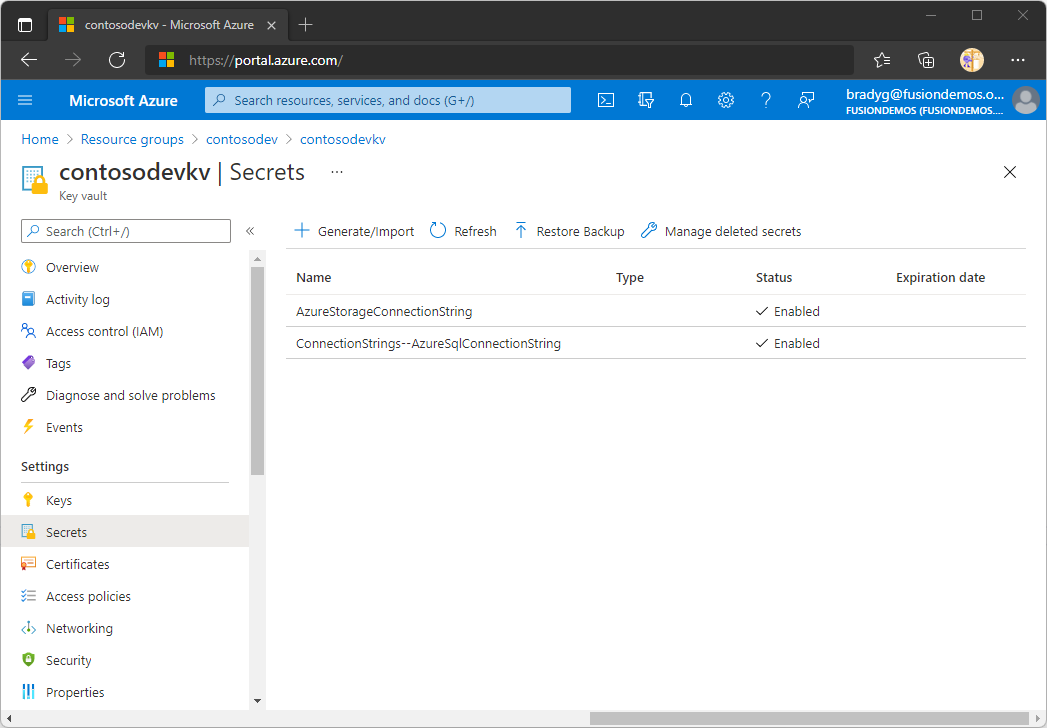
The Bicep deployment template creates two secrets in Key Vault: one for the Azure SQL Database and the other for the Azure Storage account. The .NET Core Azure Key Vault configuration provider reads those two configuration elements that will be loaded in from the Azure Key Vault, not from appsettings.json. If you look at the Azure Key Vault secrets in the Azure portal after executing the Bicep template against your subscription, you'll see the two secrets shown in Figure 3.
The minimal API code starts with host build-up, configuration, and service registration. Much like my traditional Web API code began with wiring up services in Startup.cs, so too will I begin my development with minimal APIs. I'll go ahead and read the VaultUri environment variable and use it to connect the minimal API code to the Azure Key Vault.
var builder = WebApplication.CreateBuilder(args);
// Add Key Vault provider
var uri = Environment.GetEnvironmentVariable("VaultUri");
builder.Configuration.AddAzureKeyVault(
    new Uri(uri),
    new DefaultAzureCredential());
Calls to the configuration system for the SQL database and Azure Storage connection strings are routed to Key Vault, and the minimal API code uses the traditional approach of injecting the Entity Framework Core DbContext class. See Listing 1 for a look at the Entity Framework data objects. After the Entity Framework Core database context is injected into the minimal API's service collection it uses the Azure Extensions library's AddAzureClients method to add an Azure Storage client to the services collection, too.
// Add the Entity Framework Core DBContext
builder.Services.AddDbContext<JobSiteDb>(_ =>
{
    _.UseSqlServer(
        builder.Configuration.GetConnectionString(
            "AzureSqlConnectionString"));
});

// Add Azure Storage services to the app
builder.Services.AddAzureClients(_ =>
{
    _.AddBlobServiceClient(
        builder.Configuration["AzureStorageConnectionString"]);
});
Listing 1: The Entity Framework Core data objects
public class JobSitePhoto
{
    [DatabaseGenerated(DatabaseGeneratedOption.Identity)]
    public int Id { get; set; }
    public int Heading { get; set; }
    public int JobId { get; set; }
    public double Latitude { get; set; }
    public double Longitude { get; set; }
    public string PhotoUploadUrl { get; set; }
        = string.Empty;
}

public class Job
{
    [DatabaseGenerated(DatabaseGeneratedOption.Identity)]
    public int Id { get; set; }
    public double Latitude { get; set; }
    public double Longitude { get; set; }
    public string Name { get; set; }
        = string.Empty;
    public List<JobSitePhoto> Photos
        { get; set; } = new List<JobSitePhoto>();
}

class JobSiteDb : DbContext
{
    public JobSiteDb(DbContextOptions<JobSiteDb> options)
        : base(options) { }

    public DbSet<Job> Jobs => Set<Job>();

    public DbSet<JobSitePhoto> JobSitePhotos => Set<JobSitePhoto>();

    protected override void OnModelCreating(ModelBuilder modelBuilder)
    {
        modelBuilder.Entity<Job>().HasMany(s => s.Photos);

        base.OnModelCreating(modelBuilder);
    }
}
Routing HTTP Traffic with Minimal API Methods
With the minimal API configured and connected to Azure resources, the last piece I'll explore is the routes. Each API endpoint is routed individually, so you have a 1:1 correlation between each HTTP endpoint in the API and the code that executes to satisfy the request. MapGet denotes that any HTTP GET request to the /jobs endpoint will be handled by this method.
Minimal is smart enough to know when each route method parameter should come from the path or from the services collection. You don't need to add FromServices - it just works. The Produces method is useful for specifying the shape of the API's response payload and output content type. Minimal API's WithName method is useful when you know you'll want to integrate your minimal API using OpenAPI descriptions. The WithName method sets the value of the OpenAPI operationId attribute, which is used heavily by code generators and API-consuming tools and services (like Power Apps, which I'll explore next).
// Enables GET of all jobs
app.MapGet("/jobs", async (JobSiteDb db) =>
    await db.Jobs.ToListAsync())
    .Produces<List<Job>>(StatusCodes.Status200OK)
    .WithName("GetAllJobs");
Route methods support route arguments or parameters. The GetJob API method takes an input parameter and then uses it in a LINQ expression to query a SQL database using Entity Framework Core. In the GetJob API method code, the API either returns an HTTP 200 when the job site record is found, or an HTTP 404 when there's no matching record. This demonstrates a canonical example of how multiple Produces calls specify a variety of potential request/response scenarios based on the API's business logic.
// Enables GET of a specific job
app.MapGet("/jobs/{id}",
    async (int id, JobSiteDb db) =>
        await db.Jobs
            .Include("Photos")
                .FirstOrDefaultAsync(_ =>
                    _.Id == id)
        is Job job
            ? Results.Ok(job)
            : Results.NotFound()
)
.Produces<Job>(StatusCodes.Status200OK)
.Produces(StatusCodes.Status404NotFound)
.WithName("GetJob");
The CreateJob API method accepts an incoming Job object and uses Entity Framework to create a new record in the Jobs table, demonstrating the simplicity of handling complex body payloads coming via HTTP POST requests.
// Enables creation of a new job
app.MapPost("/jobs/", async (Job job, JobSiteDb db) =>
{
    db.Jobs.Add(job);
    await db.SaveChangesAsync();
    return Results.Created($"/jobs/{job.Id}", job);
})
    .Produces<Job>(StatusCodes.Status201Created)
    .WithName("CreateJob");
You can mix route parameters, body parameters, even accept form posts and file uploads. Listing 2 shows the API's file-uploading route, which accepts image uploads taken by a Power App UI with a camera.
Listing 2: A complex API with route and HTTP file parameters
app.MapPost(
    "/jobs/{jobId}/photos/{lat}/{lng}/{heading}",
    async (HttpRequest req,
        int jobId,
        double lat,
        double lng,
        int heading,
        BlobServiceClient blobServiceClient,
        JobSiteDb db) =>
    {
        if (!req.HasFormContentType)
        {
            return Results.BadRequest();
        }

        var form = await req.ReadFormAsync();
        var file = form.Files["file"];

        if (file is null)
            return Results.BadRequest();

        using var upStream = file.OpenReadStream();

        var blobClient = blobServiceClient
            .GetBlobContainerClient("uploads")
            .GetBlobClient(file.FileName);

        await blobClient.UploadAsync(upStream);

        db.JobSitePhotos.Add(new JobSitePhoto
        {
            JobId = jobId,
            Latitude = lat,
            Longitude = lng,
            Heading = heading,
            PhotoUploadUrl = blobClient.Uri.AbsoluteUri
        });

        await db.SaveChangesAsync();

        var job = await db.Jobs
            .Include("Photos")
            .FirstOrDefaultAsync(x =>
                x.Id == jobId);

        return Results.Created($"/jobs/{jobId}", job);
    })
        .Produces<Job>(StatusCodes.Status200OK, "application/json")
        .WithName("UploadSitePhoto");
Integrating the API in New Ways with OpenAPI
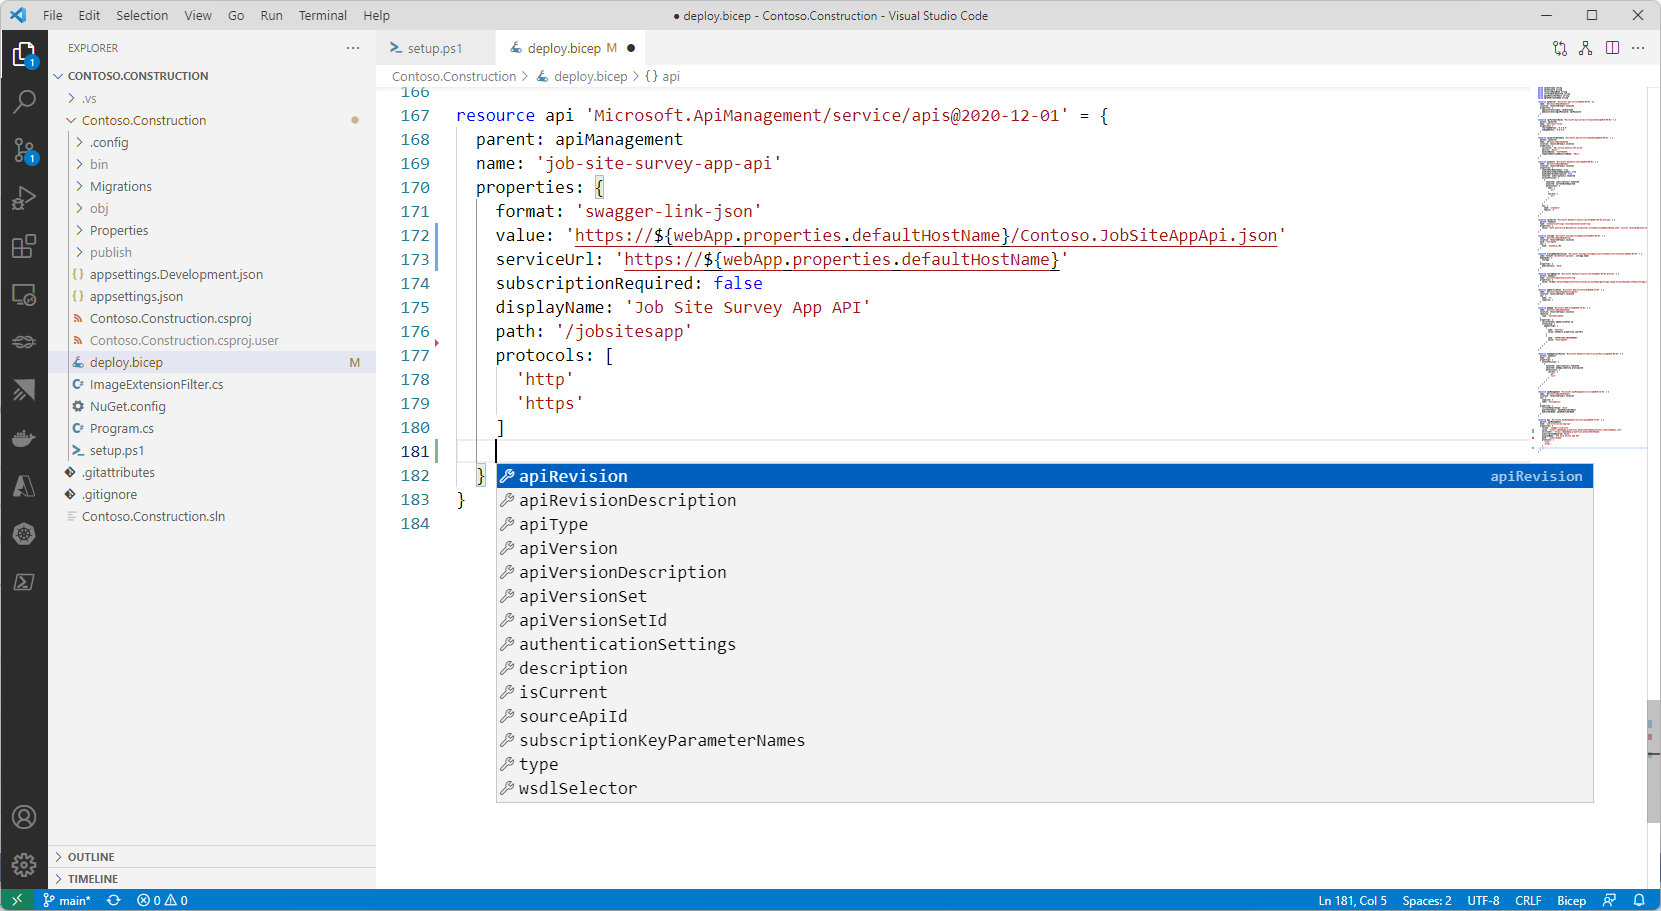
My favorite part of the set up script process in deploy.bicep is when you import the OpenAPI description from the newly-deployed app service into Azure API management. When this part of the Bicep script runs, the OpenAPI description automatically generated from the minimal API endpoints is imported into Azure API management. Figure 4 shows this exciting final step in the Bicep deployment process, and how the Bicep extension for Visual Studio Code provides in-editor support and assistance. It also comes pre-packaged with dozens of fantastic snippets, so you don't have to guess as you're learning the Bicep template syntax.
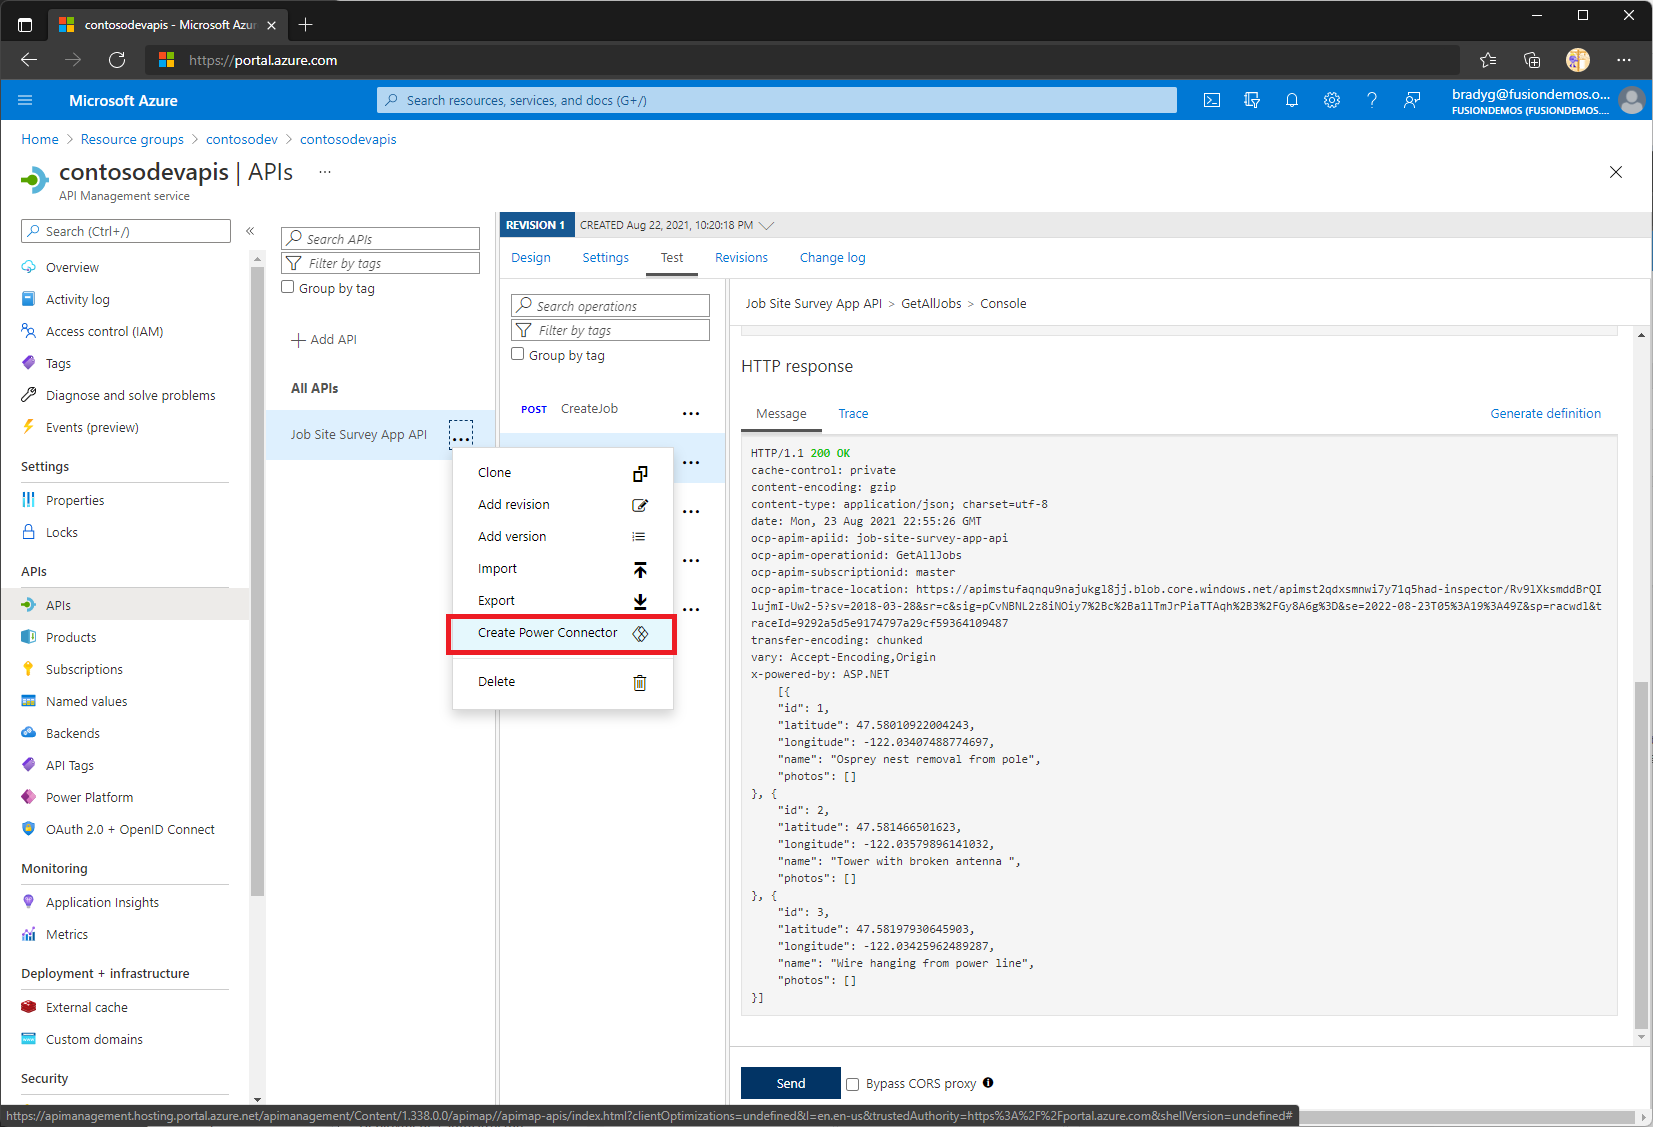
Azure API Management enables you to take all your individual APIs running in App Service, in Azure Functions, in Kubernetes - or even on-premises - and have a single place to configure, secure, and monitor them. APIs imported into Azure API Management can be used in a variety of ways, like being exported to Power Platform as a Power Apps Custom Connector. Custom Connectors are the “glue” that connects the Power Platform - Power Automate, Power Apps, Power BI, and so on - to your APIs running in Azure. In Figure 5 you'll see how, in the Azure portal, API management enables Power Platform export.
Use the API in a Low-Code Mobile Power App
The mobile app built for this article within Power Apps has five screens, two of which are simple maps that plot out job sites or photographs of those job sites and their point of origin. Field engineers click pins in the job site map screen shown in Figure 6 to navigate to a second map showing clickable icons of each of the job site photos. When users click an icon in the photos map, photographs pop up in Info Boxes taken at that specific location. This way, the field engineers can make sure they've taken photos of the job sites from all possible angles.

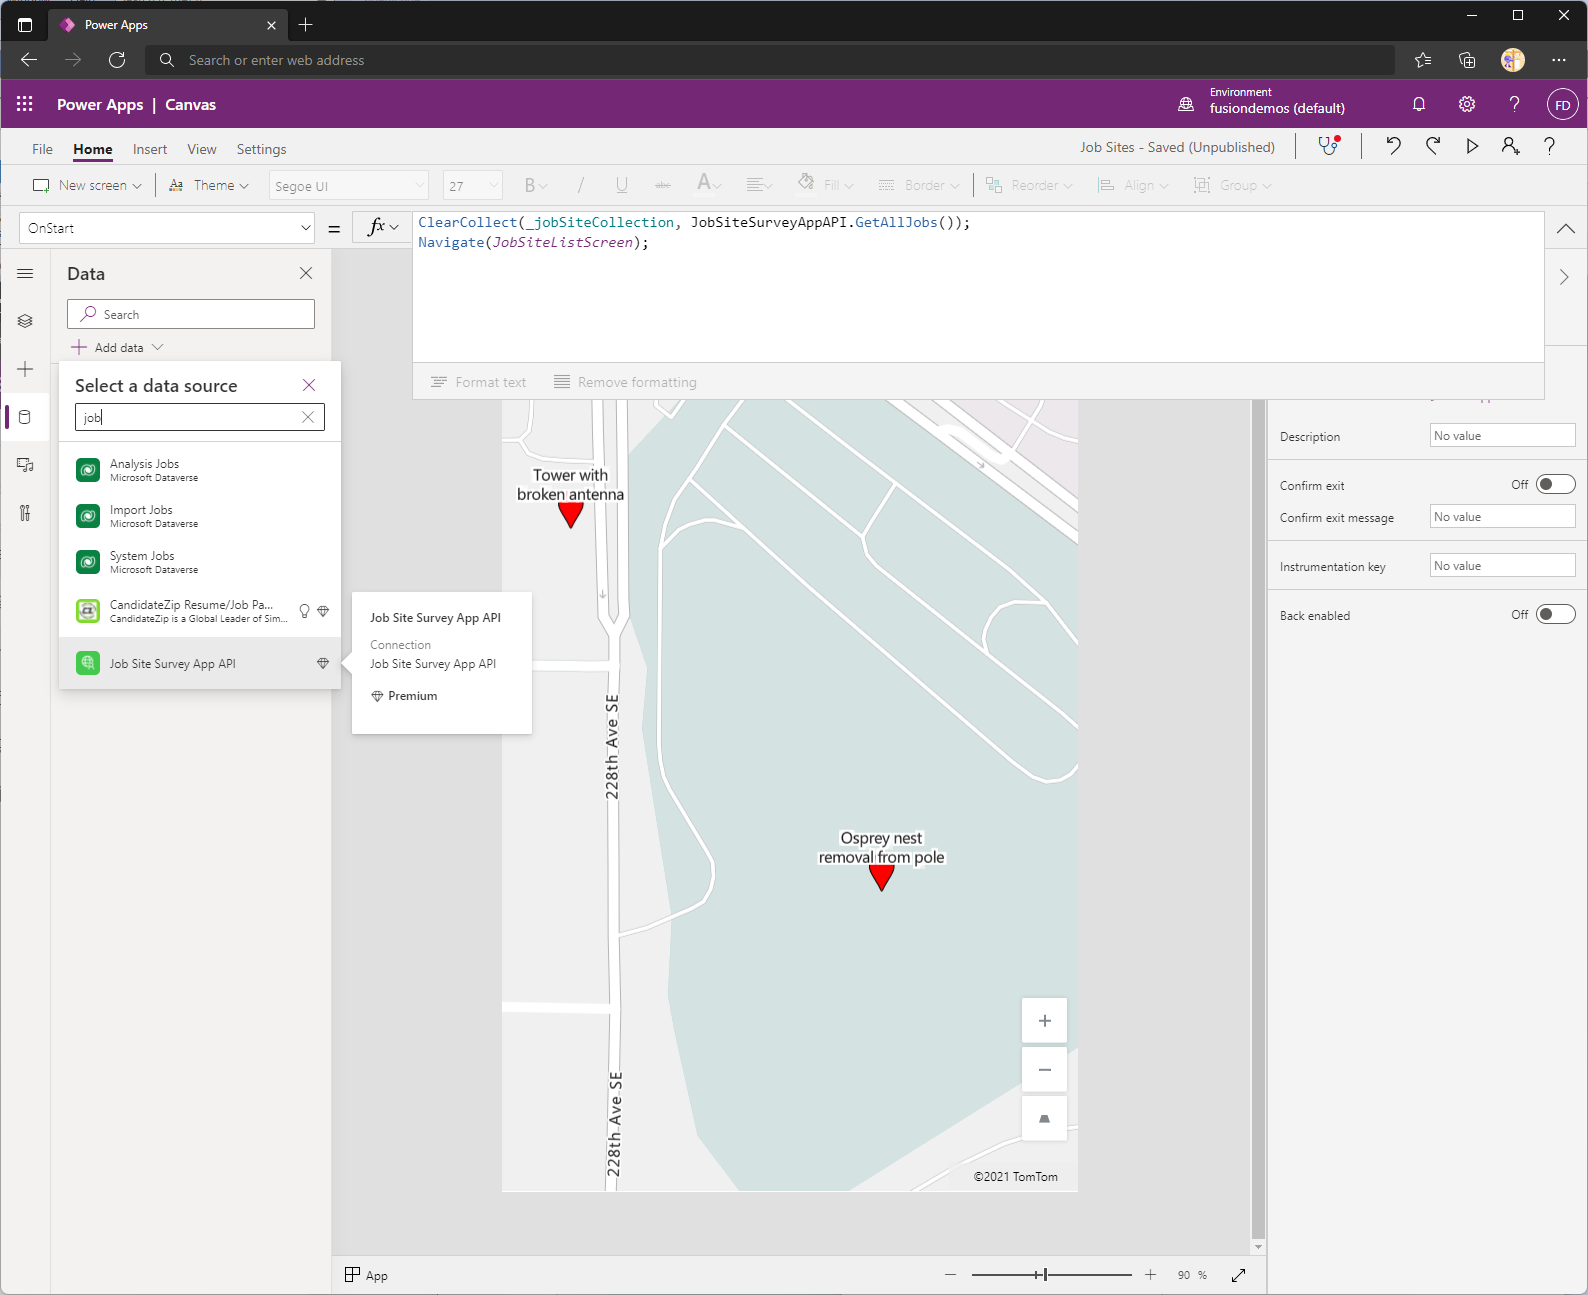
The job site map screen binds to a Collection named _jobSiteCollection. In the Power App's OnStart handler, the app calls the minimal API, clearing and re-filling the collection. Figure 7 shows how to use the Data tab in Power Apps to search for a custom connector, as well as the OnStart handler in which the API will be called to load the collection of job sites. As the app starts, OnStart fires, and the app calls the API via the JobSiteSurveyAppAPI connector's GetAllJobs method.
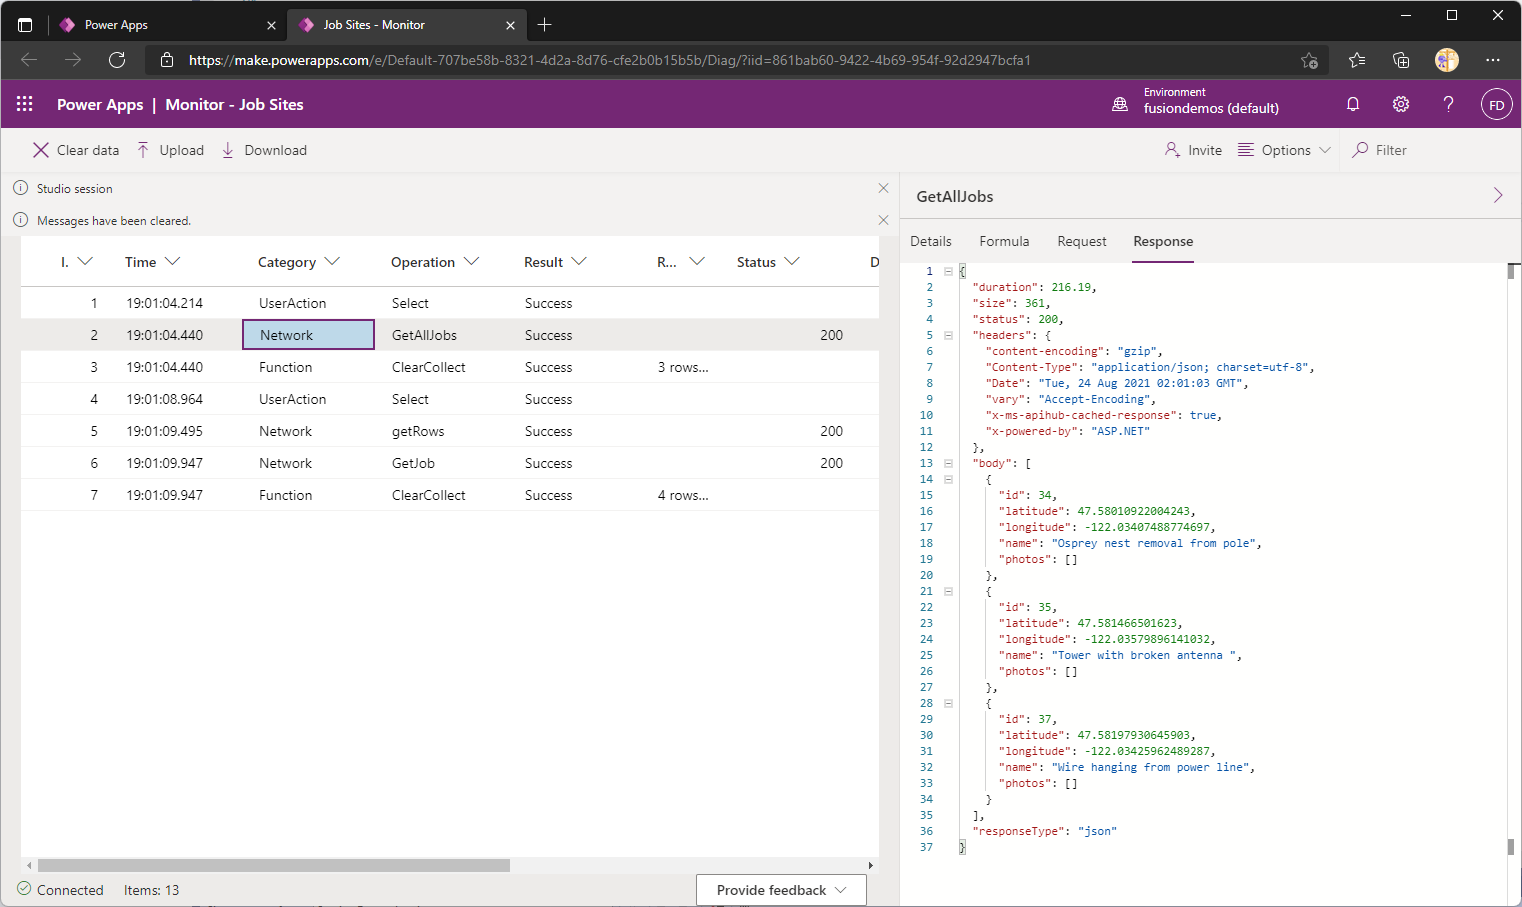
The Power Apps Monitor helps with API debugging, as it shows the requests and responses going to and from your API. The monitor, shown in Figure 8, is great to have open in another tab as build your app against your HTTP API.
Summary
If the idea of fusing together .NET, Azure, and Power Apps to get started on your low-code journey sounds appealing after reading this article, spend some time looking at the Microsoft Learn topics on fusion and low-code development (here: https://docs.microsoft.com/en-us/learn/paths/transform-business-applications-with-fusion-development/). There are a variety of other Learn paths available that go deeper on the topic of Fusion development.
If you're less interested in the UI parts of this end-to-end and mainly want to build APIs, you're sure to enjoy using .NET 6 minimal APIs with Bicep to make your API development and deployment much simpler than ever before, with less ceremony. I think experienced API developers are going to enjoy this new approach and that new API developers will find it a more graceful way to get started.
Happy coding! Be well!