NativeScript is an open-source mobile framework that makes it easier for developers to create stunning cross-platform mobile applications that share a single set of code. How NativeScript does this and why it's better over alternative mobile frameworks is the subject of this article.
Since the invention of the smart phone, there have been mobile applications and a need for mobile application developers. Using a technology like Java or Objective-C, a developer could create an application compatible with either Android or iOS. These applications are fast and beautiful, but they aren't without penalty on the developer or development teams.
Common Pitfalls of Mobile Application Development
A major pitfall in mobile application development is the need to learn a different language for each mobile platform.
Take, for example, the following Android code written in Java to make HTTP requests against some remote Web service:
RequestQueue queue = Volley.newRequestQueue(this);
String url ="https://thepolyglotdeveloper.com";

StringRequest stringRequest =
    new StringRequest(Request.Method.GET, url,
    new Response.Listener<String>() {
        @Override
        public void onResponse(String response) {
            System.out.println(response);
        }
    }, new Response.ErrorListener() {
        @Override
        public void onErrorResponse(VolleyError error
        ) {
        System.out.println("Request Failed!")
        }
    });
queue.add(stringRequest);
Much of the code in that snippet was taken from the Android SDK documentation found at https://developer.android.com/training/volley/simple.html.
To accomplish the same request within an iOS application, the Objective-C code might look something like the following:
NSURL *url =
    [NSURL URLWithString: @"https://thepolyglotdeveloper.com"];
NSURLRequest *request =
    [NSURLRequest requestWithURL:url];
[NSURLConnection sendAsynchronousRequest:request queue:[NSOperationQueue mainQueue]
completionHandler:^(NSURLResponse *response, NSData *data,
    NSError *connectionError) {
    NSString *strData = [[NSString alloc]initWithData:data NSLog(@"%@",
    strData)}];
Much of the code above was taken from https://spring.io/guides/gs/consuming-rest-ios/ to illustrate the development differences between Android and iOS using pure Java and Objective-C. Editor's note: the link no longer works.
It's feasible to learn both Java and Objective-C, two very different development technologies. If you're the manager of a development team, it might be fiscally responsible to staff developers for each technology.
The differences in platforms don't end with Java and Objective-C, but extend to how the user interface is developed using very different XML tags and attributes.
Mobile developers have been struggling with these platform differences since the beginning, which spawned ideas to find a better way to get the job done.
XML, CSS, and JavaScript or TypeScript
With NativeScript and similar frameworks, like Ionic Framework and React Native, developers can take their knowledge of Web development and apply it toward mobile applications, all with a single codebase.
Looking back at the previous example for making HTTP requests within iOS and Android applications, the following accomplishes the same thing in NativeScript:
http.getJSON("https://thepolyglotdeveloper.com").then(r => {
    console.dir(r);
}, e => {
    console.dir(e);
});
The above snippet was taken from the NativeScript Core documentation found at https://docs.nativescript.org/Http.html, but not only is it significantly smaller than the Objective-C and Java equivalents, but it's both Android- and iOs-compatible.
NativeScript supports the development of cross-platform mobile applications with JavaScript or TypeScript, a subset of CSS, and an XML markup not too different from HTML.
The icing on the cake is in the framework support that's available with NativeScript. Although NativeScript Core is an option, frameworks like Angular and Vue.js are also options.
The icing on the cake is in the framework support that's available with NativeScript.
Native APIs and Performance without a Web View
NativeScript isn't the only cross-platform mobile development framework out there that works with common Web technologies or even popular Web frameworks. For example, Apache Cordova, Ionic Framework, and other frameworks are also very popular.
So why choose NativeScript over the alternatives?
Apache Cordova-based frameworks render everything within a WebView component, which is an embedded Web browser, rather than mapping to individual native components. The problem with WebView components is that they have limitations and are known to behave differently on varying hardware and platform operating system versions.
Performance is critical in today's consumer facing mobile applications, and so is functionality.
Not only do NativeScript applications render outside a WebView, but native-platform APIs can be accessed directly from the JavaScript or TypeScript code.
Take, for instance, the following Java snippet for Android:
import android.support.design.widget.Snackbar;
Snackbar mySnackbar = Snackbar.make(
    findViewById(R.id.myCoordinatorLayout),
    "Hello World!",
    Snackbar.LENGTH_SHORT
);

mySnackbar.show();
That code presents a Snackbar in the UI. The Snackbar, like many Android APIs, isn't conveniently wrapped and ready to go in NativeScript. This doesn't mean that you can't use the Snackbar API, it just means it hasn't been designed to be slick, using as little code as possible.
The next snippet presents a Snackbar in NativeScript. Android and iOS classes are immediately available and accessible via JavaScript and TypeScript in NativeScript applications.
var Snackbar = android.support.design.widget.Snackbar;
var mySnackbar = Snackbar.make(
    topmost().currentPage.android,
    "Hello World",
    Snackbar.LENGTH_SHORT
);

mySnackbar.show();
Accessing the native APIs through JavaScript and TypeScript isn't always the most convenient way to get the job done. The Snackbar example didn't take much to get it working. Let's look at a much more complex example of native APIs, such as fingerprint authentication. This is where plug-ins come into play.
NativeScript has many available third-party plug-ins listed at https://docs.nativescript.org/plugins/index.html that take the hard work out of accessing native platform APIs. Take, for example, the fingerprint authentication functionality previously mentioned:
fingerprintAuth.verifyFingerprintWithCustomFallback({
    message: "Scan Finger",
    fallbackMessage: "Enter PIN"
}).then(() => {
    console.log("Authenticated");
}, error => {
    console.dir(error);
});
Through the fingerprint authentication plug-in, https://docs.nativescript.org/plugins/fingerprint-auth.html, what would have been lengthy Objective-C, Java, or even JavaScript code, was significantly reduced through the third-party library.
To be fair, Apache Cordova-based frameworks have access to native platform APIs through the use of plug-ins. However, these APIs can only be accessed via a defined plug-in, rather than anywhere that JavaScript or TypeScript is supported, like what NativeScript offers.
How It's Possible
NativeScript works by leveraging the V8 JavaScript engine for Android and JavaScriptCore for iOS. V8, as per the documentation found at https://developers.google.com/v8/, implements EMCAScript, and likewise with JavaScriptCore, as per the documentation found at http://trac.webkit.org/wiki/JavaScriptCore.
This allows NativeScript for Android to have nearly identical support to that found in desktop Chrome and NativeScript, and for iOS to have nearly the same support as desktop Safari.
V8 and JavaScriptCore recognize Android and iOS because the NativeScript runtime injects them. Both JavaScript virtual machines have APIs that offer a lot of customization to make this possible.
More information on how the V8 and JavaScriptCore virtual machines come together to make NativeScript possible can be found in the NativeScript documentation at https://blog.nativescript.org/.
Developing Your First Mobile App with NativeScript
Background on NativeScript can only get you so far. Let's learn about NativeScript by trying it.
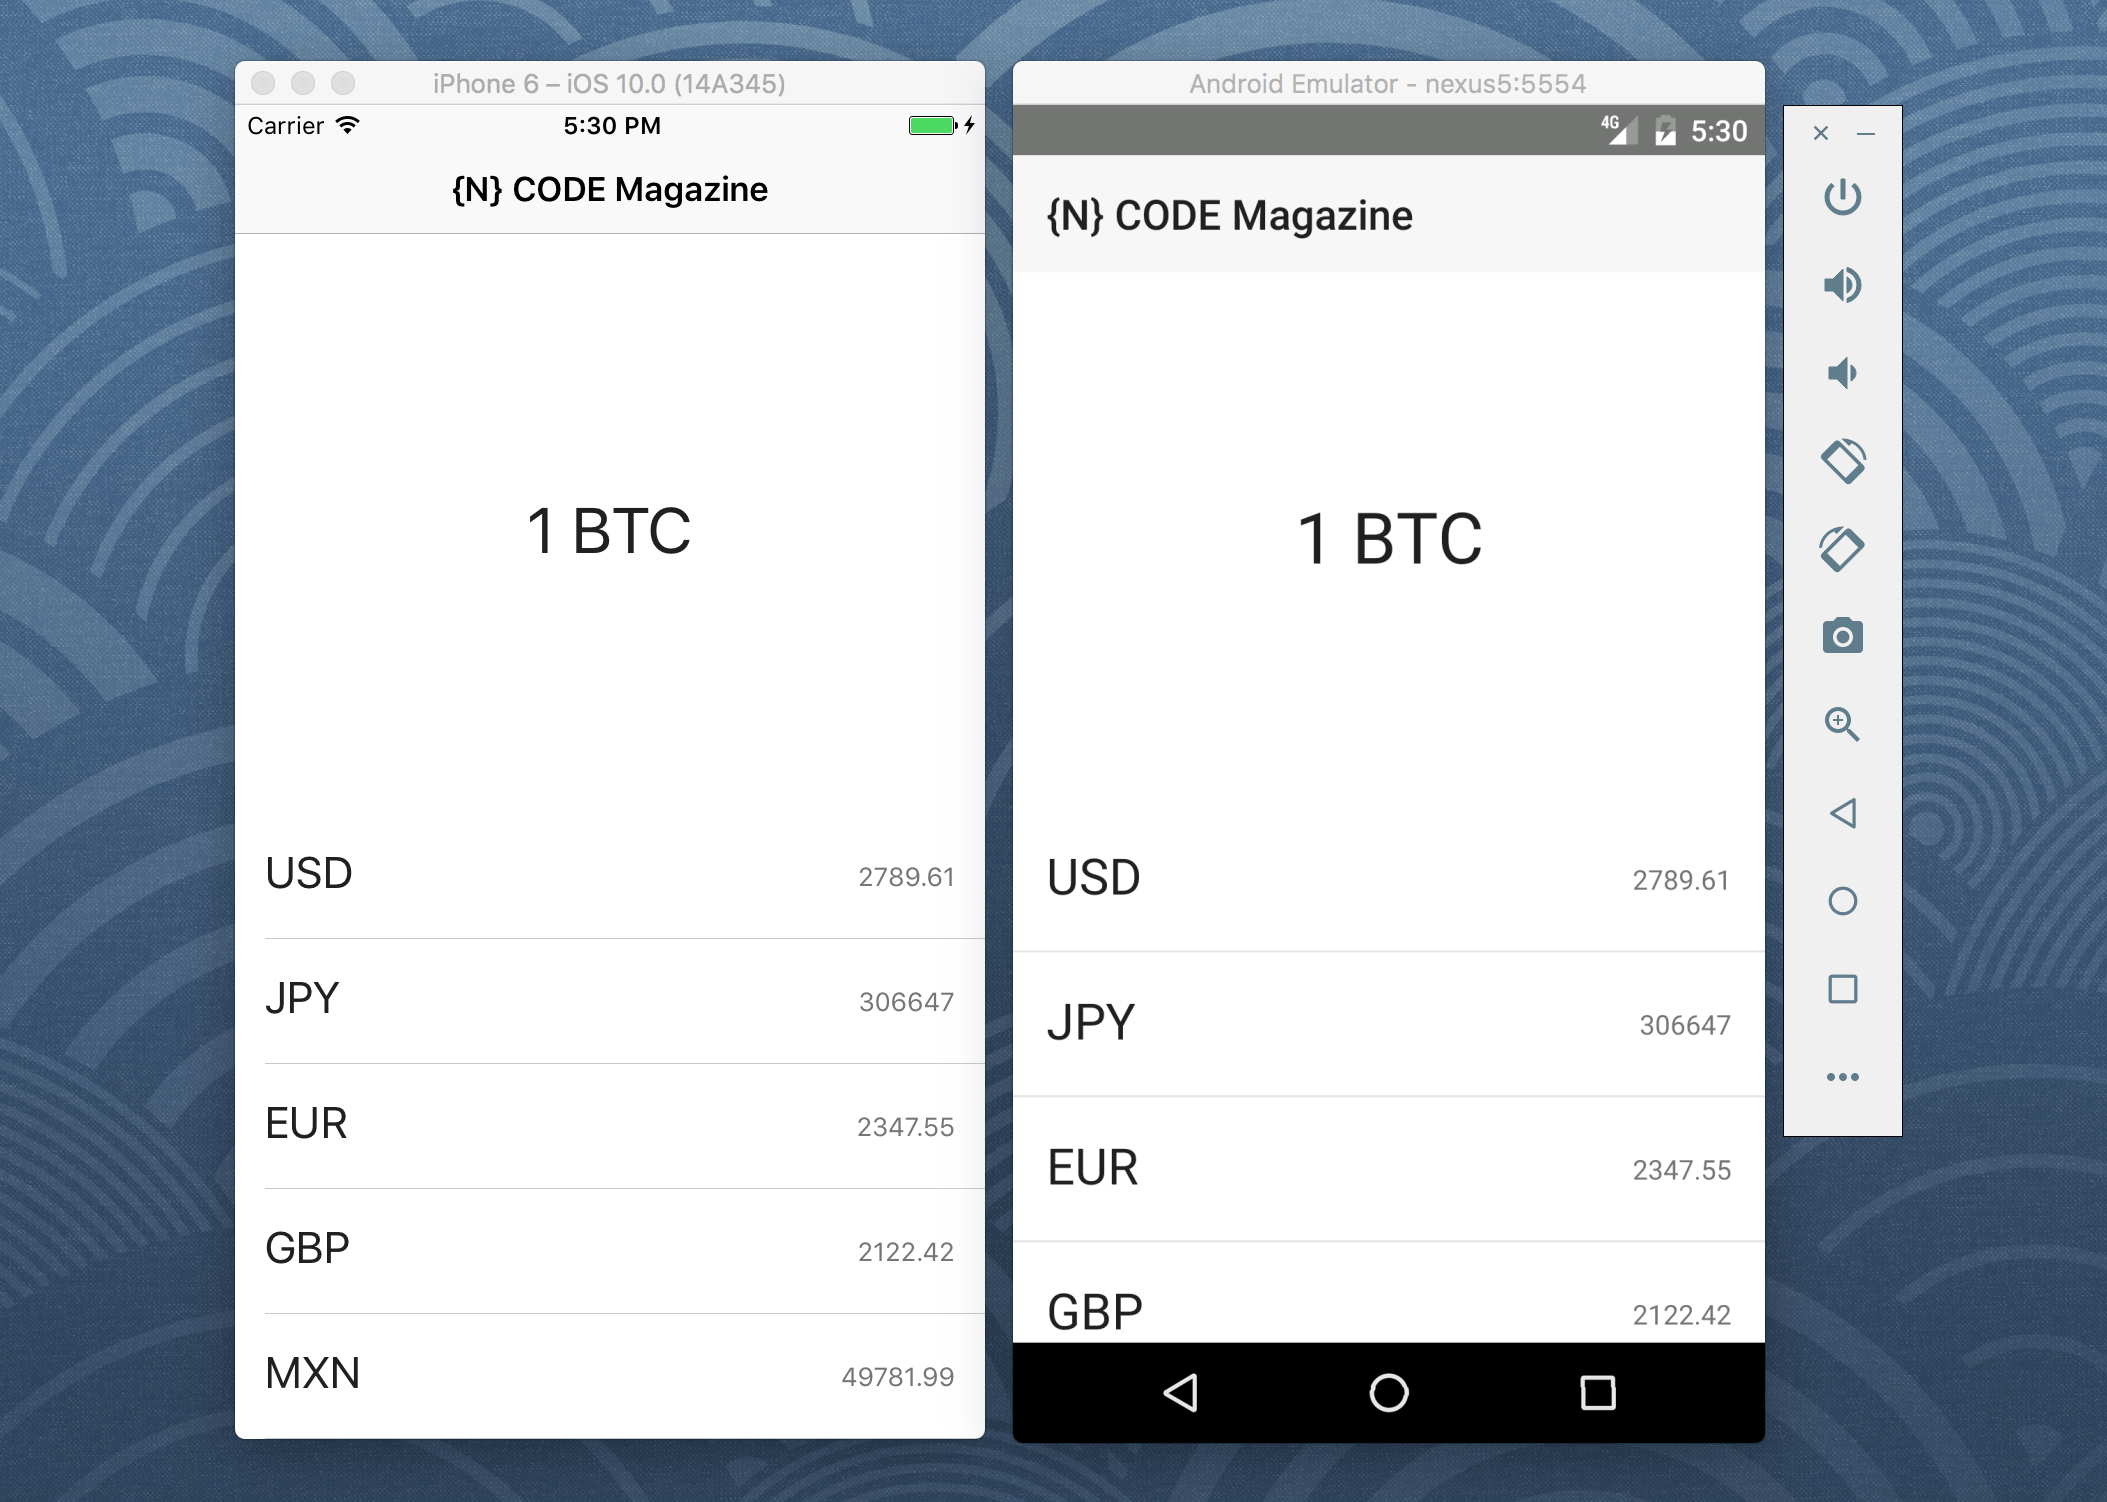
Let's explore this by creating an application that displays the current currency conversion of Bitcoin to a non-cryptocurrency alternative. It will consume data from a remote Web service, something that would take a considerable amount of work using Objective-C or Java.
Installing NativeScript for Development
NativeScript, like many technologies lately, can be installed through the Node Package Manager (NPM). With Node.js installed, execute the following bit of code to install the NativeScript CLI through NPM:
npm install -g nativescript
This command installs NativeScript globally on your computer. During the installation process, you may be prompted to install the Android SDK. Depending on your development goals, follow the prompts.
More information on installing the NativeScript CLI, and preparing it for Android and iOS development, can be found in the official NativeScript documentation at https://docs.nativescript.org/environment-setup.html.
Creating a New Project with the NativeScript CLI
To create a new NativeScript project using the CLI, execute the following:
tns create bitcoin-project --template angular
A project called bitcoin-project is created. The angular template specifies use of Angular and TypeScript in this project. Another option is –template typescript, which creates a NativeScript Core project that uses TypeScript.
The next examples use Angular with TypeScript.
Developing the Logic for the Application with TypeScript
This will be a single page application so all application logic exists in a single TypeScript file. In particular, the project's app/app.component.ts file that was created when creating the new project.
Open this file and you'll see a very basic class:
import { Component } from "@angular/core";

@Component({
    selector: "ns-app",
    templateUrl: "app.component.html",
})
export class AppComponent {
}
This TypeScript file is connected to the project's app/app.component.html file, which holds the user interface for this particular page.
You need a few more Angular services imported into this page:
import {
    Component,
    OnInit
} from "@angular/core";
import { Http } from "@angular/http";
import "rxjs/Rx";
The OnInit interface gives access to the ngOnInit life-cycle event that occurs after the constructor executes. The HTTP service allows HTTP requests to be made against remote Web services, and rxjs allows observables to be used with the HTTP streams.
Because OnInit is an interface, the class needs to implement it:
export class AppComponent implements OnInit {
public constructor() { }
public ngOnInit() { }
}
To prevent compile-time errors, the now implemented interface needs the ngOnInit method to be present.
The constructor method is used for initializing variables and services and the ngOnInit method is used for populating or loading variables using those services. It's a good idea to follow the best practices for using lifecycle hooks, as outlined by the Angular documentation at https://angular.io/guide/lifecycle-hooks.
When it comes to variables in the project, the following two exist with appropriate scopes:
private http: Http;
public data: any;
The private Http variable is an instance of the imported Http service. The public data variable holds any responses received from the Http request. Only public variables can be accessed from the HTML user interface.
Before Angular services can be used, they must be injected into the constructor method:
public constructor(http: Http) {
    this.http = http;
    this.data = [];
}
To get information about Bitcoin and its currency conversions, the popular Coinbase API is used. Information on the Coinbase API can be found at https://developers.coinbase.com/docs/wallet/guides/price-data. Essentially, a currency type can be passed to the API and its value as compared to a single Bitcoin is returned.
A currency type is passed to the API and its value, compared to a single Bitcoin, is returned.
To illustrate a request against Coinbase, a convert function can be created:
private convert(currency: string) {
    let url = "https://api.coinbase.com";
    url += "/v2/prices/spot?currency=";
    return this.http.get(url + currency).map(result => result.json());
}
A currency type such as USD, EUR, etc. can be passed and a GET request is made. The result of the request is transformed using the map operator of RxJS and the observable is returned. The request isn't executed until the observable is subscribed to.
Jumping back to the ngOnInit method, it might have the following TypeScript:
public ngOnInit() {
    let currencies = ["USD", "GBP", "EUR", "JPY", "MXN"];
    for(let key in currencies) {
        this.convert(currencies[key])
        .subscribe(result => {
            this.data.push(result.data);
       });
    }
}
When the application launches and the ngOnInit method triggers, a loop cycles for every currency type in the local currencies array. Each currency is sent via HTTP to the Coinbase API and the result is appended to the public data array that eventually binds to the user interface.
No other application logic is necessary to power this application.
Designing a Beautiful User Interface with XML
With the page logic ready to go, the corresponding user interface needs to be created. The user interface exists in the project's app/app.component.html file as defined in the TypeScript file.
From a design perspective, it needs an action bar, sometimes referred to as a navigation bar. It also needs a list of currencies and a Bitcoin value. To put emphasis on the Bitcoin value, it takes up half the screen.
Open the project's app/app.component.html file and include the action bar like this:
<ActionBar title="{N} CODE Magazine">
</ActionBar>
The page can be split into two sections by using a GridLayout with evenly distributed rows and columns.
<GridLayout rows="*, *" columns="*">
</GridLayout>
The asterisk indicates that a stretch should be made. There are two asterisks defined for rows, meaning that there are two rows. These asterisk values could easily be constant numeric or set to auto, which only takes as much height as necessary.
More information on the GridLayout and layout containers in general can be found in the NativeScript documentation at https://docs.nativescript.org/ui-and-styling.html.
Inside the GridLayout, the first row is the Bitcoin value:
<Label
    text="1 BTC"
    row="0"
    col="0"
    verticalAlignment="middle"
    class="h1 text-center">
</Label>
The text to be displayed is constant and the positioning is constant, starting at the zero index. Various NativeScript classes are used to give the text a pleasant appeal. More information on theming in NativeScript can be found in the NativeScript documentation at https://docs.nativescript.org/ui/theme or check https://github.com/NativeScript/theme.
The second row of the screen is a ListView with dynamic data that comes from the Coinbase API:
<ListView
    [items]="data"
    row="1"
    col="0"
    class="list-group">
</ListView>
The items of the ListView are bound to the public data variable found in the TypeScript file.
Each row in the ListView needs to be configured. Within the ListView tags, the following lines of code exist:
<ng-template let-c="item">
</ng-template>
Each item in the data array will be represented as c. For example, to access the Bitcoin amount, c.amount is used.
Within each row template, there needs to be another set of columns. This means that there is another GridLayout, this time within the ng-template tags:
<GridLayout
    rows="auto"
    columns="*, *"
    class="list-group-item">
</GridLayout>
The inner GridLayout has two columns and a row height that only takes as much space as necessary. Each of the two columns are dynamic data:
<Label
    text="{{ c.currency }}"
    row="0"
    col="0"
    class="h2">
</Label>
<Label
    text="{{ c.amount }}"
    row="0"
    col="1"
    class="footnote text-right">
</Label>
By using curly brackets, the content of the variable is printed rather than the name of the variable.
Although the only page in the single-page application is complete, the base template that came with the new project needs to be altered. This is because the base template came with a little more than what needed to be used. It needs to be altered to prevent run-time errors.
Cleaning the NativeScript Project
The base Angular template for NativeScript ships with some items components. These components have routes intended for navigation. Because this is a single page application, neither the components or the routes are required.
Open the project's app/app.routing.ts file and empty the routes array:
const routes: Routes = [];
Remove any imports referencing files in the items directory.
Now open the project's app/app.module.ts file and remove the importing of files in the items directory. Also remove references to those files throughout the @NgModule block.
Because an Angular service is used in the component that was created, it needs to be imported globally into the project. Within the project's **app/app.module.ts` file, include the following:
import { NativeScriptHttpModule } from "nativescript-angular/http";
The NativeScriptHttpModule needs to be included in the imports array of the @NgModule block as well.
Running the Project in the iOS or Android Emulator
At this point, the project is ready to run. In fewer than 40 lines of TypeScript logic and fewer than 15 lines of XML, a cross-platform iOS and Android application is born. To accomplish the same in Objective-C or Java, significantly more would have needed to be done.
In fewer than 40 lines of TypeScript logic and fewer than 15 lines of XML, a cross-platform iOS and Android application is born.
To run the emulator, execute the next bit of code from the NativeScript CLI:
tns run android --emulator
This command assumes that Android was properly configured on the development computer. The android argument could easily be replaced with ios, provided that Xcode is installed and configured.
Taking the Application to the Next Level with Caching
Many applications that consume remote data need to account for situations where there's no network connection. It's often a good idea to cache data and display it if fresh data can't be obtained.
The Bitcoin conversion rates can easily be stored locally and loaded at will.
To do this, within the project's app/app.component.ts file, import the following NativeScript class:
import * as ApplicationSettings from "application-settings";
The ApplicationSettings class allows key-value storage, among other things. The focus here in this article is only on key-value storage.
Within the AppComponent class, include the following save method:
public save() {
    ApplicationSettings.setString("data", JSON.stringify(this.data));
}
The complex data found in the data variable can't be stored in key-value storage, so it must first be serialized into a string.
To load the data, a similar load method might exist:
public load() {
    this.data = JSON.parse(ApplicationSettings.getString("data", "[]"));
}
The data found in the data key is loaded. If nothing exists at that key, an empty array serialized as a string is loaded. Because the data variable is meant to be complex, the serialized data is parsed back into an object.
There are many ways to call these methods, but a common way is from a button in the application action bar. Within the project's app/app.component.html file, add the following within the already existing ActionBar tags:
<ActionItem text="Save" ios.position="right" (tap)="save()"> </ActionItem>
<ActionItem text="Load" ios.position="left" (tap)="load()"> </ActionItem>
Running the application yields the same results as the previous live data only version, but this time the caching logic and buttons are available. In this example, the data is not automatically cached and loaded from a local copy.
Conclusion
Developing native mobile applications for Android and iOS no longer has to be difficult or time consuming. With NativeScript, it's very easy to create visually stunning applications with a fraction of the code and time spent during development.