In the last issue of CODE Magazine, we took a look at CODE Framework’s WPF features. This time, we are going to look at a completely different area of the framework: Creating business logic and middle tiers as SOA services. SOA is the cornerstone of many modern applications, creating systems that are more maintainable, flexible, and suitable for a wide range of scenarios, ranging from Windows to Web and Mobile scenarios using a wide variety of technologies, and outperforming conventional multi-tiered applications in a range of metrics. Using CODE Framework, it also becomes easy and extremely productive to build SOA layers.
In today’s application landscape, there only seems to be one aspect that is certain: Uncertainty. Which UI technology or which mobile platform will be dominant in the years to come? We know that for business applications especially, rich Windows UIs are still very popular and the most productive type of application. We also have no doubt about the significance of Web applications in general, and HTML5 in particular. We know that iOS and Android are important mobile operating systems, and we hope Windows Phone will catch up. There also is a good chance that Windows 8 Metro will have a significant role to play. But do we know any of these for sure? And how many of these does any system have to support now or in the future? Even if you know that you want to build your application based on HTML5, which is going to be the predominant tool for building such applications a few years down the road? Or which approach to building Windows 8 Metro applications will be the one you choose?
In short: It is currently impossible to answer many of these questions now, and it’s certainly impossible to answer these questions if you are aiming for a 5- or 10- or even 20-year horizon. 20 years may seem like an extremely long time in IT, but realistically speaking, databases that have been maintained for 10 or 20 years, or business logic that has its roots in VB6 is not uncommon. In fact, one of the most common operating systems in use today (Windows XP) is now more than a decade old. Although UI choices and platforms (such as phones and slates) have changed very rapidly and will likely continue to do so, middle-tiers and databases have evolved at a much slower pace. Consider CODE Magazine as an example. The subscriber system we are using for the magazine has continually evolved over the years, but many of its components are now over a dozen years old and that is perfectly fine.
Basing your systems on SOA and Services is the best way to deal with the uncertainties of today’s development landscape, build systems that will be maintainable for a long time, and adjust flexibly to new demands.
So how do you work productively as a developer or architect in such an environment? How can you build middle tiers, business logic, and databases in a way that will live up to the standards you set in the last decade or two, not to mention expectations in the future? How can we fulfill the expectations of a technical and economic environment where it is not acceptable to have to throw out the entire application to support the latest mobile device or browser? And how do we fulfill those expectations in a way that’s a realistically feasible approach, highly productive, creates highly flexible and exquisitely architected systems that are easy to maintain without a large squad of rocket-science-level developers, and generally promotes high quality as a goal that is easy to achieve?
Services are the Answer
I believe very strongly that Services and SOA (Service Oriented Architecture) are a very good answer to this problem. And by that, I do not mean the creation of XML Web Services or the creation of REST Services or any similar technology you might choose. Instead, I am talking about creating services that are more abstract and broken out as generically callable objects with an agreed-upon interface (“contracts”). Once such abstract services are created, various deployment choices can be made.
Do you feel that REST is the ideal way to get to those services? Fine choice! You like XML Web Services, and SOAP better? That’s fine with me too. You prefer binary optimized services for efficiency? In scenarios where binary optimized services are technically possible, they might be the best choice of all. But these are decisions that are made later. Start out with a REST Service and you might be stuck with REST forever. The same is true for many systems that are based solely on SOAP. But if you start out generic, you have great freedom in choice. Perhaps you use TCP/IP-based services initially, but then decide you want to write an iOS or Android client, and REST is the better choice for that. With solid architecture, that is simply a deployment choice.
None of these aspects are new. SOA has been around for a while and different types of service standards as well. But how do you really approach a project that utilizes SOA and do so in a way that is highly productive yet at the same easy to do, even for junior developers? And how do you really call services using all these different standards?
If you have done service work in the past, you know that a lot of this theory is not necessarily the way things work in the real world. Lots of services are stuck in SOAP. Lots of services are REST-based and cannot adjust to other standards. In fact, many environments are specifically geared towards the creation of specific types of services but can’t easily cross over to other standards. If you are using WCF in .NET, you are in a pretty good position, as WCF is highly flexible; even so, services created for SOAP do not easily translate to REST and vice-versa.
CODE Framework SOA Features
And this is where CODE Framework’s SOA features enter the picture. CODE Framework is a free and open source framework provided by the makers of CODE Magazine. It has grown out of a larger commercial product, enhanced with new features, and it is available on CodePlex (http://codeframework.codeplex.com). For specifics as to how to get and install it, see the sidebar. The range of features includes anything from data access to front ends of various kinds (WPF, Web, Mobile, etc.). For a taste of CODE Framework’s WPF features, see the article in the Jan/Feb 2012 issue of CODE Magazine. This time however, we are going to take a look at features in the Services and SOA sub-sections of the framework.
The particular goals of the CODE Framework SOA features (which are all based on WCF) include the creation of contracts and services in a highly productive way, enable hosting of those services in ways that are convenient for both development and runtime deployment, and enable seamless swapping beyond various standards and protocols to support any conceivable caller and scenario without the need for any rewrites. In addition, CODE Framework provides tools and templates to make this easy and more productive than creating old-fashioned business layers in conventional multi-tiered scenarios.
To start exploring the CODE Framework SOA features, we will create a new service contract definition as well as an implementation. The example will closely match the features used by the WPF client application I described in last month’s CODE Framework article, which used hardcoded dummy data. If you were so inclined, you could use the example created in this article and call the services from that WPF client to create a more complete application. However, to keep things simple, the downloadable sample accompanying this article will be stand-alone.
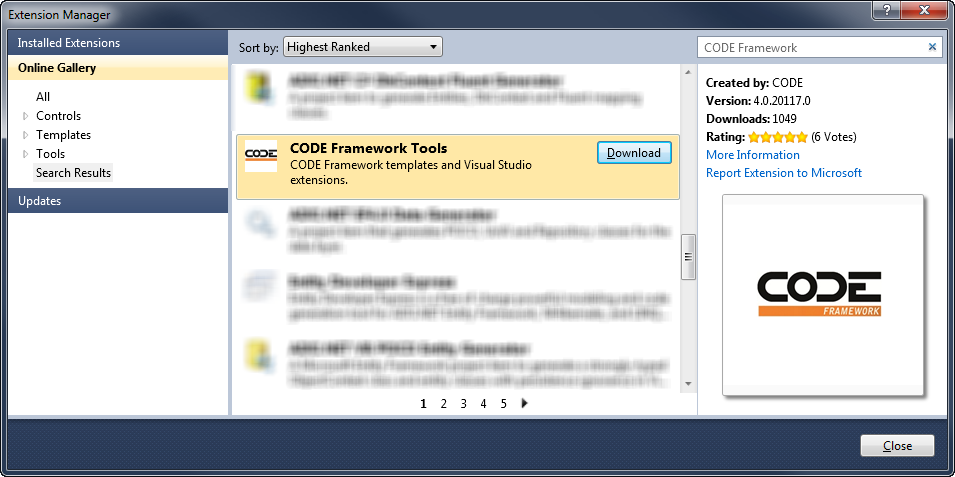
To follow this example, you need the CODE Framework on your computer, or at the very least the CODE Framework Tools (which will automatically retrieve all needed components from CodePlex, in case you are missing any, which makes this a convenient option). You can install the tools through the Visual Studio Extension Manager (found in the Tools menu) by searching for “CODE Framework” on the Online Gallery (scroll down a bit if you don’t see it right away). Figure 1 shows the Extension Manager in action. Once installed, the CODE Framework Tools provide CODE Framework project and item templates as well as other useful tools.
Creating a First Service Contract
The WPF client application created in last issue’s CODE Framework article shows a customer management application that enables you to look at a list of customers, search for customers, and edit customers, but it uses a fake data layer (hardcoded data in the front end) for the purposes of the example. In the example shown in this article, we will create some of the services that can be used to support those features through to the middle tier. (We will still forego the step of accessing data in a database, which may be a topic for a future article in this series.)
To start out, let’s create a contract definition so we know what features we want to support in our middle tier. This defines which methods (“operations”) our service has, and which parameters we send to it and what return values we expect (in SOA lingo “data contracts” or “messages”). Our service isn’t going to be overly complex or difficult. It supports a way to get all customers (whether you want to do that in a real world scenario is a different question due to the potentially large number of customers -- but perhaps for some smaller support data this would be more realistic). We need a way to search for a sub-set of customers based on different criteria. And we need a way to retrieve a single customer, modify the customer, and save the customer.
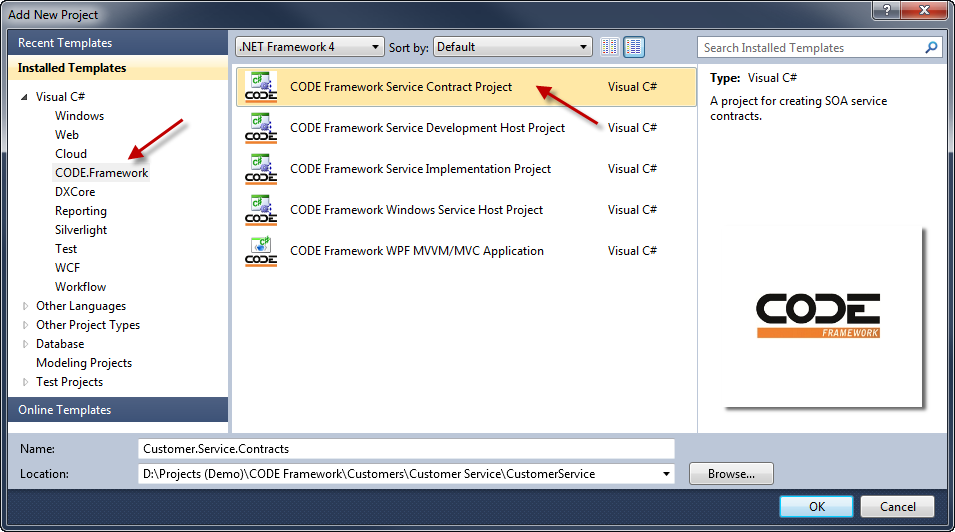
We do all this by creating a new solution and project based on the CODE Framework Service Contract project template. This project template can be found under the “CODE.Framework” category in your “New Project” dialog (see Figure 2). This project template is rather simple, and you could probably create the same project by hand without even using the provided tools. It makes sure all the right .NET Framework references are included (CODE Framework SOA projects are based on WCF) and it provides a first example contract that is also customer related. This means that there is a default contract file, called ICustomerService.cs, and is quite convenient for our needs. Most real-world projects are likely to remove or rename this file, or use it as initial guidance.
The default ICustomerService interface in this file already provides two methods (operations) that are similar to what we want to create in our example, but not quite right. What we want are the following four operations:
- GetAllCustomers()
- SearchCustomers()
- GetCustomer()
- SaveCustomer()
These operations are self-explanatory. The first two provide ways to retrieve full or partial customer lists. The third operation retrieves a single customer with all its detail, and the fourth allows us to save modified customer information in case we want to change what we retrieved with the third operation.
Using the CODE Framework, you can follow a standard pattern in how you define the parameters and return values for these operations. There is always a single input parameter, which is itself a class that usually has multiple properties. There is also a return value that is a custom class with various properties. Of course, what you are creating here is a standard WCF service contract and you just use the CODE Framework to make that as easy as possible. Because it is a standard WCF contract, you can do anything WCF supports, including sending multiple parameters and simple types, such as strings or numbers, as parameters and return values. The pattern of “single complex parameter in, single complex return value out” maps very well to all kinds of service standards and provides maximum flexibility. Note that we also like to create these custom parameter classes even if we do not send a parameter value, because then we have a simple empty class. This gives the ability to start adding parameters later without breaking the operation’s contract. In other words, it is simple to keep the service compatible over time. You do not have to follow these patterns to use the CODE Framework, but you will find that it makes your life easier and your architecture more maintainable.
We also name our parameters using a standard naming convention that includes a “Request” or “Response” suffix. The class we use as the parameter for the SearchCustomers() method is called “SearchCustomersRequest” and the return value is called “SearchCustomersResponse”. Sometimes we also send what would be a pretty close equivalent to a record in a database (such as the detailed information about a specific customer), in which case we like to use an “Information” suffix instead (such as “CustomerInformation”). Again, this is not a requirement, but we like the idea in many cases. Where it makes sense, we sometimes bend that rule a bit, too.
To create a contract with these four operations, change the ICustomerService interface to the following:
[ServiceContract]
public interface ICustomerService
{
[OperationContract]
GetAllCustomersResponse GetAllCustomers( GetAllCustomersRequest request);
[OperationContract]
SearchCustomersResponse SearchCustomers( SearchCustomersRequest request);
[OperationContract]
GetCustomerResponse GetCustomer( GetCustomerRequest request);
[OperationContract]
SaveCustomerResponse SaveCustomer( CustomerInformation request);
}
Note that this is a standard WCF service contract using standard WCF attributes such as [ServiceContract] and [OperationContract] to indicate our intentions to WCF.
As you can see, each of these classes uses a different custom class for parameters and return values. Some of them are rather simple, such as the GetAllCustomersRequest class:
[DataContract]
public class GetAllCustomersRequest
{ }
It’s admittedly not very exciting, but this class is provided to provide a defined contract that can then be version controlled over time (“versioning”). Perhaps we may need to add a parameter in the future (such as ExcludeInactiveCustomers) which we can easily do by adding a property for that purpose.
Some other classes are a bit more sophisticated, such as the GetCustomerRequest class:
[DataContract]
public class GetCustomerRequest
{
public GetCustomerRequest()
{
CustomerId = Guid.Empty;
}

[DataMember(IsRequired = true)]
public Guid CustomerId { get; set; }
}
This class includes a single property that we use to tell the service which customer we want to retrieve. There are a few things to note here. For one, we explicitly flag data elements in the contract as [DataMember]. This is not strictly required by WCF (which treats this property as optional if all members are data members) but we find that if we do not do it, it is a very common source of errors over time. We also like to use the IsRequired flag for members as a common option to indicate that this data element is required. You will see this often in our contracts, as it is often painful to deal with when elements are not required and are therefore not serialized into the contract for some reason. In more unusual client environments where you have to hand-code the service call, this can be quite inconvenient. Finally, you may notice that we use a constructor to create an explicit default value for the property. Again, it’s not a requirement but a convenience feature, as it makes it easier to deal with the contract in some cases. (Note that these defaults do not carry through to certain service clients, but it is still convenient to have them when they do show up). Many of these aspects work well for us and we recommend them, but you can substitute your own standards. After all, this is just a plain old WCF service contract.
It is also interesting to take a look at some of the response contracts. Here is the GetAllCustomersResponse class:
[DataContract]
public class GetAllCustomersResponse
{
public GetAllCustomersResponse()
{
Success = false;
FailureInformation = string.Empty;
Customers = new List<CustomerQuickInformation>();
}
[DataMember(IsRequired = true)]
public bool Success { get; set; }
[DataMember(IsRequired = true)]
public string FailureInformation { get; set; }
[DataMember(IsRequired = true)]
public List<CustomerQuickInformation> Customers { get; set; }
}
This class defines two properties that we add to all our response contracts: Success and FailureInformation. Again, this is not a requirement, but it works well for us. These properties indicate whether a service call was successful in a technical sense (in other words: “Did an exception occur on the server?”) and if not, we have a simple way to provide very basic error information. As a little side-note: We do not commonly use fault contracts, as we may encounter scenarios where they are not supported or are inconvenient. We also do not indicate detailed exception information in the FailureInformation property, as that would be a security problem (passing detailed exception information is a great source of information for hackers). Instead, we provide some basic information back to the client, and log detailed information on the server. (See below for more information as to how efficient we handle that scenario).
Note that this contract also includes a List of CustomerQuickInformation objects. This is where the actual data is stored. CustomerQuickInformation objects are data elements that describe the most important aspects of a customer (Name, ID,…) as it would be convenient for displaying lists of customers. Note again that we created a default empty List of CustmerQuickInformation in the constructor, as it can be extremely inconvenient to have to repeatedly check for null in many scenarios. We can avoid some of those by setting the default in the constructor.
All of the classes used for requests and responses follow a similar pattern. See Listing 1 for more details (or download the associated code sample). Note that the full listing contains quite a bit of documentation, which we consider important for contracts, as they define the interface to callers who may need to know what different contract elements are used for.
And that’s about it for the contract. One further thing to point out is how simple the service contract project is. It has very little code, as it only defines structures but no logic. It has very few assembly references, and the only ones we have are to some fairly basic .NET Framework assemblies. There are no references to CODE Framework assemblies. There are also no references to any business logic assemblies. And that is how we will keep things in this project. Contract assemblies are supposed to be simple and transferable. This is one way (although not the only way, of course) to give a contract definition to someone else. A potential caller using a .NET application as a client could simply use this DLL to get everything they need to know to interact with the service (or at least its structure). For that purpose, we would not want to have to give away other assemblies that this DLL depends upon.
Implementing the Service
So far, we have created a simple WCF Service Contract with some help by the CODE Framework, although so far, nothing has been surprising. As we start to implement our service, this changes drastically. The CODE Framework Tools are now starting to kick in further and make things simple for us.
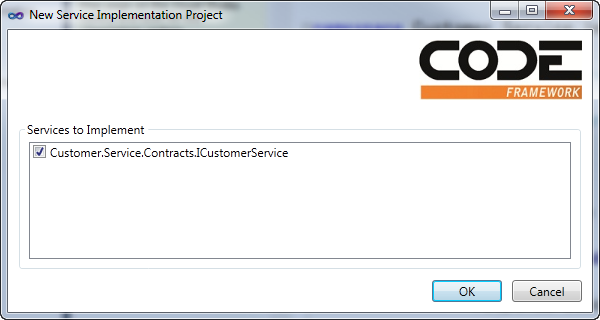
As a first step, let’s create a new project for our service implementation. To do so, add a new project to your current solution and pick the “CODE Framework Service Implementation” project template. Using this template, the CODE Framework tools analyze your current solution, find all Service Contracts, and display them in a tool window (Figure 3). This allows you to pick the services you would like to implement, and the tools create a default implementation for you. In our example, we only have one Service Contract, which is selected by default, so we can click “OK” to continue with the creation of the project. If multiple Service Contracts are found, you can pick all the ones you want to implement and the tool will create as many implementation classes as are needed.
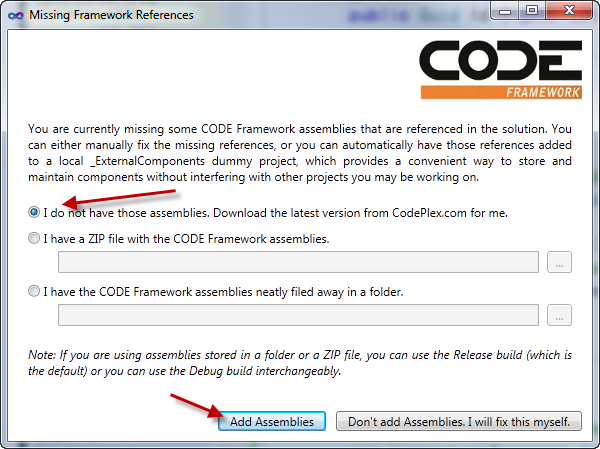
The next step depends a bit on whether or not you have already added CODE Framework assemblies to your project. If you have followed along with the example so far, you do not have those. The tools detect this issue and will help you remedy this problem by asking you where to retrieve these assemblies from. This includes automatically downloading the latest version of the required assemblies from CodePlex, which is also the default option (Figure 4). Accept that option and pick “Add Assemblies” to have the tools download the assemblies and add them to your current project for you. Note that if you were to repeat the task of creating a service implementation, this step is not required again and will be skipped. The dialog box shown in Figure 4 is only displayed if problems with missing assemblies are detected.
Once the creation of the new implementation project finishes, you have a project with all the required references to .NET Framework assemblies, CODE Framework assemblies, and of course the contract assemblies for all the contracts you choose to implement (ICustomerService, in this case). You also end up with a valid default implementation of all services (in a file called CustomerService in this example). The default implementation is a class that implements the contract interface by creating implementations for all the required operations. For instance, the default for GetAllCustomers() is:
public GetAllCustomersResponse GetAllCustomers( GetAllCustomersRequest request)
{
try
{
var response = new GetAllCustomersResponse();

// TODO: Add service-specific code here

response.Success = true;
return response;
}
catch (Exception ex)
{
LoggingMediator.Log(ex);
return new GetAllCustomersResponse { Success = false, FailureInformation = "Generic fault..." };
}
}
}
Again, this implementation follows a standard pattern that we use in all of our services (you could deviate if you wanted to, but we don’t recommend it as this works so well for us-well, you get the idea). Our operations have a try/catch block that wraps all the code. The service then implements its logic. In the GetAllCustomers() method, the final goal is to send back a fully populated GetAllCustomersResponse object that contains all the customers in the database. For that purpose, a response object instance is created, then whatever code that needs to be executed to retrieve the list runs (the part that is represented by a TODO comment) and finally, the Success flag is set to true, and the response object is returned. If any of this fails, the catch-block kicks in, uses the CODE Framework Logging System to log the problem away, and returns a response that indicates failure with some fairly rudimentary failure information (slightly more detailed than in the snippet above, which we trimmed for brevity) that allows the caller to track down further information.
Note the use of the CODE Framework Logging System. This is a good idea, because there are other components in the system that can pick up this information, as we will see below. Of course, a lot of people have their own logging systems or may even use other logging frameworks. That is fine. You can easily plug those into the CODE Framework LoggingMediator object. This is an example of a design philosophy we follow throughout all parts of the framework: We provide interesting default features, but enable bringing in other components easily if desired.
At this point, it is up to you to create the missing logic. For instance, you could go to the database to retrieve the customer information and return it from the service. This could be done any number of ways. For instance, you could use Entity Framework or NHibernate to connect to a database. Maybe you have an existing business logic layer that you can invoke. Or maybe you want to use optional CODE Framework data access components for this purpose. This decision is completely up to you. And note the following interesting aspect: The service contract provides a high degree of abstraction. If you decide that you want to use a certain technology and it turns out to be a bad choice, it is easy to change this implementation without any risk of breaking service callers. This also means that you can create quick-and-dirty implementations or simulated implementations and replace those later with final code, and you are at no risk of causing the caller problems. It is some nice extra insurance against implementation problems that might otherwise be disastrous.
For this example, we will hard-code the return value. (Perhaps we will take a look at CODE Framework business object and/or data access components in a future article). Replace the TODO comment with the following code:
for (int x = 0; x < 100; x++)
{
response.Customers.Add( new CustomerQuickInformation
        {
            Id = Guid.NewGuid(),
            FullName = "Customer #" + x
        });
}
This populates the list of customers with 100 dummy records, which will serve our purposes just fine in this example. In fact, this might even serve us just fine as a first step in a real-world service. Once we can provide this basic implementation, even though the data is bogus, this may already be useful for the other part of the development team that has to implement the interface. In early stages of development, this may be highly useful (although in later stages not so much for the obvious reason of it being bogus data). In fact, this scenario is so common and allows teams to work in such a high degree of parallel development that we are working on new features of the framework that can generate this kind of dummy data automatically as an initial step. Perhaps by the time you read this article, this feature may already be available.
You can add similar dummy code to the other three methods that the service provides. (Or download the sample code associated with this article).
And that’s about it! You have now implemented a fully functional version of our service, although with dummy data and no real access to a true database (which is a not insignificant detail in general terms, but rather irrelevant for the purposes of this specific article).
Hosting the Service for Development Purposes
Now that you have the service, you need to make it available in some way. In other words: You need to start it up so it becomes callable. This is where things usually get a bit unfamiliar for people who have never created services before. You have to create endpoints and specify protocols and bindings and set a plethora of parameters. And because the services you have created so far are standard WCF services, you can now follow the instructions of any WCF book to host these services. Or, you can let the CODE Framework help and worry about many of these details later (if you are so inclined).
One of the aspects of service hosting is that there are quite a few different ways to do it. Some of the choices for true production deployment are somewhat of a pain to deal with during development. For instance, if you choose to host services yourself in a Windows Service process, you face a scenario that is a bit of a pain to debug. To alleviate that problem, CODE Framework provides different ways to host your services (and as mentioned above, you can use all default WCF hosting options as well if you like that better). One of them is specifically geared toward development scenarios, and that is what people usually start out with.
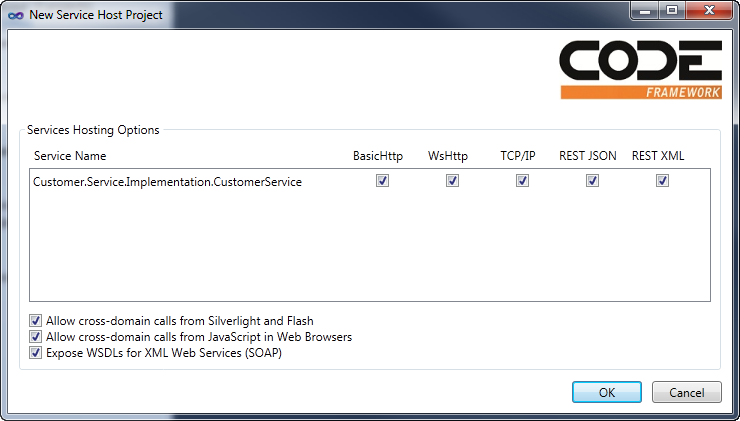
To create a hosting project that is particularly suitable during development, add another project to the solution based on the CODE Framework Service Development Host project template. Once again, this template type analyzes the entire solution to find implemented services. You will see a dialog box, as shown in Figure 5. In this dialog box, you can choose all the services you would like in your development host and the standards and protocols you want to support (note that there is a practically identical dialog in the project template for Windows Service process hosting, which is a common final deployment choice for finished projects). In most scenarios, you can accept all of these defaults and click OK, which creates a complete hosting project that requires no further work. All that is left to do at this point is to make this new project the solution’s startup project and click F5 to run it.
There are a few more details to point out. For one, if you run this project the first time, you will probably get a message from Windows asking whether you want to allow this hosting operation. Confirm this message. The second issue you may run into is that the project does not start up correctly and instead shows a security-related error message. If you see this, it is because some of the hosted endpoints run on a URL that includes “http://localhost/...” which may already be otherwise handled by your operating system and you are now effectively competing for the right to handle calls to that domain. There are various ways to fix this problem. By far the easiest is to run Visual Studio with Administrator privileges (right-click the Visual Studio icon and pick “Run as Administrator”).
The running development service host includes an interface that provides a way to see which services are running (Figure 6) as well as a way to call the services (Figure 7 and 8). Having the service host window is very convenient during development for a number of different reasons. For one, you can see all the different ways the service is hosted (in the example, the single service is hosted five ways. More about that below). You can also see the URL (“endpoint”) that each service is accessible under, as well as a few details, such as whether a WSDL endpoint is exposed and how large the messages (data amounts) can be that are communicated to the service (by default, WCF services allow for a relatively small amount of data that is often not sufficient for business applications, so the CODE Framework default increases the size somewhat, and can be configured).

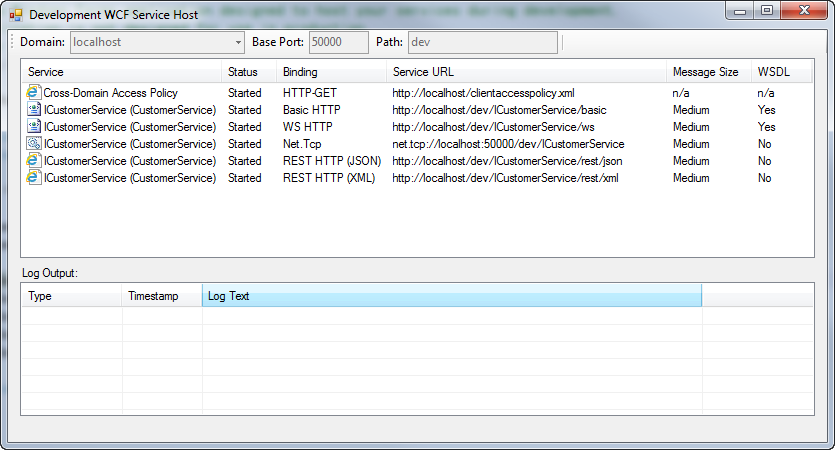
The various supported protocols and bindings are worth a second look. If you have accepted all the defaults, the service is now exposed as an XML Web Service using both basic HTTP and WS-HTTP standards. It is also exposed in a binary fashion using TCP/IP, which is an interesting option if you want to access the service from a .NET client. Furthermore, the services are hosted as REST services, supporting both XML and JSON data formats.
This last point may give you pause if you are familiar with WCF services, and especially with REST services. In WCF, you create a service that is either REST or something else. And for REST services, you pick either XML or JSON as the data format. But those services cannot move seamlessly between two non-REST formats or switch between XML and JSON. Using CODE Framework, you can expose any service as REST and have the option to pick JSON or XML as needed, or support both.
If you are now scratching your head and wondering how that works and whether that is even really possible following REST paradigms: We are exposing these services as REST services that support POST operations. RESTafarians may now point out that this is not following all the REST paradigms that should support other verbs and so forth and they are absolutely correct! Mapping an existing service to REST in this fashion only supports and uses part of the REST standard. If you want to follow all the REST ideas, you can still do that with CODE Framework, but you have to create a REST-specific service. However, if you have existing services and want to make sure you can call them from REST clients (such as JavaScript, iOS, or Android clients), this approach works very well and provides great reusability of existing code. For this reason, we find this approach very useful and straightforward. And for developers using this approach, exposing these services becomes as simple as picking a project template. (The problems we had to solve to enable this were not for the faint of heart.)
Also noteworthy are the URLs that act as the endpoints for the services. Because we have not provided any sort of configuration, the hosting tools come up with smart settings by default. These include a “dev” virtual directory (which is generally a good idea to differentiate multiple services that may run on the same computer), the name of the service, and appropriate prefixes to make sure none of the endpoints conflict with each other. Of course, all of these settings are configurable. The project template includes a default App.config file with commented-out settings that you can change. In addition, all normal WCF configuration settings work (although it is simpler to use the more abstract CODE Framework settings). You also have the option to hook into the code that creates the host so you can impact every aspect programmatically.
The final aspect we want to highlight here is the ability to place cross-domain calls to these services. This is important in various scenarios. For instance, Silverlight applications can only place calls to services on other domains if those services explicitly support cross-domain calls. This means putting a ClientAccessPolicy.xml file into the root of the Web Server hosting the service. One of the default options in the template wizard allows for this, and if you accept that default, you end up with a development host that serves up an appropriate response when this file is requested. (This file doesn’t exist, but is served up dynamically). You can see that as the first item in Figure 6. In fact, you can double-click that item to see the “file” in a browser.
Using CODE Framework SOA Features, you can host a single service as XML Web Services, REST Services, and binary services, completely interchangeably.
A similar issue applies when making a service call from JavaScript in a Web browser. This time however, the cross-domain call is enabled by adding certain HTTP headers to each response. This is a hurdle many developers have difficulty with, but they become non-issues with CODE Framework services, as enabling this type of cross-domain call is enabled by picking that option in the wizard (Figure 5).
You can also see the code it takes to enable these features in Program.cs of the generated project. Enabling cross-domain calls is as simple as the following two lines of code (with additional parameters allowing for further fine-tuning):
host.AllowHttpCrossDomainCalls();
host.AllowSilverlightCrossDomainCalls();
Taking the Services for a Spin
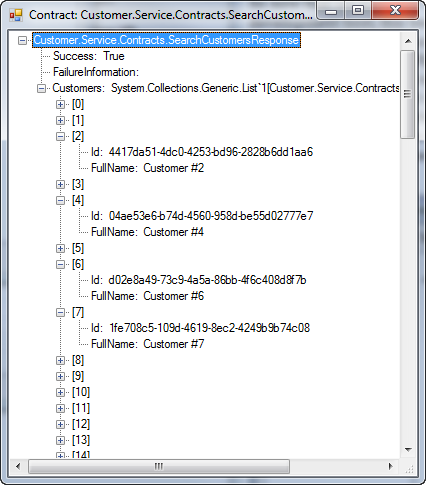
Now that you have your services up and running, how can you take them for a spin? Using the development host, this is child’s play: Double-click one of the host items (Figure 6), such as the one listing the service using the TCP/IP (net.tcp) standard. This launches a test-bench for the service, as shown in Figure 7. Pick the operation (method) you would like to call, which shows details of the request contract. For instance, if you want to try the SearchCustomers() operation, you can see that it uses a SearchCustomersRequest data contract that has three string data members (properties), which are all flagged as being required. You can now type data into each of those fields (because we are hard-coding the response, the data you provide makes no difference in this example, but would in the real world) and click Invoke to call the service. The response is shown in Figure 8.
This provides a great way for developers to create services and immediately run them without having to create a client application. In systems with a very large number of services (as is common in real-world scenarios), this is a nice ability to have.
Note that depending on the service endpoint, the test bench behaves somewhat differently. For instance, if you choose a REST-based endpoint with XML formatted data, the result is shown as raw XML. Similarly, if you use JSON formatted data, the response is displayed as raw JSON.
Technical note: All test-bench service calls use actual service infrastructure. For instance, if a TCP/IP service is called, the test-bench uses a TCP/IP infrastructure rather than calling the object locally. Similarly, if you choose a Basic-HTTP endpoint, that infrastructure is used, and if you choose REST, a REST call is placed. This is important and somewhat complex to pull off, as it provides a real-world view of whether or not the service call works as intended.
Another interesting aspect of making REST calls is that as you want to place a call to a REST service, you need to know the endpoint address (easily visible in the host UI) as well as the contract format and what that looks like exactly in XML or JSON format. This part is not as easily discerned. Using CODE Framework and this test bench, you can click the “Get XML” or “Get JSON” buttons to see the XML or JSON representation of the input contract as it is currently displayed. For instance, the input as defined in Figure 7 translates to the following JSON, which could then be directly used in REST clients such as JavaScript:
{ "CompanyName":"CODE", "FirstName":"Markus", "LastName":"Egger"}
This particular example is somewhat trivial. In real-world scenarios, contracts can be quite complex and this particular feature has saved us a lot of time on many occasions.
Note that as services are called, exceptions may occur. As mentioned before, those exceptions details are not sent back to the caller for security reasons, and are instead logged on the server. Using this development host, the host UI acts as a “log sink.” In other words: Everything that gets logged using the logging components will automatically display in the host UI. This makes it easy to see logged details during development without having to deal with systems such as the Windows Application Log. (Note: You can also double-click items to see a larger version of each message).
Also important for debugging: You can set breakpoints inside of your services as you would in any other .NET application, as this service host is a simple local process.
Calling Services
For service developers, this just about wraps up the story and for the most part, it becomes a “more of the same” issue. However, there also is the other side of the scenario, which is the caller. Of course you also want to be able to call the service easily. CODE Framework provides a large number of features for the client-side as well, making it easy to call all kinds of services (including, but not limited to our own services) from clients such as .NET, Silverlight, and mobile applications, and JavaScript. This particular article focusses on the server side. Client-side service calls will be the topic of another in-depth article. However, we want to provide at least a first glimpse of calling the service from one of the available client options. As an example, we picked a new .NET Windows Forms client application. (If you want to follow this example but make it a bit more exciting, you can use the same code and put it into the WPF example we described in last issue’s article).
A simple Windows Forms example will serve our purpose, so we created a new project based on the standard .NET Windows Forms template. The first default form created also works well. You can add a data grid view control to show the provided result.
To call the service, use two CODE Framework assemblies and the features they provide: CODE.Framework.Core.dll and CODE.Framework.Services.Client.dll. To have access to those, right-click the project References and browse to the location of those files (they are conveniently located in the _ExternalComponents/CODEFramework folder under the current solution). In addition, you need to have a reference to the contract you created, which you can do by adding a reference to the contract project in the current solution. (Note that you do not need access to the service implementation as that remains on the server only!).
Finally, you need to provide some rudimentary configuration so the client knows how to get to the desired service. For this, add an App.config file to the project and add the following config settings:
<?xml version="1.0" encoding="utf-8" ?>
<configuration>
<appSettings>
<add key="ServiceBaseUrl" value="localhost" />
<add key="ServiceProtocol" value="NetTcp" />
<add key="ServiceBasePath:ICustomerService" value="dev" />
<add key="ServicePort:ICustomerService" value="50000" />
</appSettings>
</configuration>
This specifies that you want to use binary-optimized TCP/IP. The rest of the settings match the settings on the server-side that were chosen for you by default. It is important that these settings match so that the client and the server can find each other. If you want, you can also pick other protocols since you are supporting five different ones on the host.
Calling Services using the CODE Framework is as easy and efficient as calling a local object.
Now you can go to the constructor of the form and use a CODE Framework helper class called “ServiceClient” to make a call to the service right after the call to InitializeComponent():
ServiceClient.Call<ICustomerService>(service =>
{
    var response = service.GetAllCustomers( new GetAllCustomersRequest());
    if (response.Success)
        dataGridView1.DataSource = response.Customers;
});
The ServiceClient class provides various ways to connect to services. The Call() method allows specifying a type and then passing the code that is to be executed. A very similar approach returns a reference to the service. There are quite a few variations on this theme that are beyond the scope of this article. The important part is: It becomes easy to call services. So much so, that it is as easy for developers to make service calls as it would be to use a local object.
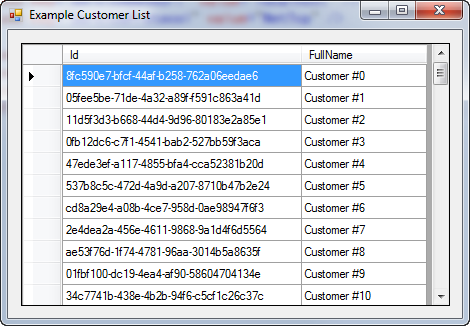
Now that your simple example client is done, you can launch both the client and the host at the same time (you can set multiple startup projects in the solution properties). The result of this simple example can be seen in Figure 9.
Note: In real-world scenarios it can sometimes happen that the host process is slower to start up than the client application, in which case, the client application (that calls the service in the constructor of the first form) fails to call the service (that hasn’t quite started up) and shows an error. If you encounter this problem, put a wait-state (such as Thread.Sleep) before your launch code. This is usually not a problem with real-world clients, but sometimes test clients are very small and launch extremely quickly.
In a future article in this series, we will take a closer look at various service client options, from .NET (including WPF) to Silverlight, Silverlight for Windows Phone, other mobile platforms such as iOS and Android, and of course Web applications, both in the form of ASP.NET as well as JavaScript within HTML.
Production Deployment Considerations
Of course, projects do not remain in development stages forever, and at some point you have to start considering production deployment options. Of course you can deploy services using standard WCF deployment options, such as hosting in IIS or hosting in Azure. We often enjoy the option to self-host services in Windows Services processes, which provides full control over the services as well as the ultimate freedom in hosting options. It also allows hosting of services on servers with very small attack surface and high efficiency, as they do not need any other running components. CODE Framework provides a special project template that works nearly identically to the development host template, but ends up creating a Windows Service host.
One of the concerns people usually raise when it comes to SOA is performance. Isn’t it much slower to call a service than a local object? That concern is not without merit. Yes, it is quite a bit slower to call external services, especially when the call goes across the Internet. Of course this also provides significant advantages (such as the ability to run in distributed scenarios as well as good scalability and great maintainability and flexibility over time) but in some scenarios, raw performance may still be an important consideration. For those scenarios, CODE Framework provides a special feature that is not available elsewhere: In-Process hosting!
“In-Process hosting” means that you build your application in a SOA fashion and follow all the ideas of SOA, but when it comes to deployment, you deploy in a more conventional fashion wherein the application includes the DLLs that implement the service. Development-wise, this is not nearly as clean as true distributed deployment, but on the other hand, it is no worse than an application that doesn’t use services at all. This way, all the services can be automatically invoked as local objects (this is simply a configuration choice in CODE Framework) and thus have exactly the same performance characteristics as all other .NET objects. (In other words, it’s very fast!)
In many cases, you may choose a combination of deployment options. Perhaps a service is deployed to a server as a Windows Service process, which is called in a plethora of ways from .NET Windows apps, to Web apps, to JavaScript, and mobile devices, but for the one scenario where you need raw performance (perhaps for a sub-set of the application, or perhaps for very specific scenarios) you create an additional deployment with CODE Framework in-process activation to eliminate 100% of the performance penalty normally associated with services. It’s a very nice option to have up your sleeve!
As you can see, there is a lot more to talk about that goes far beyond the scope of this article. However, with what you have learned in this article, you should now be able to create services in a quick and productive fashion, and end up with a result that is more flexible and maintainable than most services built in the past. Furthermore, you do not have to worry about maneuvering yourself into a dead end due to things you might want to do in the future but are not yet aware of. With the approach demonstrated here, you can add additional new features (such as security) as the need arises. Feel free to email me if you would like to discuss these further aspects.