Do you have a cool personalized application that you want to offer to over 400 million users? Do you want to light it up with Live controls or create a mashup with Live resources?
Windows Live ID now offers a simple way for third parties to get Live ID authentication in your Web or rich client applications, letting you reach millions of Live ID users, integrate with Live Controls, and access Live services.
Windows Live ID supports more than 400 million active users, performing over a billion authentications per day, with a consistent availability of over 99.9%. This foundation service is also available to third-party developers, allowing them to build identity-aware Web and rich client applications using Windows Live services, user data, and social relationships.
Include Windows Live controls in your Web application to seamlessly combine these features with your innovation.
This article focuses on the Windows Live ID Web and client authentication and explains how you can use it in your application.
What is Windows Live ID?
Windows Live ID is the identity and authentication platform for all Microsoft online services, such as Windows Live, Xbox Live, Office Live, etc. Many third-party sites also use Live ID authentication. Formerly known as Microsoft Passport, the service was rebranded to reflect the Windows Live brand, as well as new scenarios and features developed to support Windows Live.
To a user, Live ID is their identity on various Microsoft online services. It is what they use to send/receive e-mail, chat on messenger, or set up a new Office Live account-so they use it anywhere they see the Live ID logo. Windows Live ID provides single sign-on between all Live ID-enabled services, so once the user is logged in at one of these sites or rich applications, they are seamlessly signed into other Windows Live sites as well. For example, the user can open Live Mail or Windows Live Spaces from Windows Live Messenger without the need to provide their credentials again. Also, a user gets a consistent experience across Microsoft online sites, since all these sites have access to the user’s profile.
Windows Live ID authenticates users using credentials such as user name and password, or Cardspace information cards, which provide higher security against phishing. The Live ID service supports a variety of authentication protocols, including WS-*, which allows federated users of Windows Live federation partners to use Windows Live and other Live ID-enabled services. Live ID supports a variety of browsers and Windows PCs, as well as phones, MSN TV, and XBox.
Windows Live ID Web Authentication
Windows Live ID Web Authentication helps you build identity-aware Web applications. It is a service that allows you to:
- Verify the identity of visitors to your site.
- Offer personalized access to your site’s content to millions of Live ID users, who don’t need to create yet another identity.
- Provide single sign-on from your application to Windows Live services.
- Seamlessly integrate the advanced, and useful, functionality of Windows Live controls in a non-programmatic way.
- Access user’s Windows Live data with their explicit consent.
Why Does Your Web Application Need Live ID?
Wondering what kind of cool functionality Live ID can help you deliver?
The Party Planner
You have a Web application that helps users host that perfect party. With the user’s explicit consent, you get access to their Live Calendar and add tasks to help them get everything done well in time for the big day.
Discovering the Lonely Planet
You have a mashup Web application that helps users with their travel plans. Your site is a repository of information on cool locations all over the world. You help users from picking their vacation spot to booking their flights, hotels, and attractions to sharing memories from their holiday with their friends. You incorporate the Live Contacts Control, letting the user choose what contact information they want to share with your site. The user then shares vacation plans or even plans a vacation with selected contacts. You incorporate the Live Spaces Photo Control and let users upload photos from their vacation from their Live space. By using Windows Live ID, the user will be automatically authenticated by these rich controls.
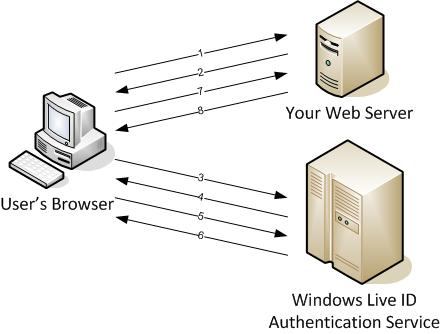
The Web Authentication Flow
Figure 1 shows the Web authentication flow:
System Requirements for Web Authentication
Web Authentication uses industry-standard HTTP protocols and does not depend on any precompiled or executable components. You can implement it on any Web-development platform. The SDK provides samples for ASP.NET, Perl, Java, Ruby, Python, and PHP. It uses the standard encryption algorithm available on these platforms.
Getting Started with Web Authentication
Do the following to start using Windows Live Web Authentication in your Web application:
- Register your Web application.
- Display the sign-in/sign-out link.
- Handle responses from Windows Live ID authentication server, to implement login, logout, and clearcookie.
- Incorporate Windows Live Controls.
- Integrate with Windows Live APIs to access other Live services via delegation.
Registering Your Web Application
To use Windows Live ID Web Authentication on your site, you must use a valid Live ID to register your Web site with Microsoft as an application. The Windows Live ID application management page located at https://msm.live.com/app/default.aspx assists you with the registration process, issues you an application ID for use with the service, and provides a place for you to manage all the applications you register.
Create a mashup of rich user content from various Live services in your application with the user’s explicit consent using the Delegated Authentication technology.
Register your application and provide the following:
-
Application Name: The unique and friendly name you use to refer to your application. -
Return URL: The URL of the page on your Web site that handles responses from the Windows Live ID authentication service. The service redirects users and their authentication tokens to this URL after they have successfully signed in, signed out, or cleared their cookies. -
Secret Key: The shared secret between you and Windows Live ID that is used to encrypt and sign all tokens that Windows Live ID sends to your site. The secret key must be in a format specified by Windows Live ID. Choose one that is difficult to guess and create security procedures to manage this key. - There is no certification or approvals process. Accept the Windows Live Terms of Use and you’re all set!
Displaying the Sign-in/Sign-out Link
- Insert the sign-in/sign-out link into your page to incorporate Windows Live ID. Include the following code in the HTML of your site, replacing the values for appid, context, and style with proper values for your implementation:
<iframe
ID ="WebAuthControl"
Name ="WebAuthControl"
Src ="https://<a href="http://login.live.com/controls/";>login.live.com/controls/<;/a>
WebAuth,htm?Appid=<%MyAppID%>&Context=
MyContext&Style=font-size%3A+10pt%3B+
font-family%3A+verdana%3B+background%3A+
white%3B">
</iframe>
Appid is the application ID you received when you registered your site. Context is the parameter holding the user state for your application and gets returned in the response from Windows Live ID authentication server so that you can preserve user state across the authentication. Style is the set of attributes that makes the sign-in IFRAME element fit your site visually.
Handling Responses from Windows Live ID
When Live ID users successfully sign in or out of your site, the Windows Live ID authentication service responds and redirects them to the return URL you specified when registering your Web application. This URL must correspond to a dynamic page that receives and appropriately processes this response.
The response has an action query-string parameter that tells your site what it needs to do. The following is the list of possible action values and what your site must do:
-
login: Your site extracts the user’s encrypted authentication token from the HTTP POST response and stores it in a session cookie to keep the user signed in to your site during multiple page views. -
clearcookie: Your site clears the session cookie you created at sign in, and returns a Graphics Interchange Format (GIF) image to the service to indicate that the user has been signed out. -
logout: Your site clears the session cookie and redirects the signed out user to a page on your site that is appropriate for unauthenticated users. -
Listing 1 demonstrates the handling of the different actions.
Incorporating Windows Live Controls
Include Windows Live Controls in your Web application to seamlessly combine these features with your innovation. When users log into your site with their Live ID credentials, they are also signed into these controls. For example, the Windows Live Contacts control is a client-side JavaScript object that allows users to share their contacts with your site. Users can view presence information for their contacts and initiate a Windows Live Messenger conversation with a contact; and you can predefine messages for users to send to their contacts.
Windows Live ID Delegated Authentication
Create a mashup of rich user content from various Live services in your application with the user’s explicit consent using the Delegated Authentication technology. With your site already using Windows Live ID Web Authentication, this is a simple additional step.
Through delegation, the Windows Live ID users of your site have the ability to consent to the scoped release of their personal information to you. For example, the user could consent to share their Live Calendar with your site and your application can then access the calendar to retrieve and edit data.
Windows Live ID Client Authentication
Windows Live ID Client Authentication helps you build personalized, identity-aware, rich client applications for the huge Live ID user base. Client Authentication is a managed API intended for use in developing applications for users’ desktops, using .NET Framework. The API lets you:
- Verify the identity of users of your client application.
- Access information about saved credentials to implement automatic sign in.
- Integrate with other Windows Live services and obtain authentication tickets necessary to access user’s personal data provided by them.
- Navigate to Windows Live ID sites in an authenticated browser window.
Why Does Your Rich Client Application Need Live ID?
Wondering what kind of cool functionality Live ID can help you build into your client?
Blogit
Your rich client application is a word processor for authors. An author uses your application to create documents. By incorporating access to Live Spaces, your application lets the author post their documents to their space and get feedback from their editor and friends.
The Client Authentication Flow
The Client Authentication flow consists of the following:
System Requirements for Client Authentication
Your development computer and user’s desktop must be running the following software:
- Windows XP Professional with SP2 or Windows Vista (32-bit versions only).
- IE 6.0 or 7.0/Firefox 1.5 and above.
- .NET Framework 2.0.
I strongly recommend you use the Visual Studio IDE to develop your client application.
Getting Started with Client Authentication
To start using Windows Live Client Authentication in your rich client application, do the following:
- Get your application ID.
- Install the Windows Live ID Client 1.0 SDK.
- Set up your development environment.
- Implement system requirement detection, authentication, automatic sign in, personalization, and access to Windows Live ID sites and services.
The SDK includes a sample application intended to help you understand how to code your client, by showing you the source code that is required to implement the features of Windows Live ID Client Authentication.
Getting Your Application ID
The application ID, your unique identifier, is a combination of your organization name, e-mail address, and application name. Declare oIDMgr as an instance of IdentityManager at the class level so that all your code can access it. Pass the application ID as a parameter to the CreateInstance method and assign the return value to oIDMgr:
oIDMgr = IdentityManager.CreateInstance("BlogIt;
<a href="mailto://vaishali@contoso.com">vaishali@contoso.com</a>;BlogIt Application",
          "Windows Live ID Client");
Setting Up Your Development Environment
Add a reference to the component to your Visual Studio project, so that you can use Windows Live ID for your client application.
Implementing System Requirement Detection
Your client developed using Windows Live ID for client applications requires the installation of the Windows Live ID Client Authentication redistributable component. This component is the assembly (DLL) that contains the Microsoft.WindowsLive.Id.Client namespace. Without this, your client will not run. Your application needs to handle the case when this assembly is not available on the machine.
Implementing Authentication
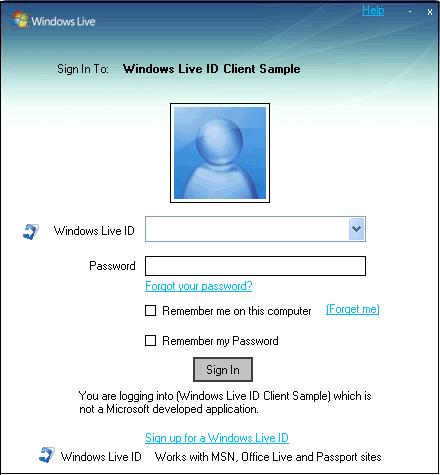
Call the Authenticate method to authenticate the user. This method shows the user the sign-in dialog box shown in Figure 2. This standard dialog box allows the user to enter their Windows Live ID credentials and makes it really easy for you to log the user in. Listing 2 shows you what you need to do when the user clicks the Sign-in/Sign-out button. Declare oID as an instance of Identity at the class level so that all your code can access it.
Implementing Automatic Sign-in
Your client must automatically sign-in the user if the user previously signed into your client application and selected the check boxes to remember both their sign-in name and password.
Your rich client can access Windows Live sites and services through a Web service, an API installed on the local computer or an authenticated browser window.
To implement automatic sign-in, your application must recognize the concept of this “default user” who will be automatically signed in. Store the sign-in name of this default user in a configuration file, the registry, text file, Web service, or any other method and pass it in as the parameter to the CreateIdentity method.
Implementing Personalization
A user personalizes your client application by specifying various data and settings to customize it. Every time the user signs into your client, you load these data and settings into the application. For example, users could pick a background color for the application or organize their Live contacts in a particular manner.
Your client:
- Lets the user create data and settings for personalization.
- Stores user-specific data and settings.
- Loads and displays user-specific data and settings when user logs in.
- Lets the user modify or delete their data and settings.
Windows Live ID provides a permanent, unique identifier for the user in the form of the Client ID or CID. Access to the CID is provided through the CID property of a currently authenticated Identity object. Storing the user-specific data and settings with the CID gives you the power to roam the data across machines. Store the data and settings in a configuration file, the registry, a database, text file, Web service, or any other method of your choice.
Implementing Access to Windows Live ID Sites and Services
Your client can access Windows Live ID sites and services in the following ways:
- Through a Web service API, such as SOAP or XML-RPC.
- Through an authenticated browser window.
For access through a Web service API, your code will:
- Authenticate the user with the Authenticate method.
- Obtain a service-specific ticket with the GetTicket method.
- Add the ticket as a request header for the SOAP or XML-RPC calls.
- For HTTP-based SOAP calls, refer to the documentation for the service to find the URL of the Web Service Description Language (WSDL) file that describes the service and add a Web reference to your application project in Microsoft Visual Studio.
-
Listing 3 demonstrates calling the MetaWeblog API, both to post data and to get data back. - How you open an authenticated browser window depends on which browser the user has installed. For IE 6.0 or 7.0, call the OpenAuthenticatedBrowser method. For browsers other than IE, invoke the execution of the browser and make sure that the browser sends the appropriate authentication data in a form post to the Windows Live ID site or service URL. Obtain this authentication data by calling the GetNavigationData method.
Special thanks to Dave Shevitz and Vivek Nirkhe for their help with this article.
Listing 1: Handling different actions in the response from the Windows Live ID authentication service for Web Authentication.
//Handling a login action
If (action == "login")
{
WindowsLiveLogin.User user = wll.ProcessLogin(Request.Form); //The ProcessLogin method parses, decrypts, and validates the encrypted authentication token received from the Windows Live ID authentication service, letting you access the user's unique ID easily
HttpCookie loginCookie = new HttpCookie("webauthtoken"); //Storing the authentication token in a cookie called "webauthtoken" to keep the user signed in to your site during multiple page views
if(user != null)
{
loginCookie.Value = user.Token;
if (user.UsePersistentCookie)//The ProcessLogin populates the user object with properties like the user.UsePersistentCookie property. If UsePersistentCookie is true, your application is expected to use a persistent cookie to store the authentication token. A persistent cookie keeps the user signed in across multiple browser sessions
{
loginCookie.Expires = DateTime.Now.AddYears(10);
}
}
else
{
loginCookie.Expires = DateTime.Now.AddYears(-10);
}

Response.Cookies.Add(loginCookie);
Response.Redirect("default.aspx");
Response.End();
}

//Handling a clearcookie action
else if (action == "clearcookie")
{
HttpCookie loginCookie = new HttpCookie("webauthtoken");//Deleting the current "webauthtoken" cookie
loginCookie.Expires = DateTime.Now.AddYears(-10);
Response.Cookies.Add("webauthtoken");
string type;
byte[] content;
wll.GetClearCookieResponse(out type, out content);//GetClearCookieResponse returns a GIF image to the authentication server to indicate that the user has signed out
Response.ContentType = type;
Response.OutputStream.Write(content, 0, content.Length);
Response.End();
}

//Handling a logout action
else if (action == "logout")
{
HttpCookie loginCookie = new HttpCookie("webauthtoken");//Deleting the current "webauthtoken" cookie
loginCookie.Expires = DateTime.Now.AddYears(-10);
Response.Cookies.Add("webauthtoken");
Response.Redirect("default.aspx");//Redirecting users to the page on your Web application that is seen by users who are signed out
Response.End();
}
Listing 2: What to do when the user clicks the Sign-in/Sign-out button in your client application.
//Event handler for Sign-in/Sign-out button clicks
private void buttonSignInOrOut_Click(object sender, EventArgs e)
{
//Check to see if the user is currently authenticated
if (!oID.IsAuthenticated)
    {
try
    {
         //Try to authenticate the user by showing the Sign-in dialog window
      if (oID.Authenticate())
    {
currentUserName = oID.UserName;
            }
      else
    {
MessageBox.Show("Authentication failed");
    }
    }
catch (WLLogOnException wlex)
   {
       if (wlex.FlowUrl != null)
    {
MessageBox.Show(wlex.ErrorString + "Please go to " + wlex.FlowUrl.AbsoluteUri + "to correct the condition that caused the error");
    }
    else
    {
MessageBox.Show(wlex.Error   String);
    }
    }
}

else
    {
      //If user is authenticated, they intended to Sign-out. Try signing the user out.
try
    {
    oID.CloseIdentityHandle();
    currentUserName = "";
    }
catch (WLLogOnException wlex)
    {
       if (wlex.FlowUrl != null)
{
MessageBox.Show(wlex.ErrorString + "Please go to " + wlex.FlowUrl.AbsoluteUri + "to correct the condition that caused the error");
    }
         else
    {
MessageBox.Show(wlex.ErrorString);
}
    }
    }

UpdateDisplay();
}
Listing 3: Calling the MetaWeblog API from your client application.
//Posting to a blog
public static void PostBlog(string subject, string body, string spaceUrl, Identity oId)
{
   spaceUrl = ReplaceInvalidXMLChars(spaceUrl);
      body = ReplaceInvalidXMLChars(body);
      subject = ReplaceInvalidXMLChars(subject);

// The following statement creates the HTTP request to post a new blog. The statement creates a byte array that is based on the requestXML string, which contains the metaweblog API XML statement for creating posts. This string is then modified with four variables: a blog name, which is "MyBlog", spaceUrl, which is a user-supplied identifier of their blog location, a string that contains the subject of the blog, and a string that contains the blog entry.
   byte[] postData = new UTF8Encoding(false).GetBytes(String.Format(requestXml, "MyBlog", spaceUrl, "", subject, body));

// Building the HTTPWebRequest object, using a pre-defined string, SPACES_API_URL
   HttpWebRequest request = (HttpWebRequest)HttpWebRequest.Create(SPACES_API_URL);

// Create a string to get the authentication ticket, then acquire the ticket
string         ticket = "";
      try
      {
         ticket = oId.GetTicket("<a href="http://storage.msn.com">storage.msn.com</a>", "MBI", true);
      }
      catch (WLLogOnException wlex)
      {
         if (wlex.FlowUrl != null)
              {
               MessageBox.Show(wlex.ErrorString + "Please go to " + wlex.FlowUrl.AbsoluteUri + "to correct the condition that caused the error");
             }
            else
             {
                MessageBox.Show(wlex.ErrorString);
             }
}


// Build the HTTP headers, including the authorization ticket
   request.Headers.Add("Authorization", "WLID1.0 " + ticket);
      request.AllowAutoRedirect = false;
      request.UserAgent = "WindowLiveClientSDKSpacesLoginTester";
      request.ContentType = "text/xml";
      request.Pipelined = false;
   request.ProtocolVersion = HttpVersion.Version10;
      request.Method = "POST";
      using (Stream requestStream = request.GetRequestStream())
      {
         requestStream.Write(postData, 0, postData.Length);
      }

// Get the response back from the HTTP request
   HttpWebResponse response = (HttpWebResponse)request.GetResponse();

// Code that manages the response could go here
}


//Getting posts from a blog
public static void GetPosts(string spaceUrl, int numberOfBlogs, Identity oId)
{
   spaceUrl = ReplaceInvalidXMLChars(spaceUrl);

// The following statement creates the HTTP request to get a specified number of blog posts. The statement creates a byte array that is based on the getPostsXml string, which contains the metaweblog API XML statement for getting posts. This string is then modified with three variables: a blog name, which is "MyBlog", spaceUrl, which is a user-supplied identifier of their blog location, and a number that specifies the number of blog entries to return. In this case, you are getting one blog entry back, but you can return up to 20

byte[] postData = new UTF8Encoding(false).GetBytes(String.Format(getPostsXml, "MyBlog", spaceUrl, "", numberOfBlogs));

// Building the HTTPWebRequest object, using a pre-defined string, SPACES_API_URL
   HttpWebRequest request = (HttpWebRequest)HttpWebRequest.Create(SPACES_API_URL);

// Create a string to get the authentication ticket, then acquire the ticket
   string ticket = "";
      try
      {
         ticket = oId.GetTicket("<a href="http://storage.msn.com">storage.msn.com</a>", "MBI", true);
}
      catch (WLLogOnException wlex)
      {
         if (wlex.FlowUrl != null)
            {
               MessageBox.Show(wlex.ErrorString + "Please go to " + wlex.FlowUrl.AbsoluteUri + "to correct the condition that caused the error");
            }
      else
            {
               MessageBox.Show(wlex.ErrorString);
}
}


// Build the HTTP headers, including the authorization ticket
   request.Headers.Add("Authorization", "WLID1.0 " + ticket);
      request.AllowAutoRedirect = false;
      request.UserAgent = "WindowLiveClientSDKSpacesLoginTester";
      request.ContentType = "text/xml";
      request.Pipelined = false;
      request.ProtocolVersion = HttpVersion.Version10;
      request.Method = "POST";
      using (Stream requestStream = request.GetRequestStream())
{
         requestStream.Write(postData, 0, postData.Length);
}

// Get the response back from the HTTP request
   HttpWebResponse response = (HttpWebResponse)request.GetResponse();

// Code that manages the response (parses, etc.) could go here
}