In the past year, new technologies from Microsoft have changed how we can add ink to Web sites and the change is definitely for the better!
One small property added to ASP.NET 2.0 server controls, OnClientClick, has had a big impact on simplifying the process of moving ink from the Web page to the Web server. The capability that OnClientClick provides, allowing developers to tie both a client-side event and a server-side event to one Click event, was actually achievable prior to ASP.NET 2.0 using control attributes, but it was more complex to set up and not very discoverable.
Visual Studio 2005’s new UserControl TestContainer interface makes it much simpler to test and debug user controls.
Microsoft’s ASP.NET AJAX has removed the pain and the complex coding required to ensure that any ink in the control remained in place during a page postback. However, it does require a small change to how you build your control.
In addition to these enhancements, there are three other points to be aware of. The first is the COM-Visible parameter for any ink controls that you will use in Web sites and the second is a change in Internet Explorer, which impacts how you embed the ink control into the Web page. Lastly, Microsoft Visual Studio® 2005’s new UserControl TestContainer interface makes it much simpler to test and debug User Controls. You no longer need to create a Windows Form just for this purpose.
In this article, you will learn how to build a simple ink-enabled Windows Forms control that is ready to be placed in an ASP.NET page (with or without AJAX) and how to write ASP.NET 2.0 and AJAX-enabled Web pages that can host this ink control.
Creating an Ink-Enabled Control
When you create an ink-enabled Windows Forms control to use on a Web page, you need to consider two things that are different from a control that you’d place in a Windows Form. First, you won’t be able to debug the control from a Web site. Luckily, the new UserControl TestContainer in Visual Studio 2005 allows you to run and debug the user control while it is being designed. To test more complex functionality, you may want to embed the control in a simple Windows Form where you can debug from the Windows Form code into the user control as long as their projects are in the same solution.
The second big difference is that your Web application cannot access the control’s methods from managed code. Why not? Because the user must download the embedded control to their computer, you will not be able to interact with the control from the server-side code, but only from client-side code-JavaScript.
This means that you must try to embed as much of the control’s functionality and logic within the control and expose only the most minimal amount of functionality to the calling code (the JavaScript). For example, you’d place all functionality for the ink style (color, transparency, width) into the control. That way, you won’t have to write any JavaScript to attempt to deal with the colors. The only functionality that you should need to expose is anything that the page or Web application must control. For example, if the page of the Web application must have knowledge of the color that the ink uses, you would need to make a public property. As another example, suppose you need to persist the ink data. That would require having a public method that returns the ink data to the calling code. The page’s JavaScript function could call that method and have access to the ink data, and then pass it onto the server-side code, which could do something like store the data into a database.
The ink control that I will create will have the following capabilities:
To create this control, start with a Windows Forms Control Library project, which will automatically create UserControl1.
As with any Tablet PC development, you will need to start with the following actions:
- Add the Microsoft.Ink API into the project references.
- Add an InkOverlay component to the control.
- Instantiate and enable the InkOverlay.
The control’s code should look like this when you have done these things:
VB
Imports Microsoft.Ink

Public Class UserControl1

  Private inkO As InkOverlay

  Private Sub UserControl1_Load(ByVal sender As _
 System.Object, ByVal e As System.EventArgs) _
 Handles MyBase.Load
    inkO = New InkOverlay(Me)
    inkO.Enabled = True
  End Sub

End Class
C#
using Microsoft.Ink;

public partial class UserControl1 : UserControl
{
  private InkOverlay inkO;
    public UserControl1()
    {
       InitializeComponent();
    }

  private void UserControl1_Load(object sender,
 EventArgs e)
  {
    inkO = new InkOverlay(this);
    inkO.Enabled = true;
  }
}
In the control’s design surface, add some functionality for controlling the color.
Drag a ToolStrip control onto the UserControl. You can create as many color buttons as you wish by clicking the button icon on the toolstrip. Figure 1 shows the four new buttons after changing the DisplayStyle to None and the BackColor to represent the desired colors.
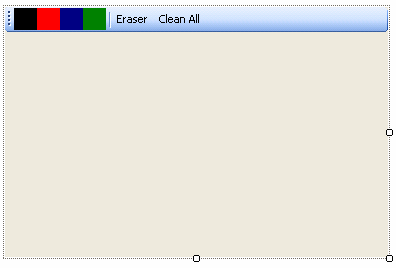
I added two more buttons, which both have the DisplayStyle property set to Text. The first button’s Text property is “Eraser” and the second is “Clean All”.
The ink control will contain all of these functions. There’s no need to write any code in the Web page to control these actions.
The buttons’ Click events will perform the following functionality:
- The four color buttons will cause the ToolStripColorButtons_Click event to fire, changing the pen color to the background color of the clicked button.
- The eraser button will change the pen’s EditingMode to eraser. The default eraser mode is StrokeErase, which causes the entire stroke to be affected. Alternatively, you can change the InkOverlay’s EraserMode to PointErase if you prefer.
- The Clean All button cleans all ink from the entire control.
Note that if you are new to C# Windows Forms, you can wire up the Click event of each of the buttons to the following code in the Events portion of the control property window. All four color buttons will point to the btnColor_Click method.
VB
Private Sub btnColor_Click _
(ByVal sender As System.Object, ByVal e As _
System.EventArgs) Handles btnBlack.Click, _
btnBlue.Click, btnGreen.Click, btnRed.Click
  Dim btn As ToolStripButton = sender
  inkO.DefaultDrawingAttributes.Color = _
  btn.BackColor
  'make sure you are not in erase mode
  inkO.EditingMode = InkOverlayEditingMode.Ink
End Sub

Private Sub btnEraser_Click(ByVal sender As _
System.Object, ByVal e As System.EventArgs) _
Handles btnEraser.Click
  inkO.EditingMode = InkOverlayEditingMode.Delete
End Sub

Private Sub btnClean_Click(ByVal sender As _
System.Object, ByVal e As System.EventArgs) _
Handles btnClean.Click
  inkO.Ink.DeleteStrokes()
  Me.Invalidate() 'forces a redraw
End Sub
C#
private void btnColor_Click(object sender,
 EventArgs e)
{
  ToolStripButton btn = ((ToolStripButton)sender);
  inkO.DefaultDrawingAttributes.Color =
  btn.BackColor;
  //make sure you are not in erase mode
  inkO.EditingMode = InkOverlayEditingMode.Ink;
}

private void btnEraser_Click(object sender,
EventArgs e)
{
  inkO.EditingMode = InkOverlayEditingMode.Delete;
}

private void btnClean_Click(object sender,
EventArgs e)
{
  inkO.Ink.DeleteStrokes();
  this.Invalidate(); //forces a redraw
}
The last three functions, shown in Listing 1, will be public so that the Web page’s client-side code can interact with the user control. The first returns the current color name, the second returns the ink data as a Base64-encoded string, and the third will load data into the control. This conversion to Base64 is critical for enabling the ink data to be transmitted over HTTP to get to the server-side code where you might do something such as store the data into a database, or in the case of this article, store it into a file.
The LoadInkData_64 method has been written specifically to accommodate the control being placed in an AJAX page. On a normal page, any time the page posts back, the ink control would be re-instantiated. In that case, loading the ink data is simple. However if you are using AJAX and the page is only doing a partial postback where the ink control is NOT part of that postback, you’ll have to load ink into a control that may already have ink data in it. This code does that by disposing and then reinstantiating the InkOverlay.
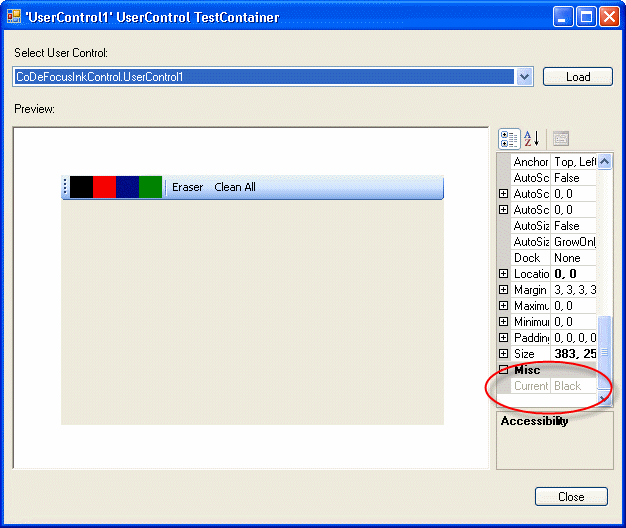
You can test the control by pressing F5 and invoking Visual Studio 2005’s UserControl TestContainer. As shown in Figure 2, you will find that the CurrentColor property is visible in the properties window and that you can use all of the functionality on the control’s surface. However, you cannot test the public methods here.
One last little design action to take is to set the control’s BorderStyle property to FixedSingle. This makes it easier to identify the boundaries of the control when you embed it into the Web form.
Before building the project, it is necessary to change the assembly’s ComVisible attribute. You can do this through the project property pages by clicking the Assembly Information button on the Application tab and checking Make assembly COM-Visible. You can also change this attribute directly in the project’s AssemblyInfo file.
This completes the ink object. Once you have created the Web site, you will need to copy the DLL from this compiled project into the Web site project.
Creating the Web Page to Host the Ink Control
The page you are creating can:
- Avoid the embedded object “please click here” problem in Internet Explorer 7.
- Enable partial postbacks with the ASP.NET AJAX UpdatePanel.
- Send the ink control’s data to an image file.
- Retrieve ink data from an image file and load it into the ink control for additional drawing.
- Display the current ink color being used in a small panel.
Before creating this Web site, you must install Microsoft’s ASP.NET AJAX. You can learn more about AJAX and download the installer at http://ajax.asp.net.
It is important to embed as much of the control’s functionality and logic within the control and expose only the most minimal amount of functionality to the calling code (the JavaScript).
Also, note that you must create this Web site in HTTP rather than using ASP.NET 2.0’s Development Web Server (file). Some of the functionality of the embedded control does not work in the Development Web Server.
Create a new AJAX-enabled Web site. For the sake of this demo, you will find it easier to do this in the same solution where you created the user control.
Add the User Control to the Page
First you want to get the user control onto the page. This is where you need to code around a “feature” of Internet Explorer 7, which is included in recent updates to Internet Explorer 6, as well. The feature requires that users explicitly choose to activate any objects embedded into a Web page. So, users have to choose to activate things like the Adobe® Flash® object, Microsoft Windows Media Player, or any ActiveX® control. Essentially they have to activate on the page embedded using <EMBED> or <OBJECT> tags. both Microsoft and Adobe have articles with workarounds for Web developers. See the Links sidebar for more information.
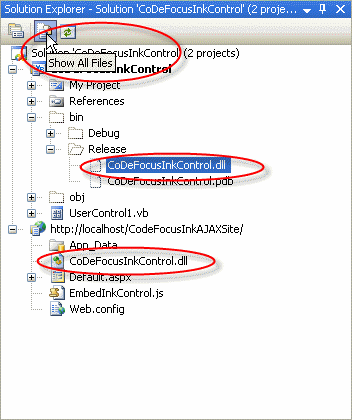
Locate the user control’s DLL in the first project. You may have to Show All Files to see it. Copy the file and paste it into the Web site project, just like you might do for an image.
Use a Jscript file from the installed templates in Visual Studio to dynamically embed the user control. Create a new JScript template file, named EmbedInkObject.js, and copy the following JavaScript into it, removing any line wrapping in the actual code:
document.write('<object id="InkControl" classid=
"CoDeFocusInkControl.dll#CoDeFocusInkControl.
UserControl1" height="400" width="400"/>');
Notice the pattern of the classid: AssemblyName.dll#FullyQualifiedClassName and represents the project name and the namespace plus class name of the user control, since none of the defaults were changed.
Now you need to call this JavaScript from the client side. In the HTML source of the page, place the following in the spot where you would like to see the ink control:
<script src=EmbedInkControl.js></script>
Because the control is dynamically embedded at run time, you will not see any evidence of it on the design surface of the page. Alternatively, you can place the <object> tags and code directly in the HTML for the sake of positioning and sizing the control, but then use the <script> tags when you are ready to deploy the page.
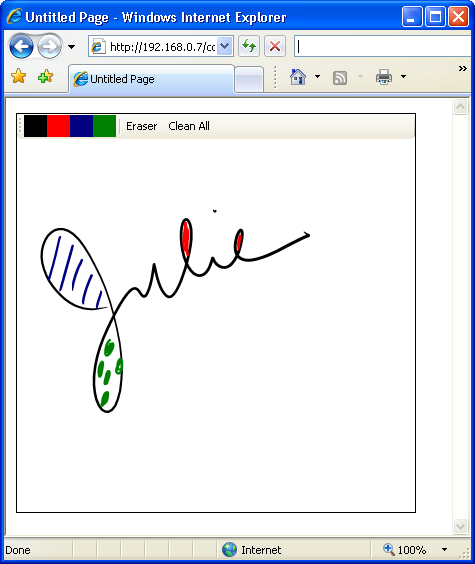
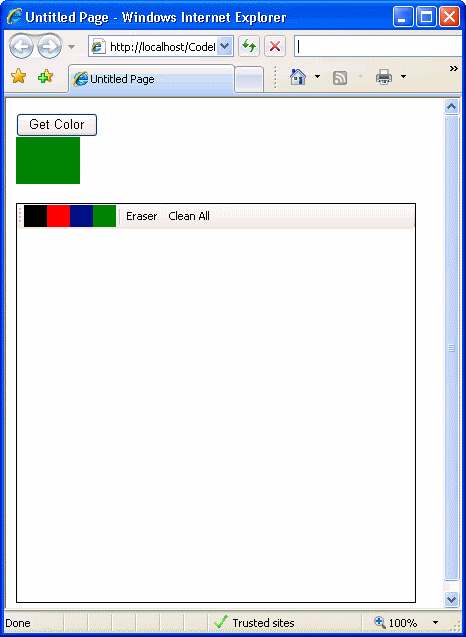
If you run the form now, you will see that all of the control’s embedded functionality for drawing, changing the pen color, erasing, and cleaning the control work with no additional effort. Figure 4 shows the ink control in use before you add any code to the Web site.
Getting the Page to Interact with the Control
Now that you have the functioning control on the page, it’s time to get down to the real dirty work of communicating with the control and getting the ink data from it as well as back into it.
I’ll first show you how to get the CurrentColor information from the control. Since that information is in the control on the client side, there is no need for any server-side functionality, so you can do this with a regular HTML input button and a DIV tag. When a user clicks the button, this function fills the DIV with the current pen color. Set it up following these steps:
<script>
function ShowCurrentColor()
{
  document.all("colorDiv").style.backgroundColor=
   form1.InkControl.CurrentColor();
}
</script>
- Run the form again to see the button function in tandem with the selected pen color as in Figure 5.
So far, interacting with the ink control is pretty simple, especially when you only need to do so on the client side.
Getting the Ink Data to the Server Side-It’s Simple with OnClientClick
Now that you are an expert at interacting with the embedded ink control, it’s time to go to the next step: getting the ink data from the control and sending it to the server side. Prior to ASP.NET 2.0, this involved a lot of steps and trickery, but as mentioned above, the new OnClientClick property of some of the ASP.NET 2.0 server controls has simplified this enormously.
Anything outside of the UpdatePanel will be untouched during the postback.
Follow three steps to accomplish this task.
Once you have the data on the server side, you can do whatever you wish with it. For example, store it into a database, send it to a Web service, or save it in a file. In this case, the example code will store it into an image file on the local drive.
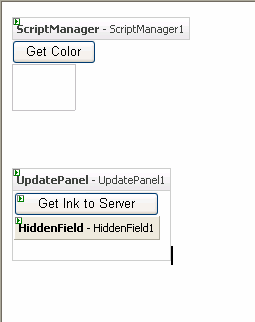
To get started, drag an ASP.NET HiddenField server control and an ASP.NET Button server control onto the form. Change the button’s Text property to “Get Ink to Server”.
In the OnClientClick property (visible in the property window) of the button, enter GetInkToServer().
Copy the following script into the same section where you put the ShowCurrentColor function:
function GetInkToServer()
{
 form1.HiddenField1.value=
   form1.InkControl.GetInkData_64();
}
Back in design view, double-click the new button to automatically create the server-side Click event of the button. What’s perfect about the OnClientClick for your purposes is that it runs before the server-side event code. This allows you to first place the ink data into the hidden control, run the following server-side code to grab that data, and then have your way with it, so to speak:
VB
Protected Sub Button2_Click(ByVal sender As _
 Object, ByVal e As System.EventArgs) _
 Handles Button2.Click
    Dim inkstr As String = Me.HiddenField1.Value
    'now you have your hands on the data.
    'Save it as GIF.
    Dim bytes() As Byte = _
     Convert.FromBase64String(inkstr)
    System.IO.File.WriteAllBytes _
     (Server.MapPath("") & "\myimage.gif", bytes)
  End Sub
C#
protected void Button2_Click(object sender,
 EventArgs e)
{
  string inkstr = HiddenField1.Value;
  //now you have the data
  //Save it to a GIF
  byte[] bytes = Convert.FromBase64String(inkstr);
  System.IO.File.WriteAllBytes(
   Server.MapPath("") + "\\myimage.gif",bytes);
}
Run the project at its current state. In a default setup you will find the file, myimage.gif, in the project folder inside “C:\inetpub\wwwroot\”.
And Now, AJAX
You may have noticed when running this last sample that when the page posted back after running the server-side code, the ink control was empty. That is because when the page posted back, it was rendered anew in its entirety. This means that the ink control you see after the postback is a completely new control. Prior to AJAX, it was a complex chore to persist the ink and load it back into the newly rendered control. But with AJAX, you can get this to happen with very little effort.
Although you created an AJAX-enabled Web site, you haven’t actually implemented any AJAX features yet! So now it’s time.
It seems as if nothing happened. The screen didn’t flash and the ink remained in the control. But if you look at the new myimage.gif, you will see that it has the new drawing in it. For the true skeptic, you can prove to yourself that something really happened by putting a breakpoint in the Button2_Click event.
Congratulations, you are now an AJAX expert! Actually there is a lot more to learn about AJAX, but there is clearly a lot of power just in the simplicity of the UpdatePanel!
Loading Saved Ink into the Control
Once your application has saved the ink, whether it is someone’s doodles or perhaps some “red line” markup on an architectural drawing, it’s possible that the user or a colleague will need to add to or modify the drawing. If your application persisted the ink data properly, the application can load it back into an ink control and continue working.
The example above extracted the ink data, but when it streamed the data into the GIF file, the application lost the actual ink data. But what if you had stored it in a database field or an XML file? Then the ink object’s structure is properly persisted and you can retrieve it.
Add the code in Listing 2 to the code-behind of the page. This will use an XMLTextWriter to build an XML file that includes the ink data.
In the Click event of the Get Ink to Server button, comment out the last two lines of code and add the call to the new method as shown below:
VB
Protected Sub Button2_Click(ByVal sender As _
 Object, ByVal e As System.EventArgs) _
 Handles Button2.Click
    Dim inkstr As String = Me.HiddenField1.Value
    'now you have the data. Save it as GIF.
    'Dim bytes() As Byte = _
    ' Convert.FromBase64String(inkstr)
    'System.IO.File.WriteAllBytes _
    ' (Server.MapPath("") & "\myimage.gif", bytes)
    SaveasXMLFile(inkstr)
  End Sub
C#
protected void Button2_Click(object sender,
  EventArgs e)
{
  string inkstr = HiddenField1.Value;
  //now you have the data. Save it to a GIF
  //byte[] bytes=Convert.FromBase64String(inkstr);
  //System.IO.File.WriteAllBytes(
  //Server.MapPath("") + "\\myimage.gif",bytes);
    SaveasXMLFile(inkstr);
  }
Now, you will add functionality to pull that data from the XML file back into the ink control.
Drag another standard button into the UpdatePanel and change its Text property to “Get Ink from Server”. Double-click the button to get to its server-side Click event.
Here you will leverage a few tricks. First you will read the XML file data and store it into the HiddenField control. Then using the ClientScript Manager specifically for AJAX, you will create some script that will get included and run upon the postback. This script will pull the data from the HiddenField and pass it into the ink control’s LoadInkData_64 method.
Copy the following code into the server-side Click event of the new button:
VB
Dim inkdata As String
'get ink from XML
inkdata = GetDatafromXML()
If inkdata > "" Then
  Me.HiddenField1.Value = inkdata
  <a href="http://System.Web.UI">System.Web.UI</a>.ScriptManager. _
 RegisterStartupScript(UpdatePanel1, Me.GetType, _
 "PageLoadScript", LoadScript, True)
End If
C#
string inkdata;
inkdata = GetDatafromXML();
if (inkdata != "")
{
  this.HiddenField1.Value = inkdata;
  <a href="http://System.Web.UI">System.Web.UI</a>.ScriptManager.
  RegisterStartupScript(UpdatePanel1,
  this.GetType(), "PageLoadScript", LoadScript,
  true);
}
Next, add the GetDatafromXML and LoadScript methods found in Listing 3.
Run the form again. Draw something in the ink control and save it to XML with the Get Ink to Server button. Clean the control so that it is empty and click the Get Ink from Server button. The ink is loaded back in. Modify the drawing and save it again. Clean the control and load the drawing again. You can see that you are now able to save, retrieve, and modify the drawing. And thanks to AJAX, it all happens very smoothly.
Now that you are familiar with the basics of using the Tablet PC API and writing effective ink controls for ASP.NET as well as AJAX, you have the tools to dig deeper into both technologies and wrap them into more useful Web sites. There are a lot of possibilities for online collaboration with ink, from social applications such as signing birthday cards, to business applications such as red-lining architectural drawings. Mobile computing becomes even more mobile when you can take it to the Web.
Listing 1: VB and C# code for Public methods of the ink user control
VB

Public ReadOnly Property CurrentColor() As String
 Get
   Return inkO.DefaultDrawingAttributes.Color.Name
  End Get
End Property

Public Function GetInkData_64() As String
  If inkO.Ink.Strokes.Count = 0 Then
    Return "empty"
  Else
    Dim inkBytes As Byte() = inkO.Ink.Save(PersistenceFormat.Gif, _
    CompressionMode.NoCompression)
    Return Convert.ToBase64String(inkBytes)
  End If
End Function

Public Sub LoadInkData_64(ByVal inkData As String)
  Dim inkBytes As Byte() = Convert.FromBase64String(inkData)
  If inkO IsNot Nothing Then
    inkO.Dispose()
    inkO = New InkOverlay(Me)
    inkO.Enabled = True
  End If
  inkO.Ink.Load(inkBytes)
  Me.Invalidate()
End Sub


C#

public string CurrentColor
{
  get { return inkO.DefaultDrawingAttributes.Color.Name; }
}

public string GetInkData_64()
{
  if (inkO.Ink.Strokes.Count == 0)
  {
    //test for data
    return "empty";
  }
  byte[] inkBytes = inkO.Ink.Save(PersistenceFormat.Gif,
  CompressionMode.NoCompression);
  return Convert.ToBase64String(inkBytes);
}


public void LoadInkData_64(string inkData)
{
  byte[] inkBytes = Convert.FromBase64String(inkData);
  if (inkO != null) //Ink overlay already exists
  {
    inkO.Dispose();
    inkO = new InkOverlay(this);
    inkO.Enabled = true;
  }
  inkO.Ink.Load(inkBytes);
  this.Invalidate(); //forces a redraw
}
Listing 2: Method to persist the ink data in an XML file
VB

Private Sub SaveasXMLFile(ByVal inkdata As String)
  Using fs As New System.IO.FileStream( _
  Context.Server.MapPath("")+ "\inkdataasxml.xml", _
  System.IO.FileMode.Create)
    Using xwriter As New System.Xml.XmlTextWriter(fs, _
    System.Text.Encoding.UTF8)
      With xwriter
        .WriteStartDocument() 'create starting tag
        .WriteStartElement("inkData")
        .WriteElementString("Ink", inkdata)
        .WriteElementString("LastUpdate",Now.ToString)
        .WriteEndElement()
      End With
    End Using
  End Using
End Sub


C#

private void SaveasXMLFile(string inkdata)
{
  using (System.IO.FileStream fs= new
  System.IO.FileStream(Context.Server.MapPath("")+
  "\\inkdataasxml.xml", System.IO.FileMode.Create))
  {
    using (System.Xml.XmlTextWriter xwriter=
    new System.Xml.XmlTextWriter(fs,System.Text.Encoding.UTF8))
    {
      xwriter.WriteStartDocument(); //create starting tag
      xwriter.WriteStartElement("inkData");
      xwriter.WriteElementString("Ink", inkdata);
      xwriter.WriteElementString("LastUpdate",
      DateTime.Now.ToString());
      xwriter.WriteEndElement();
    }
  }
Listing 3: Two of the methods that are part of the code to load XML data into into the ink control
VB

Private Function GetDatafromXML() As String
  Dim inkData As String = ""
  Using fs As New System.IO.FileStream(Context.Server.MapPath("") _
  + "\inkdataasxml.xml", System.IO.FileMode.Open)
    Using xreader As New System.Xml. _
    XmlTextReader(fs)
      While xreader.Read
        If xreader.Name = "Ink" Then
          inkData = xreader.ReadString()
          Return inkData
        End If
      End While
    End Using
  End Using
  Return inkData
End Function

Private ReadOnly Property LoadScript() As String
  'creates the script that will be run when
  ' the UpdatePanel posts back
  Get
    Dim sb As New StringBuilder
    sb.AppendLine("inkdata= " & _
     "document.all('HiddenField1').value;")
    sb.AppendLine("  if (inkdata!='')")
    sb.AppendLine("form1.InkControl.LoadInkData_64(inkdata);")
    sb.AppendLine(" document.all('HiddenField1').value='';")
    Return sb.ToString
  End Get
End Property


C#

private string GetDatafromXML()
{
  string inkdata;
  using (System.IO.FileStream fs = new
  System.IO.FileStream(Context.Server.MapPath("") +
  "\\inkdataasxml.xml", System.IO.FileMode.Open))
  {
    using (System.Xml.XmlTextReader xreader = new
    System.Xml.XmlTextReader(fs))
    {
      while (xreader.Read())
      {
        if (xreader.Name == "Ink")
        {
          inkdata = xreader.ReadString();
          return inkdata;
        }
      }
      return "";
    }
  }
}

private string LoadScript
{
  get {
    System.Text.StringBuilder sb=new System.Text.StringBuilder();
    sb.AppendLine("inkdata= document.all('HiddenField1').value;");
    sb.AppendLine("  if (inkdata!='')");
    sb.AppendLine("form1.InkControl.LoadInkData_64(inkdata);");
    sb.AppendLine(" document.all('HiddenField1').value='';");
    return sb.ToString();
  }
}