When developers think of how to access data, many use the Entity Framework (EF), Dapper, NHibernate, or some other object-relational mapper (ORM). Each of these ORMs use ADO.NET to submit their SQL queries to the back-end database. So, why do many developers use ORMs instead of just using ADO.NET directly? Simply put, ORMs allow you to write. If each of these ORMs are simply wrappers around ADO.NET, can you write your own wrapper to cut down the amount of code you need to write? Absolutely! This series of articles shows you how to create a set of reusable wrapper classes to make it simpler to work with ADO.NET in .NET 6.
In these articles, you write code to map columns to properties in a class just like the ORMs do. You check for attributes such as [Column] and [Key] on class properties and use those attributes in your data application. You build SQL statements from your classes and submit that SQL to the database efficiently and safely. By the end of these articles, you're going to have a design pattern for typical CRUD applications that's fast and requires less ADO.NET code, just like the most popular ORMs out there. Besides learning about ADO.NET, these articles teach you how to create a set of generic classes and methods. By the end of these articles, you'll have some insight into how many ORMs work.
What's in These ADO.NET Wrapper Classes
The classes you're going to create in these articles are not intended to be an ORM. Instead, they are going to help you perform standard CRUD operations in an efficient manner and with less code. The classes you're going to learn about will perform the same, and sometimes better, than the corresponding ORMs because there is less overhead. Another advantage of using the classes described herein is that you're writing straight-forward C# code and you don't have to learn any new configuration or tooling. You're going to make these classes generic so that you can use them with any .NET data provider such as SQL Server or Oracle.
Read Operations
The classes you're going to learn about in these articles will perform standard CRUD operations. For reading data, you can submit dynamic SQL, call views, or invoke stored procedures to return data and have that data automatically mapped to C# classes.
Standard data annotations such as the [Column] attribute can be used to map a column to a property name that's different from the column name. You can use the [NotMapped] attribute so you can add properties that have nothing to do with the table. You're going to create a custom attribute called [Search] to help you handle many searching scenarios in a generic manner.
Modify Operations
These wrapper classes also allow you to submit action queries such as INSERT, UPDATE, and DELETE using either dynamic SQL or stored procedures. You're going to be able to retrieve the identity value generated from SQL Server, handle data validation using the .NET data annotations, and add your own custom validation code. Finally, you'll create a way to get excellent exception information to help you track down any potential problems quickly and easily.
Using the ADO.NET Wrapper Classes
Once you build a few reusable classes that you'll learn about in this article, all you'll need are an entity class, a search class, and a repository class for each table in your database. Let's look at some typical code you're going to have to write to retrieve rows from a table.
Get All Rows
Once you have a “Database Context”, a “Repository”, and an “Entity” class built, you can retrieve all rows in the table by using code shown in the following code snippet. Now, you must admit, this is very simple code and right one par with what you'd write when using an ORM such as the Entity Framework.
using AdvWorksDbContext db = new(connectString);
List<Product> list = db.Products.Search();
// Display the Results
foreach (var item in list)
{
    Console.WriteLine(item.ToString());
}
In the code above, create an instance of a database context class, named AdvWorksDbContext, within a using so the connection is closed and disposed of properly after the data is read. Within the AdvWorksDbContext class, you expose an instance of a ProductRepository class as a property named Products. Pass in a connection string to the constructor of the AdvWorksDbContext class. This connection string is used by the base class to create a connection to the database. Here's what your database context class is going to look like.
public class AdvWorksDbContext: SqlServerDatabaseContext
{
    public AdvWorksDbContext(string connectString): base(connectString)
    {
    }

    public override void Init()
    {
        base.Init();
        Products = new(this);
    }

    public ProductRepository Products { get; set; }
}
Search for Specific Rows
If you wish to search for specific rows within a table, you need only create a class with properties set to the values to search for. The code shown in Listing 1 allows you to search for data in the SalesLT.Product table from the AdventureWorksLT database. This code returns a list of product objects that represent each row found that matches the criteria.
Listing 1: A sample of how to search for data using the ADO.NET wrapper you're going to create in this article
using AdvWorksDbContext db = new(connectString);

// Search for products that
// Start with 'C' AND ListPrice >= 50
List<Product> list = db.Products.Search(new ProductSearch()
{
    Name = "C",
    ListPrice = 50
});

// Display the Results
foreach (var item in list)
{
    Console.WriteLine(item.ToString());
}
The Search() method has two overloads, one of which is passed an instance of a ProductSearch class. The Name property in the ProductSearch is set to the value “C” and the ListPrice is set to “50”. The ProductSearch class looks like the following:
public class ProductSearch
{
    [Search("LIKE")]
    public string Name { get; set; }

    [Search(">=")]
    public decimal? ListPrice { get; set; }
}
A custom [Search] attribute (which you'll build in the next article) specifies what operator to use when building the WHERE clause to submit to the database. The Search() method generates a SELECT statement with a WHERE clause when a search object is passed in as shown in the following code snippet.
SELECT * FROM SalesLT.Product
WHERE Name LIKE 'C%' AND ListPrice >= 50;
Obviously, you're going to need a way to add, edit, and delete rows of data within a table. More code will be added to this class to perform the other CRUD functionality as you work your way through these articles. All you need is an entity class to map to your table, a search class, and a repository class for each table. You then expose each repository class from the database context class, and you're ready to write the code shown in Listing 1.
Getting Started
To really learn how to use these ADO.NET wrapper classes, I recommend that you follow along as I go through the steps in this article. To start, create a .NET 6 console application and download the AdventureWorksLT SQL Server database.
Build a .NET 6 Console Application
Open Visual Studio 2022 and click on the Create a new project option. Locate the template for a Console App that runs on .NET on Windows, Linux, and macOS. Highlight that template and click the Next button. Type in AdoNetWrapperSamples for the Project name property. Click the Next button and make sure you choose .NET 6.0 (Long-term support) for the Framework property.
Right mouse-click on the AdoNetWrapperSamples project and select Manage NuGet Packages… Click on the Browse tab, type in System.Data.SqlClient, and install this package into your project. This package provides all the ADO.NET classes you need to connect to a database and to retrieve and modify data to/from a table.
Get the AdventureWorksLT Database
For these articles, I'm going to use the AdventureWorksLT database, so you need to install this database into your SQL Server. You can get the database and instructions at this link. You can also get a recent database backup and the appropriate .SQL files to create the tables at my GitHub located at https://github.com/PaulDSheriff/AdventureWorksLT. Once you have the AdventureWorksLT database installed into your SQL Server, you're ready to start building the classes to access the Product table within that database.
The Basics for Building an Entity List
To read data from a table in ADO.NET, you need to use three different classes. First you need to create a SqlConnection object with the appropriate connection string to your database. Place that SqlConnection object into the Connection property of a SqlCommand object and set the CommandText property to the SQL to submit. Finally, call the ExecuteReader() method on the SqlCommand object to create an instance of a SqlDataReader object. Loop through the rows in the data reader and each time through, build an instance of a Product object and populate the properties with the columns from the Product table you're reading.
The Product Class
In the AdventureWorksLT database, there's a Product table in the SalesLT schema. To retrieve the data from that table and create an instance of a Product object for each row, create a Product entity class as shown in Listing 2. I'm not using all the columns in the table, just enough to illustrate the concept of creating a collection of Product objects.
Listing 2: An entity class has one property for each column in your table
#nullable disable

using System.ComponentModel.DataAnnotations.Schema;

namespace AdoNetWrapperSamples.EntityClasses;

[Table("Product", Schema = "SalesLT")]
public partial class Product
{
    public int ProductID { get; set; }
    public string Name { get; set; }
    public string ProductNumber { get; set; }
    public string Color { get; set; }
    public decimal StandardCost { get; set; }
    public decimal ListPrice { get; set; }
    public DateTime SellStartDate { get; set; }
    public DateTime? SellEndDate { get; set; }
    public DateTime? DiscontinuedDate { get; set; }

    public override string ToString()
    {
        return $"Product Name: {Name} - Product ID: {ProductID} - List Price: {ListPrice:c}";
    }
}
Right mouse-click on the project and add a new folder named EntityClasses. Right mouse-click on this EntityClasses folder and add a new class named Product. Add the code shown in Listing 2. Please note that due to space limitations in the magazine, the string in the ToString() method is broken across multiple lines. You'll need to put that string all on one line.
The DataReaderExtensions Class
One of the challenges you may encounter when reading data from a table, is a null value in columns. When a null is read from a data reader, .NET interprets it as a DbNull object. You can't put this value into a .NET data type, even if it's a nullable type. So, the best thing to do is to create an extension method, named GetData<T>(), to handle these DbNull values. For example, if your reader variable is named rdr, call the GetData() method passing in the data type that you wish the data to be converted to as shown in the following code snippet.
ProductID = rdr.GetData<int>("ProductID");
Name = rdr.GetData<string>("Name");
Right mouse-click on the project and add a new folder named Common. Right mouse-click on this Common folder and add a new class named DataReaderExtensions. Add the code shown in Listing 3 to this file.
Listing 3: Extension method to handle null values in the data reader
#nullable disable

using System.Data;

namespace AdoNetWrapper.Common;

public static class DataReaderExtensions
{
    public static T GetData<T>(this IDataReader dr, string name, T returnValue = default)
    {
        var value = dr[name];

        if (!value.Equals(DBNull.Value))
        {
            returnValue = (T)value;
        }

        return returnValue;
    }
}
Create a ProductRepository Class
Now that you have a Product class to represent the Product table, create a class called ProductRepository to perform the actual calls to the database and create the collection of Product objects. Right mouse-click on the project and add a new folder named RepositoryClasses. Right mouse-click on this RepositoryClasses folder and add a new class named ProductRepository. Add the code shown below to this file.
#nullable disable

using AdoNetWrapper.Common;
using AdoNetWrapperSamples.EntityClasses;
using System.Data;
using System.Data.SqlClient;

namespace AdoNetWrapperSamples.RepositoryClasses;

public class ProductRepository
{
}
Within the ProductRepository class, create a method called Search() as shown in Listing 4. This method accepts a connection string and a SQL string. It then creates the new SqlConnection and SqlCommand objects. It opens the connection and then invokes the ExecuteReader() method to create a SqlDataReader object.
Listing 4: The Search() method is the public API to perform searching of records
public virtual List<Product> Search(string connectString, string sql)
{
    List<Product> ret;

    // Create a connection
    using SqlConnection cnn=new(connectString);

    // Create a command object
    using SqlCommand cmd = new(sql, cnn);

    // Open the connection
    cnn.Open();

    // Create a data reader within a using
    // so it is closed and disposed of properly
    using SqlDataReader rdr = cmd.ExecuteReader(CommandBehavior.CloseConnection);

    // Build the collection of entity objects
    ret = BuildEntityList(rdr);

    return ret;
}
The Search() method calls the BuildEntityList() method to which the SqlDataReader object is passed. This method is responsible for building a Product object from each row in the table. Calls to the extension method, GetData<T>(), make sure null values are handled correctly. Add the BuildEntityList() method (Listing 5) to the ProductRespository class.
Listing 5: The BuildEntityList() is responsible for loading data into an entity object
protected virtual List<Product> BuildEntityList(IDataReader rdr)
{
    List<Product> ret = new();

    // Loop through all rows in the data reader
    while (rdr.Read())
    {
        // Create new object and add to collection
        ret.Add(new Product
        {
            ProductID = rdr.GetData<int>("ProductID"),
            Name = rdr.GetData<string>("Name"),
            ProductNumber = rdr.GetData<string>("ProductNumber"),
            Color = rdr.GetData<string>("Color"),
            StandardCost = rdr.GetData<decimal>("StandardCost"),
            ListPrice = rdr.GetData<decimal>("ListPrice"),
            SellStartDate = rdr.GetData<DateTime>("SellStartDate"),
            SellEndDate = rdr.GetData<DateTime?>("SellEndDate"),
            DiscontinuedDate = rdr.GetData<DateTime?>("DiscontinuedDate")
        });
    }

    return ret;
}
It's now time to try out the code you wrote to ensure that you can read data from the Product table and build a collection of Product objects. Open the Program.cs file and delete all the code. Add the code shown in Listing 6 to this file.
Listing 6: Create a ProductRepository object and search for all product data
#nullable disable

using AdoNetWrapperSamples.EntityClasses;
using AdoNetWrapperSamples.RepositoryClasses;

string ConnectString = "Server=Localhost; Database=AdventureWorksLT; Integrated Security=Yes";
string Sql = "SELECT * FROM SalesLT.Product";

ProductRepository repo = new();
List<Product> list = repo.Search(ConnectString, Sql);

Console.WriteLine("*** Display the Data ***");
// Display Data
foreach (var item in list)
{
    Console.WriteLine(item.ToString());
}

Console.WriteLine();
Console.WriteLine($"Total Items: {list.Count}");
Console.WriteLine();
Be sure to adjust the connection string to the correct values for connecting to your server. If you're unsure about what connection string to use, visit www.connectionstrings.com as they provide a wealth of information on how to build connection strings for all sorts of databases.
Try It Out
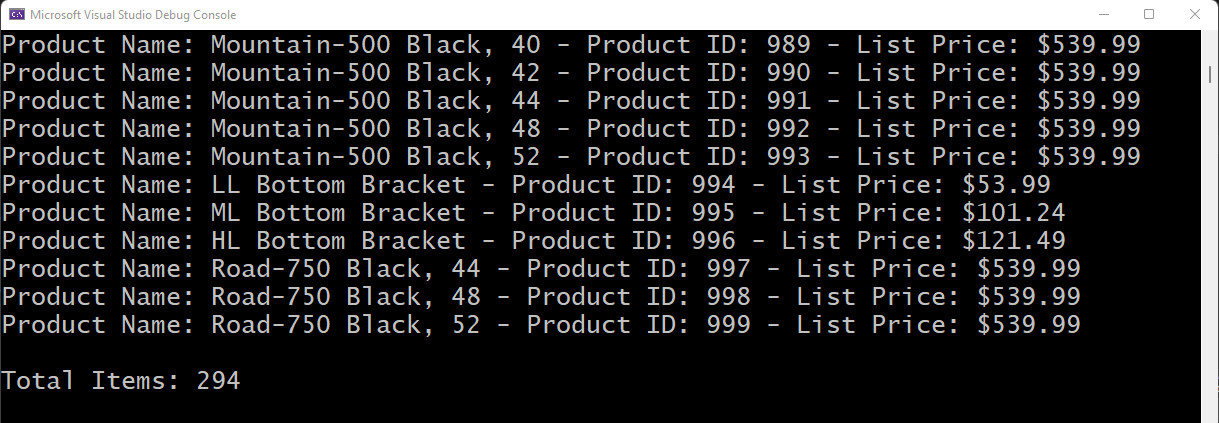
Run the console application, and if you typed everything in correctly, you should see a set of products displayed, along with the total items returned, as shown in Figure 1.
Read Connection String from appsettings.json
Instead of hard-coding your connection string, it's a better idea to put that connection string into a .json file. Right mouse-click on the project and select Add > New Item… from the context-sensitive menu. Click on the General tab and locate the JSON File item. Set the Name property to appsettings.json and click the Add button. Add the code shown below into the .json file. Be sure to adjust the connection string to the one you need for your server. Also, your connection string shouldn't be broken across multiple lines, I had to do that for formatting purposes of this magazine.
{
    "ConnectionStrings": {
        "DefaultConnection": "Server=Localhost; Database=AdventureWorksLT; Integrated Security=Yes"
    }
}
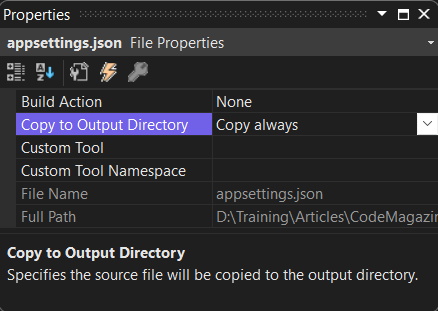
Make sure that the appsettings.json file is always copied to the directory where the program is run from. Click on the appsettings.json file to give it focus, then right mouse-click on it, and select Properties from the context-sensitive menu. From within the Properties window, change the Copy to Output Directory property to Copy always as shown in Figure 2.
Add the Hosting Package
To use the Configuration service used to read configuration settings in .NET 6, add a package called Microsoft Extensions Hosting. Right mouse-click on the project and select Manage NuGet Packages… Click on the Browse tab, enter Microsoft.Extensions.Hosting and press Enter. In the list below, highlight the package and click on the Install button to add this package to your project. Open the Program.cs file and add a few using statements.
using Microsoft.Extensions.Configuration;
using Microsoft.Extensions.DependencyInjection;
using Microsoft.Extensions.Hosting;
Delete the line of code you wrote earlier that defines and initializes the ConnectString variable and replace it with the following lines of code. These lines of code create a hosting service from which you can request a Configuration service. You then call the GetValue<string>() method to read the connection string from the appsettings.json file.
// Setup Host
using IHost host = Host.CreateDefaultBuilder().Build();

// Ask service provider for configuration
IConfiguration config = host.Services.GetRequiredService<IConfiguration>();

// Get connection string
string ConnectString = config.GetValue<string>("ConnectionStrings:DefaultConnection");
Try It Out
Run the application and, if you typed everything in correctly, everything should work just as it did before.
Create a Generic Database Context Class
If you look at the code in Listing 4, you can figure out that you don't really want to write this code repeatedly for each table you wish to read data from. There are a few problems with this code. First off, there's a lot of it, and secondly, you have hard-coded references to the Sql* classes. What if you want to use Oracle, SqlLite, or another database server at some point? It would be nice if you had a more generic approach.
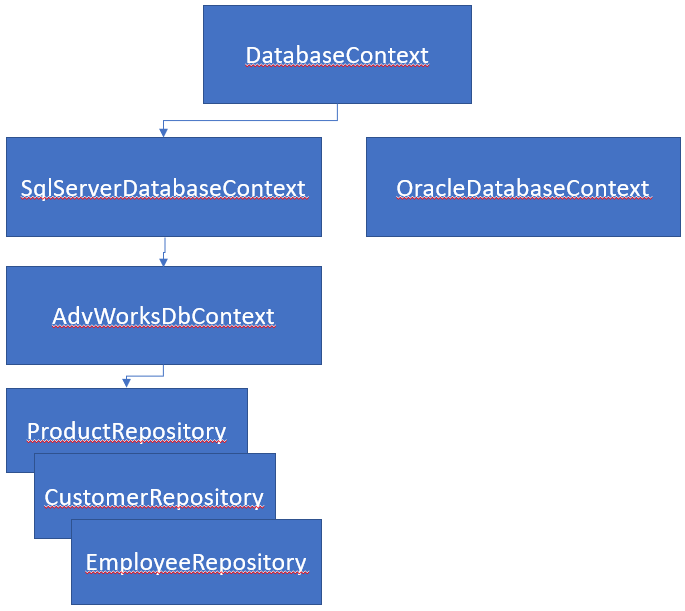
To achieve this goal, you're going to build a few classes, as shown in Figure 3. The first class is called DatabaseContext, which is an abstract class that only contains methods used to create connections, commands, parameters, and data readers. This class implements the IDisposable interface so it can be wrapped within a using. The methods for creating the various objects are meant to be overridden by the SqlServerDatabaseContext, or the OracleDatabaseContext classes with concrete implementations of the specific objects for their database provider. For example, the CreateConnection() method in the DatabaseContext looks like the following:
public abstract IDbConnection CreateConnection(string connectString);
The overridden method in the SqlServerDatabaseContext class returns an actual SqlConnection object as shown in the following code snippet:
public override SqlConnection CreateConnection(string connectString)
{
    return new SqlConnection(connectString);
}
The SqlServerDatabaseContext and OracleDatabaseContext classes are meant to be generic to work with any SQL Server or Oracle database respectively. The AdvWorksDbContext class shown in Figure 3 inherits from the SqlServerDatabaseContext and is meant to work with just the AdventureWorksLT database. The Repository classes use the services of the SqlServerDatabaseContext to read, insert, update, and delete data from their appropriate tables.
Build the Abstract DatabaseContext Class
Right mouse-click on the Common folder and create a new class named DatabaseContext as shown in Listing 7. This class has a constructor to which a connection string must be passed. After all, without a connection string, there's no way you're going to be able to interact with a database. It has a few public properties, Init() and Dispose() methods. Most of the properties are self-explanatory, but the ParameterPrefix property is going to be implementation-dependent. For example, when using SQL Server, parameters are prefixed with the at sign (@). However, when using Oracle, parameters are prefixed with the colon (:). In the Init() method of the SqlServerDatabaseConnect class is where you initialize the ParameterPrefix to the @ sign.
Listing 7: The abstract DatabaseContext class provides a generic interface for creating ADO.NET objects
#nullable disable

using System.Data;

namespace AdoNetWrapper.Common;

/// <summary>
/// Abstract base class for all
/// ADO.NET database operations
/// </summary>
public abstract partial class DatabaseContext: IDisposable
{
    public DatabaseContext(string connectString)
    {
        ConnectionString = connectString;
        Init();
    }

    public string ConnectionString { get; set; }
    public string ParameterPrefix { get; set; }
    public IDbCommand CommandObject { get; set; }
    public IDataReader DataReaderObject { get; set; }

    protected virtual void Init()
    {
        ParameterPrefix = string.Empty;
    }
}
Create a Dispose Method
Add a Dispose() method (Listing 8) to the DatabaseContext class to check the various properties to ensure that they're closed and disposed of properly. Check the DataReaderObject property and if it's not null, call the Close() and Dispose() methods on this object. Next, check the CommandObject property and ensure it's not null. If it's not, check the Connection property, and if it's not null, check whether the Transaction property is not null and dispose of the Transaction property. Call the Close() and Dispose() on the Connection property and then finally dispose of the CommandObject. The Dispose() method in this class runs when you either explicitly call the Dispose() method or the instance of the DatabaseContext goes out of scope when wrapped within a using.
Listing 8: You must have a Dispose() method in order to ensure there are no memory leaks
public virtual void Dispose()
{
    // Close/Dispose of data reader object
    if (DataReaderObject != null)
    {
        DataReaderObject.Close();
        DataReaderObject.Dispose();
    }

    // Close/Dispose of command object
    if (CommandObject != null)
    {
        if (CommandObject.Connection != null)
        {
            if (CommandObject.Transaction != null)
            {
                CommandObject.Transaction.Dispose();
            }
            CommandObject.Connection.Close();
            CommandObject.Connection.Dispose();
        }
        CommandObject.Dispose();
    }
}
Now that you have the basics of the DatabaseContext class created, add a couple of method overloads to create connection objects. In this class, it's important to only use the interface objects such as IDbConnection so this class is completely database independent.
public virtual IDbConnection CreateConnection()
{
    return CreateConnection(ConnectionString);
}

public abstract IDbConnection CreateConnection(string connectString);
The next two overloaded methods are used to build command objects. Use the IDbCommand interface as the return values from these methods.
public virtual IDbCommand CreateCommand(string sql
{
    return CreateCommand(CreateConnection(), sql);
}

public abstract IDbCommand CreateCommand(IDbConnection cnn, string sql);
When you need to build parameters for either dynamic SQL or for submitting stored procedures, you need a couple of methods to create parameters. These methods use the IDataParameter interface, but when you create the SqlServerDatabaseContext class, you return an actual SqlParameter object.
public abstract IDataParameter CreateParameter(string paramName, object value);

public abstract IDataParameter CreateParameter();
The next method to create helps you retrieve any output parameters returned from a stored procedure. This method GetParameter() returns an IDataParameter object, but is an abstract method so you must override it in the SqlServerDataContext, or OracleDataContext class you create.
public abstract IDataParameter GetParameter(string paramName);
The next two methods are used to create an instance of a data reader object. Ensure you're returning the IDataReader interface from these methods in this class.
public virtual IDataReader CreateDataReader()
{
    return CreateDataReader(CommandObject, CommandBehavior.CloseConnection);
}

public virtual IDataReader CreateDataReader(CommandBehavior cmdBehavior)
{
    return CreateDataReader(CommandObject, cmdBehavior);
}
You need one additional method for creating a data reader. This method accepts a command object and the CommandBehavior enumeration. The default for the CommandBehavior is to close the connection when the reader is closed, but the optional parameter allows you to change that behavior if needed.
This method is the one that is called by the previous two methods you created. It opens the connection, and calls the ExecuteReader() method on the command object to build the actual data reader object. The data reader object created is placed into the DataReaderObject property.
public virtual IDataReader CreateDataReader(IDbCommand cmd, CommandBehavior cmdBehavior = CommandBehavior.CloseConnection)
{
    // Open Connection
    cmd.Connection.Open();

    // Create DataReader
    DataReaderObject = cmd.ExecuteReader(cmdBehavior);
    return DataReaderObject;
}
Create a SQL Server Database Context Class
Now that you have the generic DatabaseContext class created, build the SqlServerDatabaseContext class. This class supplies the concrete Sql* objects to work with any SQL Server database. Right mouse-click on the Common folder and create a new class named SqlServerDatabaseContext. Add the code shown in Listing 9. This class has a constructor that must accept a connection string, and it passes it directly to the base class. In the Init() method, which is called from the base class, is where you set the ParameterPrefix property to the at (@) sign, which will be used by the methods dealing with parameters.
Listing 9: The SqlServerDatabaseContext class inherits from the DatabaseContext class and initializes the ParameterPrefix property in the Init() method.
#nullable disable

using System.Data;
using System.Data.SqlClient;

namespace AdoNetWrapper.Common;

/// <summary>
/// Database context using ADO.NET
/// for SQL Server Databases
/// </summary>
public partial class SqlServerDatabaseContext: DatabaseContext
{
    public SqlServerDatabaseContext(string connectString) : base(connectString) { }

    protected override void Init()
    {
        base.Init();

        ParameterPrefix = "@";
    }
}
Let's now add the various overrides to the methods that create the concrete implementations of the SQL objects. Start by overriding the CreateConnection() method to return a SqlConnection object. You only need to override the one method as the other method in the base class simply calls this one.
public override SqlConnection CreateConnection (string connectString)
{
    return new SqlConnection(connectString);
}
Override the one method for creating a command object because the other two methods in the base class call this one. In this method, set the CommandObject property with the new SqlCommand() object you create. You need to have this command object property public so you can add parameters to it and dispose of it when the database context class goes out of scope.
public override SqlCommand CreateCommand(IDbConnection cnn, string sql)
{
    CommandObject = new SqlCommand(sql, (SqlConnection)cnn);
    CommandObject.CommandType = CommandType.Text;
    return (SqlCommand)CommandObject;
}
The next methods to override are the ones that create new parameter objects. The first method accepts a parameter name and the value to assign to the parameter. It checks to see if the paramName parameter starts with the value in the ParameterPrefix property or not. If it doesn't, then the ParameterPrefix is added to the paramName parameter before the SqlParameter object is created. The second method returns an empty SqlParameter object.
public override SqlParameter CreateParameter(string paramName, object value)
{
    if (!paramName.StartsWith(ParameterPrefix))
    {
        paramName = ParameterPrefix + paramName;
    }
    return new SqlParameter(paramName, value);
}

public override SqlParameter CreateParameter()
{
    return new SqlParameter();
}
Some stored procedures return an OUTPUT parameter. After submitting a command, you can retrieve one of the OUTPUT parameters by querying the appropriate parameter object and requesting the value. The GetParameter() method shown below accepts a parameter name to locate, ensures it starts with the appropriate prefix, and then accesses the Parameters property on the CommandObject to retrieve the value.
public override SqlParameter GetParameter(string paramName)
{
    if (!paramName.StartsWith(ParameterPrefix))
    {
        paramName = ParameterPrefix + paramName;
    }
    return ((SqlCommand)CommandObject).Parameters[paramName];
}
The last method to override is the one that creates the SqlDataReader object. Pass in an instance of a command object and optionally, the CommandBehavior to use after closing the reader.
public override SqlDataReader CreateDataReader(IDbCommand cmd, CommandBehavior cmdBehavior = CommandBehavior.CloseConnection)
{
    // Open Connection
    cmd.Connection.Open();

    // Create DataReader
    DataReaderObject = cmd.ExecuteReader(cmdBehavior);

    return (SqlDataReader)DataReaderObject;
}
You're not going to create the OracleDatabaseContext class in these articles. However, you follow the same procedures I did in this section for building the SqlServerDatabaseContext class, just substituting the appropriate Oracle* classes for the Sql* classes used here.
Modify the Search() Method to Use the SQL Server Database Context Class
Now that you have built the generic SqlServerDatabaseContext class, you should use this to perform the searching. Open the ProductRepository.cs file and remove the using System.Data.SqlClient;* statement. Modify the Search() method to look like the following code.
public virtual List<Product> Search(string connectString, string sql)
{
    List<Product> ret;

    using SqlServerDatabaseContext dbContext = new(connectString);

    // Create Command Object with SQL
    dbContext.CreateCommand(sql);

    ret = BuildEntityList(dbContext.CreateDataReader());

    return ret;
}
As you can see, this code is much simpler, but still takes advantage of the using to make sure all resources are appropriately disposed of. You first create an instance of the SqlServerDatabaseContext class as part of the using. You then create a command object with the SQL to submit. Finally, you create the data reader and pass it to the BuildEntityList() method.
Try It Out
Run the console application again, and you should see the same number of product objects displayed as you saw earlier.
Generically Creating an Entity List
The code for working with a database has been greatly simplified, but let's now work on the BuildEntityList() method. This method is hard-coded to build just Product objects. Let's make this a generic method to which you can pass any type of object to build a collection out of.
You're going to use .NET Reflection to build the objects. Yes, I know what you're thinking: Isn't reflection very slow? It used to be, but starting with .NET 3.5, Microsoft did a serious overhaul of the reflection classes to ensure that it would be fast enough to support the new Entity Framework they were releasing at the same time. In fact, the code shown in Listing 10 is like the code the Entity Framework uses for populating entity collections.
Listing 10: Use reflection to read the data and create a list of any type of entity classes
protected virtual List<TEntity> BuildEntityList<TEntity>(IDataReader rdr)
{
    List<TEntity> ret = new();
    string columnName;

    // Get all the properties in <TEntity>
    PropertyInfo[] props = typeof(TEntity).GetProperties();

    // Loop through all rows in the data reader
    while (rdr.Read())
    {
        // Create new instance of Entity
        TEntity entity = Activator.CreateInstance<TEntity>();

        // Loop through columns in data reader
        for (int index = 0; index < rdr.FieldCount; index++)
        {
            // Get field name from data reader
            columnName = rdr.GetName(index);

            // Get property that matches the field name
            PropertyInfo col = props.FirstOrDefault(col => col.Name == columnName);

            if (col != null)
            {
                // Get the value from the table
                var value = rdr[columnName];
                // Assign value to property if not null
                if (!value.Equals(DBNull.Value))
                {
                    col.SetValue(entity, value, null);
                }
            }
        }
        // Add new entity to the list
        ret.Add(entity);
    }

    return ret;
}
Open the ProductRepository.cs file and add a new using statement.
using System.Reflection;
Turn the Search() method into a generic method by passing in a type parameter, <TEntity>, as seen in the code below.
public virtual List<TEntity> Search<TEntity>(string connectString, string sql)
{
    List<TEntity> ret;

    using SqlServerDatabaseContext dbContext = new(connectString);
    dbContext.CreateCommand(sql);

    ret = BuildEntityList<TEntity>(dbContext.CreateDataReader());

    return ret;
}
When you make the call to the Search() method from the Program.cs file, specify the name of the class to create as the list of objects. In the code shown below, you pass in Product to the <TEntity> type parameter.
List<Product> list = repo.Search<Product>(ConnectString, Sql);
Make BuildEntityList() a Generic Method
Modify the BuildEntityList() to be a generic method as shown in Listing 10. Add the <TEntity> type parameter like you did in the Search() method. The SqlDataReader object has a GetName() method, which retrieves the current column name via an index. You need to be able to map this column name to the same property name in the type of class passed in. Use the typeof() method on the type parameter passed in and then call the GetProperties() method to return all the properties in the class. You now have all the property names, and you can get the column name from the data reader. All you need to do now is to map the value from the data reader into the property of the class.
Loop through each row in the Product table and each time through, create a new instance of a Product object using the Activator.CreateInstance() method. Loop through each column in the data reader object and set the field name into the variable named columnName. This code assumes that the column name in the table exactly matches the property name in the class. Later you're going to learn how to map column names to property names using an attribute. Look up the property by calling the props.FirstOrDefault() method to locate where the property name is the same as the column name.
If a property is found with the same name, check to see if the value in the column is not a DbNull value. If it isn't, use the reflection SetValue() method on the property to set the value on the newly created instance of the Product class to the value from the column in the table. Add the new instance of the Product class to the collection and repeat this process until all rows in the table have been processed.
Try It Out
Open the Program.cs file and modify the call to the Search() method to look like the following code.
List<Product> list = repo.Search<Product>(ConnectString, Sql);
Run the console application and, once again, you should see the same product objects displayed.
Handle the [Column] Attribute on the Entity Class
One of the problems with the way the BuildEntityList() method is written, is that it assumes the column name is the same as the property name in your class. There are many times when you might have column names with characters that aren't valid in property names. Or maybe your column names are all upper-case and you want your properties to be camel case. Or maybe you just want your property name to be more descriptive than the column name is. Whatever, the reason, simply add a [Column] attribute above the property you want to be different. Open the Product.cs file and rename the ProductID and the Name properties to be Id and ProductName respectively.
public int Id { get; set; }
public string ProductName { get; set; }
Above the Id property, add the [Column] attribute to specify the name of the actual column in the table.
[Column("ProductID")]
public int Id { get; set; }
Do the same for the renamed ProductName property, and add the [Column] attribute to be the actual name of the column in the table.
[Column("Name")]
public string ProductName { get; set; }
Check for the [Column] Attribute When Reading Data
Add some code to the BuildEntityList() to take advantage of the [Column] attribute. Open the ProductRepository.cs file and add a using statement at the top of the file.
using System.ComponentModel.DataAnnotations.Schema;
In the BuildEntityList() method, modify the code within the loop, as shown in Listing 11. The first part of this code is the same. The difference is that you're checking to see if the variable col is a null, and if it is, that means the column name didn't match any property names. Call the FirstOrDefault() method again on the props collection, but you're now looking for any column that has a [Column] attribute, and whether the Name property in the [Column] attribute matches the column name from the data reader. If you find it, the col property is now set to a valid property, and now you can set the value into that property.
Listing 11: Add code to check for the [Column] attribute
for (int index = 0; index < rdr.FieldCount; index++)
{
    // Get field name from data reader
    columnName = rdr.GetName(index);

    // Get property in entity that matches the field name
    PropertyInfo col = props.FirstOrDefault(col => col.Name == columnName);

    if (col == null)
    {
        // Is column name in a [Column] attribute?
        col = props.FirstOrDefault(c => c.GetCustomAttribute<ColumnAttribute>()?.Name == columnName);
    }

    if (col != null)
    {
        // Get the value from the table
        var value = rdr[columnName];

        // Assign value to the property if not null
        if (!value.Equals(DBNull.Value))
        {
            col.SetValue(entity, value, null);
        }
    }
}
Try It Out
Run the console application again and you should see the same product objects displayed.
Build SELECT Statement from Properties
If you take a look at the SalesLT.Product table in the AdventureWorksLT database, you'll see that there are many more columns than properties in the Product class. This means that sending the SELECT * FROM SalesLT.Product SQL statement to the server returns much more data than is needed. Obviously, a less wasteful approach is needed.
Actually, there's no need to pass in a SQL statement to the Search() method at all, as the statement can be inferred from the properties within the Product class. So, let's eliminate the SQL statement and read the property names (and any [Column] attributes) to build the SELECT statement to send to the database.
Let's also add some additional functionality to check whether a [NotMapped] attribute has been added to any properties. Sometimes you need additional properties in your entity class, but those properties aren't mapped to any column in the table, this is what the [NotMapped] attribute is for. To illustrate the [NotMapped] attribute, open the Product.cs file and add the following property somewhere within this class.
[NotMapped]
public bool IsSelected { get; set; }
Instead of gathering the properties of the class within the BuildEntityList() method, let's move this functionality into a new method. The new method uses reflection to collect the column name and the property information for each property in the entity class and return that as a collection of objects. Create a class to hold that information by right mouse-clicking on the Common folder and adding a new class called ColumnMapper as shown in the code snippet below.
#nullable disable

using System.Reflection;

namespace AdoNetWrapper.Common;

public class ColumnMapper
{
    public string ColumnName { get; set; }
    public PropertyInfo PropertyInfo { get; set; }
}
Open the ProductRepository.cs file and add a few new properties to this class. You can see the collection of ColumnMapper classes that are going to hold the information about each property in the Product entity class. There are also properties for the schema and table name of the table this repository class is working with. The SQL property will hold the last statement used to retrieve data from the table.
public string SchemaName { get; set; }
public string TableName { get; set; }
public List<ColumnMapper> Columns { get; set; }
public string SQL { get; set; }
Add a method named Init() to the ProductRepository class to initialize some of these properties to valid start values.
protected virtual void Init()
{
    SchemaName = "dbo";
    TableName = string.Empty;
    SQL = string.Empty;
    Columns = new();
}
Add a constructor to the ProductRepository() class to call the Init() method.
public ProductRepository()
{
    Init();
}
Add a Method to Build a Collection of Columns
Let's add a new method named BuildColumnCollection() to build the collection of ColumnMapper objects, as shown in Listing 12, and remove this functionality from the BuildEntityList() method. Once this collection is built, you're going to be able to do two things: build the SELECT statement to submit to retrieve the data and map the data from the data reader to the properties in the class.
Listing 12: Add a method to build a collection of column information from the properties of your entity class
protected virtual List<ColumnMapper> BuildColumnCollection<TEntity>()
{
    List<ColumnMapper> ret = new();
    ColumnMapper colMap;

    // Get all the properties in <TEntity>
    PropertyInfo[] props = typeof(TEntity).GetProperties();

    // Loop through all properties
    foreach (PropertyInfo prop in props)
    {
        // Is there a [NotMapped] attribute?
        NotMappedAttribute nm = prop.GetCustomAttribute<NotMappedAttribute>();

        // Only add properties that map to a column
        if (nm == null)
        {
            // Create a column mapping object
            colMap = new()
            {
                // Set column properties
                PropertyInfo = prop,
                ColumnName = prop.Name
            };

            // Is column name in [Column] attribute?
            ColumnAttribute ca = prop.GetCustomAttribute<ColumnAttribute>();
            if (ca != null && !string.IsNullOrEmpty(ca.Name))
            {
                // Set column name from [Column] attr
                colMap.ColumnName = ca.Name;
            }

            // Create collection of columns
            ret.Add(colMap);
        }
    }

    return ret;
}
In this method, call the GetProperties() method on the TEntity type passed in. Once you have all the properties from the class, loop through each one and check to see if there's a [NotMapped] attribute on each column, if there is, bypass that column and don't add it to the collection of ColumnMapper objects. Otherwise, create a new ColumnMapper object and set the PropertyInfo property to the current PropertyInfo object, and the property name to the ColumnName property.
Next, check for a [Column] attribute on the property. If the [Column] attribute exists, make sure the Name property has been filled in on that attribute. It's possible to just specify a type for the column and not set the name for the column when using the [Column] attribute. If the Name property exists, replace the ColumnName property in the ColumnMapper object. Finally, add the ColumnMapper object to the collection to be returned, and repeat this process until all properties have been processed.
Add a Method to Set Table and Schema Properties
To build the SELECT statement, you need the schema name and table name in the database you're building the SQL for. By default, the SchemaName property is initialized to “dbo,” as that's the most common schema in SQL Server. The TableName property is set to the entity class name. However, most entity classes use the [Table] attribute to specify the table name and optionally the schema name. Create a method in your RepositoryBase class named SetTableAndSchemaName and add the following code to this method.
protected virtual void SetTableAndSchemaName(Type typ)
{
    // Is there is a [Table] attribute?
    TableAttribute table = typ.GetCustomAttribute<TableAttribute>();

    // Assume table name is the class name
    TableName = typ.Name;
    if (table != null)
    {
        // Set properties from [Table] attribute
        TableName = table.Name;
        SchemaName = table.Schema ?? SchemaName;
    }
}
Add Method to Build a SELECT Statement
You're now going to create a method called BuildSelectSql() to call the BuildColumnCollection() method you just wrote. After building the column collection, loop through it and use the ColumnName property to create a SELECT statement to submit to the database. Use a StringBuilder object to create the SELECT statement, so bring in the System.Text namespace by adding a using statement at the top of the ProductRepository class.
using System.Text;
Add the BuildSelectSql() method to the repository class, as shown in Listing 13. Call the BuildColumnCollection() method to fill in the Columns property. Call the SetTableAndSchemaName() method to set the TableName and SchemaName properties. Build the SELECT statement by iterating over the Columns collection and adding each ColumnName property to the SELECT statement.
Listing 13: Add a method to build the SELECT SQL statement to submit to the database
protected virtual string BuildSelectSql<TEntity>()
{
    Type typ = typeof(TEntity);
    StringBuilder sb = new(2048);
    string comma = string.Empty;

    // Build Column Mapping Collection
    Columns = BuildColumnCollection<TEntity>();

    // Set Table and Schema properties
    SetTableAndSchemaName(typ);

    // Build the SELECT statement
    sb.Append("SELECT");
    foreach (ColumnMapper item in Columns)
    {
        // Add column
        sb.Append($"{comma} [{item.ColumnName}]");
        comma = ",";
    }

    // Add 'FROM schema.table'
    sb.Append($" FROM {SchemaName}.{TableName}");

    return sb.ToString();
}
Modify the Search() Method
Modify the Search() method as shown in Listing 14.
Listing 14: The BuildEntityList() is now much simpler because the column information is pre-built
protected virtual List<TEntity>BuildEntityList<TEntity>(IDataReader rdr)
{
    List<TEntity> ret = new();

    // Loop through all rows in the data reader
    while (rdr.Read())
    {
        // Create new instance of Entity
        TEntity entity = Activator.CreateInstance<TEntity>();

        // Loop through columns collection
        for (int index = 0; index < Columns.Count; index++)
        {
            // Get the value from the reader
            var value = rdr[Columns[index].ColumnName];

            // Assign value to the property if not null
            if (!value.Equals(DBNull.Value))
            {
                Columns[index].PropertyInfo.SetValue(entity, value, null);
            }
        }

        // Add new entity to the list
        ret.Add(entity);
    }

    return ret;
}
Remove the string sql parameter passed in. Add the call to the BuildSelectSql() method and place the resulting SELECT statement into the SQL property of this class. Pass the SQL property to the CreateCommand() method. Then call the BuildEntityList() method as you did before.
public virtual List<TEntity> Search<TEntity>(string connectString)
{
    List<TEntity> ret;

    // Build SELECT statement
    SQL = BuildSelectSql<TEntity>();

    using SqlServerDatabaseContext dbContext = new(connectString);
    dbContext.CreateCommand(SQL);

    // REST OF THE CODE HERE

    return ret;
}
Modify the BuildEntityList Method
Because you added the code to check for the [Column] attribute and to ignore any columns with the [NotMapped] attribute, the BuildEntityList() method is now much simpler. Replace the BuildEntityList() method with the code in Listing 14.
Try It Out
Open the Program.cs file, remove the Sql declaration and assignment, and remove it from the second parameter passed to the Search() method.
List<Product> list = repo.Search<Product>(ConnectString);
Run the console application and you should see the same product objects displayed.
Summary
In this article, you learned how to use .NET reflection to create a generic way to build a collection of entity objects from any table in a database. You learned how to use the [Column] and the [NotMapped] attributes to set the column name or ignore properties in your entity class. An abstract base class was illustrated from which you then provided a concrete implementation for accessing any SQL Server database. This same base class could then be used as the basis for any other database context classes you need to access Oracle, SQL Lite, or other databases that have a .NET provider.
In the next article, you're going to refactor the repository class so it's much more generic. You'll also add search capabilities to your repository class, retrieve a scalar value, work with multiple result sets, and call stored procedures.