I've always been a proud, card-carrying member of the “I am not a sysadmin” club, which has evolved to the “I don't really do DevOps” club in recent years. But it's hard to ignore how much simpler the “ops” part of DevOps has become, thanks to advances in developer tooling, cloud services, and more.
Deploying an app to the cloud is fairly simple, but one of the other pieces of the puzzle that I typically “leave to a professional” is security. Like the Ops, there are a lot of security tasks that have become more accessible to developers like me who are typically fearful of security. In this article, I'll share with you an important security step that even the most avid members of the I Don't Do DevOps Club can achieve. If I can do it, you can too. Come on along.
I have a small (very small) Web application that tracks the episodes of Microsoft's twitch streaming show, the 425 Show (aka.ms/425Show). The 425 Show is hosted by developer advocates for Microsoft's identity platform. In this article, you'll learn how to leverage Microsoft Identity via Azure Active Directory (AAD) to secure a Web application. I was recently a guest on that show where one of the dev advocates, Christos Matskas, taught me how to perform this task.
You may, like I did, wonder where that name 425 came from. I'll give you two possible answers and let you ponder which is correct. 425 is either based on the area code for Seattle/Redmond where Microsoft is headquartered or a nod to the HTTP 425 “Too early” status code that indicates that the server is unwilling to risk processing a request that might be replayed. I'll reveal the answer after we've accomplished this article's goals!
My starting point is an ASP.NET Core Razor app, named EspisodeApp, that I created using the standard ASP.NET Core Web App project template (for C#). I targeted .NET 5 when the template offered an option and then went with the rest of the defaults.
The goal of this article is to store my database connection string along with its secrets, user ID, and password, in Azure Key Vault. I'll continue to debug the app in Visual Studio using the Azure.Identity API to gain access to secrets stored in Key Vault without explicitly providing credentials. This means that the application code will have no secrets at all and set us up for deploying the app to Azure where the application will continue to leverage Azure.Identity to access those secrets. There's a lot to learn here so I'll relay the full story in two parts. This article is Part 1. In Part 2 (coming soon to an issue of CODE Magazine), I'll walk through deploying the app and realizing the benefits that Azure Identity gives us developers as we seamlessly move from dev to production without having to worry about credentials or modifying any source code.
Customizing the Razor App to Track 425 Show Episodes
With the base app in hand, I made the following three changes to the default project in order to add in my Episodes data.
- Add a class to track 425 Show episodes.
- Create Razor pages that use EF for persisting the episode data.
- Migrate the Episodes schema database locally.
Add a Class to Track 425 Show Episodes
This is a simple CRUD class with no fancy logic to distract you from the focus of this article.
public class Episode
{
    public int EpisodeId { get; set; }
    public string Title { get; set; }
    public string GuestName { get; set; }
    public DateTime Date { get; set; }
    public string URL { get; set; }
}
Create Razor Pages that Use EF Core for Persisting the Episode Data
The project template created a Pages folder for the Razor pages. You'll need to start by adding a new subfolder under Pages named Episodes. I'll walk you through the next steps in case they're new to you. Thanks to Visual Studio's tooling, you can right-click that new Episodes folder, choose Add, then Razor Page, and in the “Add New Scaffolded Item” window that opens, choose the Razor Pages using Entity Framework (CRUD) option. In the next window, set Model class to Episode, let Data Context class create a new Data context by clicking the + sign. I named mine EpisodesContext and left the other defaults on that page.
The result isn't just the new set of Razor pages and the new EpisodesContext class that it placed in a Data folder, but two more changes. A connection string is defined in appsettings.json and the Startup.ConfigureServices has a configuration for EpisodesContext to use the SQL Server provider with that new connection string. The template-generated database name for the Episodes database is quite long, so I changed the name to Episodes in appsettings.json to make it more readable.
I then modified the new EpisodesContext class using the HasData method to seed five episodes of the 425 Show into the database. That code goes into the OnModelCreating virtual method and gets used to add seed logic into migration files. Listing 1 shows the new method with only one of the episodes seeded. You can find the rest in the download example with this article.
Listing 1: Using the HasData method to create seed data for the Episodes database
protected override void OnModelCreating(ModelBuilder modelBuilder)
{
    modelBuilder.Entity<Episode>().HasData(
        new Episode {
            EpisodeId = 1,
            Title = "All about Open Source and .NET",
            GuestName = "Claire Novotny",
            Date = new System.DateTime(2021, 3, 2),
            URL = "https://www.youtube.com/watch?v=flj9MHrOU0k";
        }
    );
}
Migrate the Episodes Database Schema Locally
If, like me, you used the wizard to create the EF Core-based Razor pages, Visual Studio added the relevant EF Core packages into the project so you can go ahead and run migrations. I want my migrations to go into that Data folder, so I'm using the -o (output) parameter to specify that.
add-migration init -o Data\EpisodesMigrations
Note that if you added the seeding logic in EpisodesContext, the migration includes logic to seed the database with the specified data.
With this in place, you can now let migrations create a local Episodes database with the update-database command.
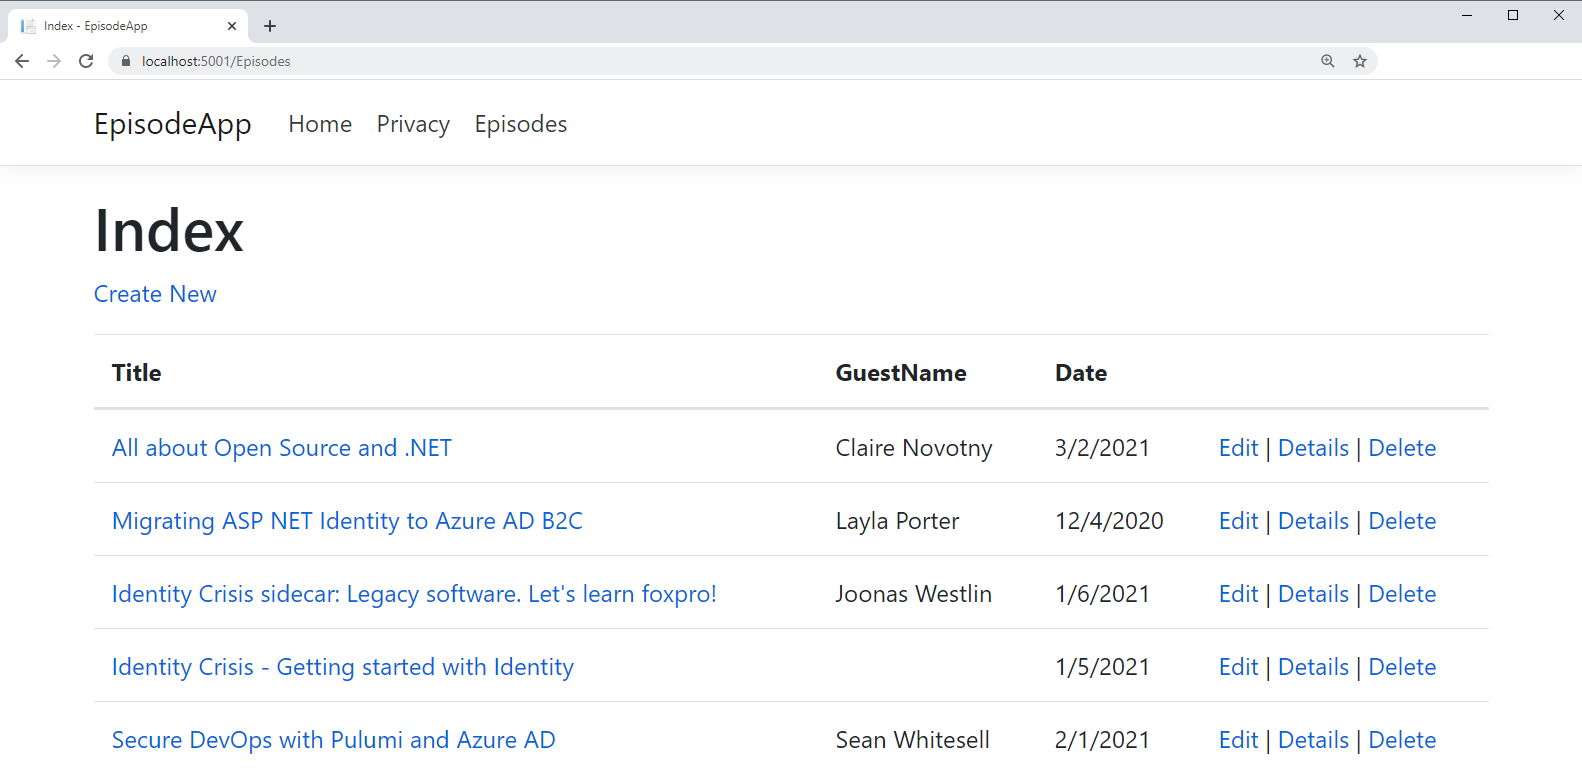
I made a few formatting changes in the Episodes\Index.cshtml and the Shared\_Layout.cshtml pages that you can copy from my sample if you'd like. The modification to Layout adds an Episodes link to the menu, which just provides a shortcut to the [baseURL]/Episodes. Navigating to the Episodes index, as you can see in Figure 1, the app has read the seed data from the database and displays the episodes list.
Anticipating the Problem of Secrets in the Connection String
As I contemplate deploying this application to the cloud, I have to consider the age-old problem of how to protect the login and password required to access my database. The connection string is currently part of the application code in appsettings.json. Not only will this be included in the deployed solution, but it will get shared into any source control solution. To be fair, I'm currently using SQL Server LocalDB for development, which doesn't require a login and password in the connection string. But when it's time to deploy, I plan to target Azure SQL and at that point, I will, indeed have secrets to protect! I may even want to avoid divulging the location of the database, so I'll consider my entire connection string a secret, even before I've evolved it to a production database.
Initially, I can move the developer secrets into ASP.NET Secrets Manager (https://docs.microsoft.com/en-us/aspnet/core/security/app-secrets), which is a good solution when working locally. But I'm thinking further ahead to deployment. If I'm working with a team, everyone will be responsible for setting up the connection string to the shared Azure SQL database on their own development computers. When I deploy the app to Azure, I'll still need the connection strings to be available to my application. How can I hide them from the application code yet still make them available to the application and possibly other developers for testing? Database credentials are a great first step for learning how to manage secrets but there's an even better way: Azure Key Vault protected by Azure AD allows us to protect Azure SQL database credentials. There are plenty of other types of secrets you may need to store in your application. In the end, you'll have a solution where your code base has nothing to do with connection strings or other application secrets and using Key Vault and Azure AD allows us to store and access your secrets in a way that's seamless when moving between development and production.
Leveraging Azure Key Vault and Azure Active Directory
This is what I learned from Christos on our 425 Show episode and it's the knowledge I want to share with you - taking advantage of Azure Key Vault to hide the secrets (the connection strings) and Azure Active Directory to access those secrets on your behalf. In the end, your application will have no secrets to potentially leak - with Azure AD providing secure access to Key Vault.
I'll evolve to this solution in three passes.
- The first pass leverages the Azure Key Vault and Azure Active Directory while you continue to debug the application in Visual Studio with the local database.
- The second pass transfers to using an Azure SQL database that I'll consider a test database.
- The third pass deploys the application to Azure and you'll see that because the connection strings are already stored in the Key Vault and the application is already aware of Azure AD, it will just work without additional tweaking. This last pass will be described in a future follow-up article in this magazine.
An important note that I learned the hard way (as you'll witness if you watch the 425 Show episode that I participated in) is that your Azure account must be tied to an Office 365 or Microsoft 365 account. My Microsoft identity is so old that I created it with a Live.com account and used that account to set up my Azure subscription. Azure Active Directory won't work with Azure accounts that are tied to Live.com. If you're in the same boat, check out my blog post about how to add an O365 identity to your Azure account without disrupting any existing dependencies (thedatafarm.com/azure/azureaad/).
Azure Active Directory won't work with Azure accounts that are tied to Live.com.
Moving the Connection String to Azure Key Vault
In the first step, I move my LocalDB connection strings to Azure Key Vault and continue testing against my local database. I'm a fan of changing one thing at a time, in case something breaks. You can create a new Key Vault resource using the Azure Portal, PowerShell, or the Azure CLI. I prefer to use the portal when learning about a service for the first time because it really hand-holds you through the steps. You can find walk-throughs for each path in the docs at https://docs.microsoft.com/en-us/azure/key-vault/general/overview. Setting up the keys in a Key Vault means creating a Key Vault, creating an Azure Active Directory identity that's allowed to access the vault, and then creating the keys.
Creating a Key Vault
Start by logging into the Azure Portal and search for Key Vault to access the service.
The service is structured such that you can define multiple vaults, each of which has a unique name and is tied to a particular Azure subscription and resource. Once you've defined a vault, you can add keys and secrets to it.
You'll see a grid listing any Key Vaults that you've already created. Let's create a new one. Click New, which presents you with a form for the vault's properties. You'll start by specifying which Azure subscription to tie the key to and which resource group to use - either an existing or a new one. Then you need to provide a name for the vault and, like most other Azure resources, it needs to be unique to the universe of Azure Key Vaults because the vault name becomes its URL. I left the rest of the properties (Region, Pricing tier, Soft-delete, Days to retain and Purge protection) at their defaults and then choose Review and Create. After verifying my choices, I clicked the Create button and waited for the vault to be created - about 10 seconds.
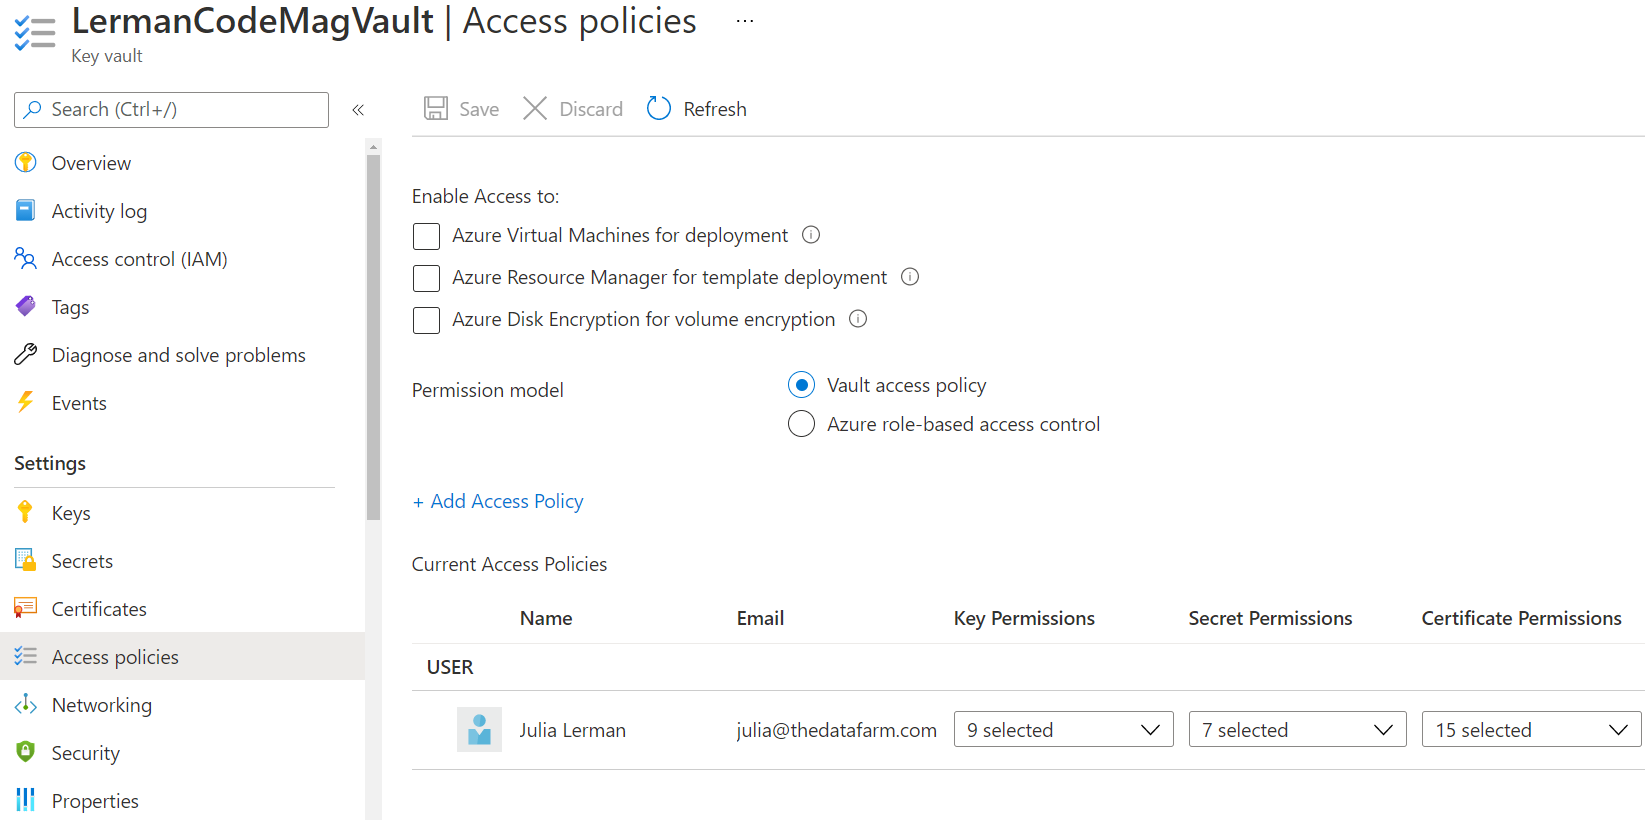
Granting Access to the Key Vault
Every Key Vault requires at least one Access Policy to define what actions are allowed to be performed by a particular identity. When you initially create a Key Vault, Azure creates a default access policy granting wide permissions on to the Azure subscription owner account. Figure 2 shows the default policy that grants my owner account access to a variety of tasks for keys, secrets, and certificates in this vault: creating, reading, editing, deleting, and more.
For production, you'll want to have a dedicated identity for the application and that identity requires its own access policy in the Key Vault. Because this is merely a learning demo, it's fine to use the owner account with its many privileges for the upcoming steps. You won't need to create an additional policy quite yet. Keep in mind that you will need to log in to Visual Studio with whatever account is tied to the access policy in order to debug the app in Visual Studio. In my case, they are one and the same and it's likely that this is your case as well. I'll show you how to resolve that if needed when we cross that bridge. Again, as a reminder, if your Azure subscription owner account is a Live account, you'll need to follow the path I laid out in the above-mentioned blog post to get this to succeed.
Adding Secrets to the Key Vault
Now you can finally add some secrets! Well, you only need one secret, which will be the connection string used for accessing the Episode data. It seems silly to put a local connection string in the cloud but bear with me. I found it to be a great step in the learning path.
It's important to be aware of how ASP.NET Core detects configuration information. The appsettings.json file is but one of a number of sources that ASP.NET Core seeks out at run time. Other configuration sources include what's read from the development.appsettings.json file and your computer's environment variables. If there are any duplicates among these sources, ASP.NET Core's policy is “last one in wins.” I currently have my connection string in appsettings listed in JSON format as:
"ConnectionStrings": {
    "EpisodesContext":"Server=(localdb)\\mssqllocaldb;
    Database=Episodes;
    Trusted_Connection=True;
    MultipleActiveResultSets=true"
}
In my code, I'm using the configurations API to discover that string:
Configuration.GetConnectionString("EpisodesContext"))
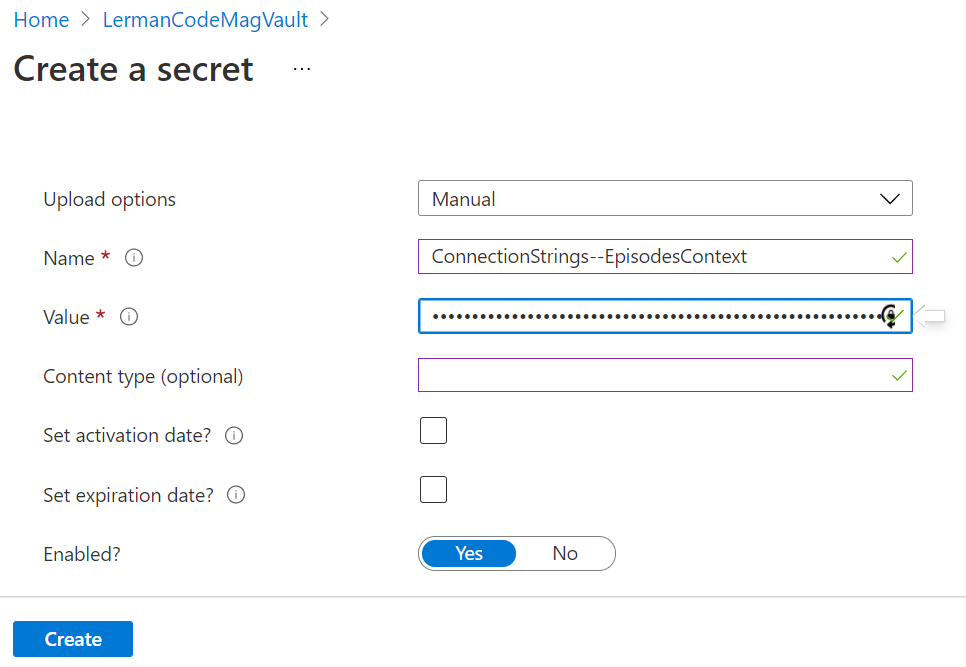
So I need to relay both ConnectionStrings and EpisodesContext in the key name in my vault where Episodes is a property of ConnectionStrings. The syntax for this is parent dash dash child, so ConnectionStrings--EpisodesContext.
You may notice that the Key Vault has settings for Keys and for Secrets. We're working with Secrets in this case. Select Secrets and then Generate/Import. You'll be entering this manually, so leave the Upload options at Manual, as shown in Figure 3. Enter the name that will be sought by the GetConnectionString method: ConnectionStrings--EpisodesContext. Then paste in the connection string you're currently using from the JSON file. Don't include the line wraps or the enclosing quotes. Most importantly, if, like me, you're using C# and have two back-slashes between (localdb) and msssqllocaldb, remove one of them.
The final setting defaults are fine, so go ahead and click Create.
Each secret has a unique ID and is immutable. However, the secrets are versioned. If you discover that you have a typo or some other problem with the value, you can drill into the secret and there's a “New Version” option that allows you to create a new version of the secret and enter a new value.
Modifying the App to Read the Secret from the Key Vault
Now that the Key Vault is set up with the secrets, it's time to head back to the solution in Visual Studio. The secret sauce for reading the Key Vault lives in a pair of NuGet packages: Azure.Identity and Azure.Extensions.AspNetCore.Configuration.Secrets.
Add both of these packages to your project.
With those in place, you'll then modify your app so that it knows how to access secrets and knows where your secrets live. This happens in program.cs, as the application starts up.
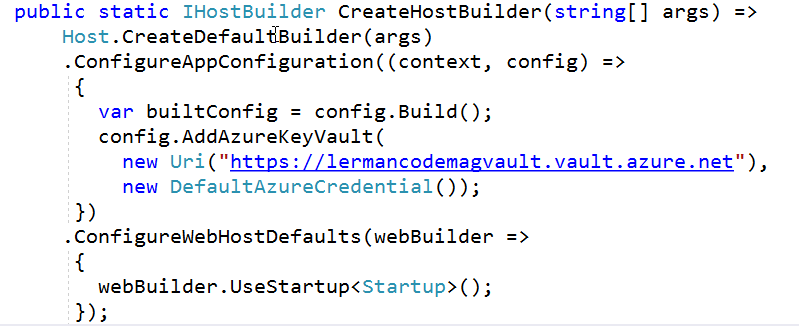
In the CreateHostBuilder method, you need to add a new configuration source, an Azure Key Vault using the AddAzureKeyVault method. This requires referring to the Microsoft.Extensions.Configuration namespace in the class Using statements and takes two parameters: the URI of the key vault and an Azure credential. You can copy the URI from the Key Vault's option page. That string has a slash at the end, which you'll need to remove.
.ConfigureAppConfiguration((context, config) =>
{
    var builtConfig = config.Build();
    config.AddAzureKeyVault(new Uri(https://lermancodemagvault.vault.azure.net),
    new DefaultAzureCredential());
})
Notice that I'm specifying the DefaultAzureCredential (which lives in the Azure.Identity namespace). Like the configurations, the Identity API look through a list of possible sources for credentials. Here are those sources in the order that the API searches for them:
- InteractiveBrowserCredential
- EnvironmentCredential
- ManagedIdentityCredential
- SharedTokenCacheCredential
- VisualStudioCredential
- VisualStudioCodeCredential
- AzureCliCredential
Notice that among these is the VisualStudioCredential. This is why I stated earlier that when debugging, it works the most simply if the account you used to sign into Visual Studio (or Visual Studio Code), matches the identity of the Access Policy for the key vault! If you can't sign in with the same user in Visual Studio, you can use the Azure CLI to sign in so that there's an access token in cache to allow you to sign in. But the bottom line is this: As long as you have a valid, signed-in account in Visual Studio or the Azure CLI, you don't have to supply credentials explicitly in your code. When you deploy the app to Azure, the application uses the System Assigned Managed Identity to authenticate and the API finds that and passes it along.
Figure 4 shows the full CreateHostBuilder method so you can see how the new code fits in with the existing code.
There's one last step to perform in the code. Remember that the connection string is still in your source code in appsettings.json. You no longer need to read from appsettings because you're reading from the key vault. You can remove the entire ConnectionStrings section from the file. Don't forget to also delete the comma that separates the AllowedHosts property from the ConnectionStrings property!
Potential Problems When Debugging in Visual Studio
Before you attempt to run the app, which will now read from the Azure Key Vault, it's a good idea to verify that you are signed into Visual Studio with the account whose credentials match the access policy. It's possible to have multiple accounts tied to your instance of Visual Studio. I'm sometimes logged in with my old Live account and sometimes with my Office 365 account. For this work, I signed out from the personal Live account and then signed back in with the O365 account. I didn't even have to close the project or Visual Studio. Learn more about managing multiple accounts in Visual Studio in the docs at: docs.microsoft.com/en-us/visualstudio/ide/work-with-multiple-user-accounts. If you're not using the correct account, there are a few different exceptions you might get (at Main.CreateHostBuilder()) depending on the specific scenario. Here are a few examples:
- Logged into my personal account, trying to access the Key Vault tied to my O365 account, I get an Azure.Identity.AuthenticationFailedException.
- Logged into a different account that's part of the same organization as the O365 account in the access policy, I get a 403 error code with the “Azure.RequestFailedException”.
If you get past the CreateHostBuilder method, that means the credentials lined up.
If you get past the
CreateHostBuildermethod, that means the credentials lined up.
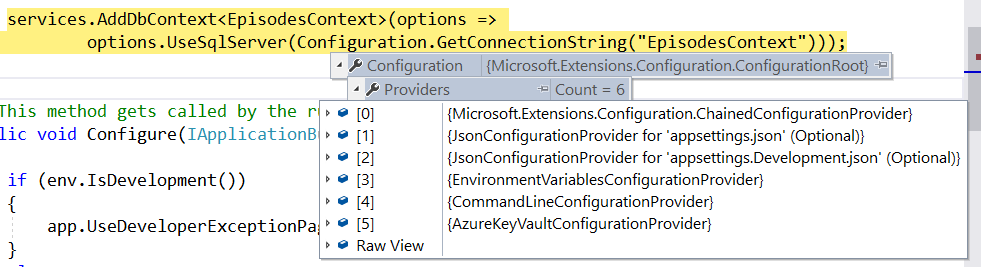
Another problem I've encountered is when I've forgotten to remove the extra slash in the connection string value stored in the key vault. That results in the Episodes page failing. It spins for longer than usual and then shows that you have a SqlException stating that the specified LocalDB instance name is invalid. Set a breakpoint in startup where the DbContext service is being set up. Then you can inspect the connection string it found.
In fact, it's interesting to see Azure as one of the configuration providers during debug, as shown in Figure 5.
When I inspected the value of `Configuration.GetConnectionString(“EpisodesContext”)``, I found that there weren't two but four slashes in the server name. I fed two into the Secret value and then Azure escaped them and it became four, which is why the instance name is invalid.
Server=(localdb)\\\\mssqllocaldb; etc.
Remember that point I made about updating the version of a secret in the Key Vault? Well, now I can take advantage of that. I'll open the Key Vault, select Secrets, select that secret from the list, and then click New Version. This gives me a form where I can enter a new value for the secret and I pasted in the correct syntax for the connection string this time. After saving that, I went back to Visual Studio and inspected the value (only two slashes this time) again before letting the app continue on its way. And the Episodes page displayed correctly, just as it did in Figure 1.
What I've achieved thus far is to completely remove my secret connection string from my source code and without adding any other secrets to my source, such as the Azure credentials, I'm able to read the secret from my Azure Key Vault.
There's an important question to ask of this new set up: Will EF Core migrations continue to work if the connection string is in the Key Vault and I'm relying on the code in program.cs to provide access? The answer is yes! Consider that when the connection string was in appsettings.json, the migrations API still had to find it. The API does whatever work is necessary to get the configuration information that startup would normally get for you and that means it's also discovering that the key vault is one of the configuration sources and its secrets get read. I wasn't sure that it would work so I just deleted my local database and ran update-database in PowerShell and the database did get created.
Switching from LocalDB to Azure SQL
Now that I know I can access my Key Vault when debugging the application, it's time to switch to using my cloud database. There are so many options for creating a new Azure SQL database. You can do it from inside Visual Studio Server Explorer, from EF Core migrations, inside the Azure Portal, using the Azure CLI, in Azure Data Studio, or via PowerShell. Once the database is created, you can use EF Core migrations to build SQL script that creates the tables, keys, and seed data in the database. Using the script is imperative for production databases. But this is just a test/demo database, so I'm quite happy to continue taking advantage of EF Core Migrations.
I already have a few Azure SQL Servers configured in Azure, even one that I created for building CODE Magazine demos. And these are already aware of my IP address allowing my computer (and Visual Studio) through the firewall. So rather than creating a new server instance, I'll just create my Episodes database on the existing server, for which I already have a server address. The database has a SQL login and password. It's also possible to use Azure AD identities for accessing an Azure SQL Server. You'll be taking advantage of this later, but with respect to my “change one thing at a time” mantra, I'll build a connection string to that server using the SQL credentials and specifying the Episodes database that doesn't yet exist.
Server=tcp:
codemagsqlserver.database.windows.net,1433;Database=Episodes;User ID=*****@codemagsqlserver;Password=***;Trusted_Connection=False;Encrypt=True;
Then I can go into my key vault, into my secrets, click on the ConnectionStrings--EpisodesContext secret and then select New Version to replace the value with this new connection string.
With the new connection string in place and the confidence from already verifying that EF Core migrations will find it, I'll go back to Visual Studio and run update-database again. This time, EF Core looks on the Azure SQL Server, discovers that Episodes doesn't exist yet, creates the database, and migrates the schema as well as inserts the seed data into the database.
Being a bit of a worrier, I did connect to the new Azure SQL Episodes database in Visual Studio's SQL Server Object Explorer to confirm that the database, the Episodes table, and the five seeded rows truly existed. Then I'm able to run the app again, which continues to work, reading the Key Vault, getting the new connection string, and displaying the data.
Ready to Move the App to the Cloud in Part 2
That was a lot to learn, but look at you now! Using Azure Active Directory and Key Vault like a pro, creating software that works without worrying about exposing your important secrets and letting your Visual Studio login (or perhaps VS Code if that's how you followed along) take responsibility for Azure credentials.
There's more to do and more cool stuff to add to your skill set in Part 2 as I share with you how to completely remove the user ID and password from the connection string and let the database also take advantage of Azure AD. And you'll give the app its own Managed Identity as you deploy it to the cloud. At that point, your application and your database use Azure AD for authentication and you'll be able to easily go from development to production as you evolve your Web application without having to muck with credentials or secrets (or change the code that relies on those) any more.
There's one last bit of business to attend to, which is to share the real source of the name for the 425 Show. Part of it is, of course, the Redmond area code, 425. But the other is related to the fact that Christos lives on the west coast of the US and his co-host, John Patrick Dandison, lives three hours ahead on the east coast. The show was scheduled for morning in east coast time, which was really early in the morning for Christos. It was just too early! And what a sweet coincidence (or was it?) that the 425 area code matched the “too early” HTTP response code. There was no question that the show had to be named 425!