Sometimes when you think about managing state in large applications, it's easy to think of everything as its own small island of functionality. But sometimes centralizing state actually simplifies the tangled web of properties and events. In this article, I'll show you how and why to use Vuex in your Vue.js projects to simplify and centralize your state.
Complexity Is the Problem
Lots of projects start out small. Maybe yours did. Before too long, you're up to a large number of components in your Vue project. This isn't special about Vue or about React, Angular, WinForms, C++ apps, etc. They all eventually run into this problem. It comes down to having individual components that need to interact with others.
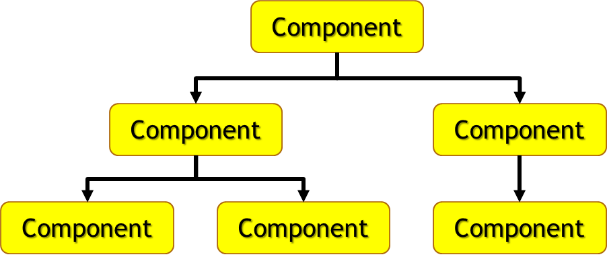
Naively, devs often think of a Vue application as a hierarchy (as seen in Figure 1). The problem with this approach is that you think of navigating the hierarchy in order to communicate with other components. This leads to fragile code that's dependent on the existing design of a particular app, or worse, refactoring the composition could easily break and lead to performance issues.
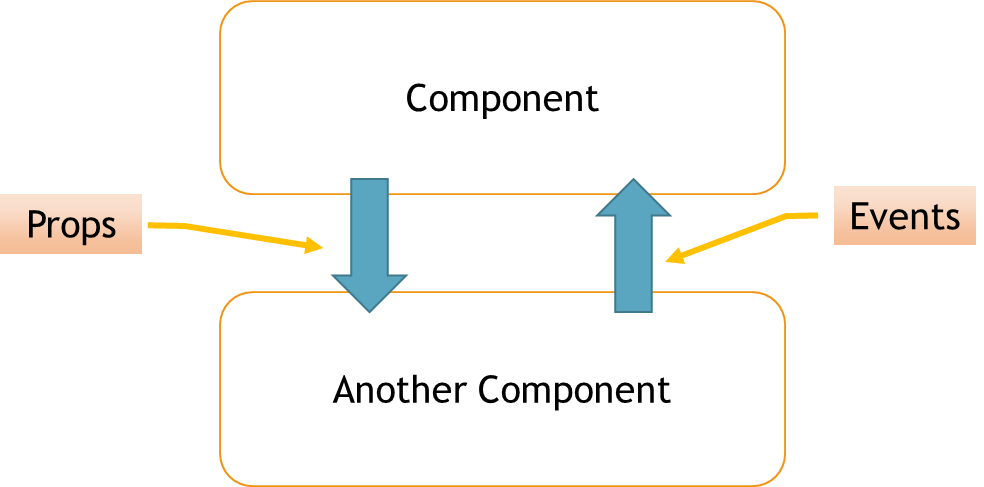
The other issue at the heart of the problem is coupling. A lot of modern frameworks (including Vue) are built to allow for building and testing of components in isolation. Loose coupling is the best way to allow this, but once you hit real requirements, it can be easy to start coupling Vue components through props and events (as seen in Figure 2):
Last, reactivity is a double-edged sword. It can be easy for components to change each other's data without realizing it. Finding these bugs can be laborious and requires the understanding of complex interactions.
I think that a solution to this is to centralize state throughout many Vue applications. Although this isn't necessarily for the more basic Vue projects, it does represent a powerful tool for projects whose complexity is starting to increase.
What Is Vuex?
As per the Vuex website: “Vuex is a state management pattern + library for Vue.js applications.” What does that mean? It's a way of centralizing state in your application so that every component has access to the state your application needs. This may be typical application data (e.g., CRUD data), but also could include UI data (e.g., errors and busy flags) as well as lookup data (e.g., states, countries).
Part of the central conceit in Vuex is that allowing components to use data should be easy and changing state should be purposeful. In other words, everyone should be able to get state that they need without regard of who “owns” that data. But at the same time, it should be more difficult to change that state to prevent accidental changes or copies of the data. Enough talk; let's see it in action.
Applying Vuex
To start out, you'll need to add Vuex to your project. Usually this is done by calling npm or Yarn to add the project:
C:\>npm install vuex --save
Once the package is installed, you can start using Vuex. Like many libraries with Vue.js, you need to opt into using Vuex like so:
import Vue from "vue";
import Vuex from "vuex";

Vue.use(Vuex);
For most cases, you'll opt into using Vuex directly in the store that you need to create. Let's do that next.
Creating a Store
The central idea behind Vuex is to create a Store that's accessible from anywhere in your Vue.js application. This happens by creating an instance of an object inside of Vuex called Store:
// store.js
import Vue from "vue";
import Api from "@/services/api";
Vue.use(Vuex);
export default new Vuex.Store({
  ...
});
Notice that you're exporting the store, so you probably know that the next step is to import it into the application:
// main.js
import Vue from 'vue';
import App from './App.vue';
import router from './router';
import store from "@/store.js";
Vue.config.productionTip = false
new Vue({
  router,
  store,
  render: h => h(App)
}).$mount('#app')
Notice that as you import the store, you're just adding it to the new Vue object. The effect of this is that the store is available through out every view throughout the system. Because this Vue object is the parent of the entire project, it's projected as a property throughout the app. Note that in this case, you're injecting it in the main.js (of a Vue CLI project) so that it's available everywhere. To access it, you use the $store property in your code. As you add to the store, that will become more apparent.
The store object is structured as four main properties that contain the four parts of the store:
export default new Vuex.Store({
  state: {
  },
  mutations: {
  },
  actions: {
  },
  getters: {
  }
});
Each part of the store has its own job:
- State: The actual data in the store
- Mutations: Where state is changed (or mutated)
- Actions: Operations on the data. Often resulting in one or more mutations
- Getters: Computed operations on the state
One of the key ideas here is to centralize the changing of state. This way, any changes to state (and reactivity from that state) only need to be concerned in one place. In fact, you can ensure that data isn't changed anywhere but in mutations by adding:
export default new Vuex.Store({
  strict: true,
  state: {
  },
  mutations: {
  },
  actions: {
  },
  getters: {
  }
});
Turning on strictness throws errors when the state is attempted to be changed outside of the mutations. Strictness is a double-edged sword in that it forces more checking code to be included, so it's generally suggested that you only turn on strictness during development.
Let's walk through using the store to see how it works, beginning with state.
Using State
Let's start with some simple state: isBusy and error. This way, you can show errors and wait cursors wherever you need them in your app:
export default new Vuex.Store({
  strict: true,
  state: {
    isBusy: false,
    error: ""
  },
  mutations: {
  },
  actions: {
  },
  getters: {
  }
});
You can see that state is just a bag of properties. These can be simple, scalar properties like you have here, or they can be collections or trees of information. In a view, you can simply bind to these using the $state object. For example:
<div class="alert alert-warning"  v-if="$store.state.error">
  {{ $store.state.error }}
</div>
<div v-if="$store.state.isBusy">
    <i class="fas fa-spinner fa-spin"/>
    Please Wait...
</div>
Of course, you're accessing these through the state directly from the $store object. That's pretty ugly. In fact, this can cause some issues with reactivity. To use the state, you really want to expose the state as computed values in your code:
  computed: {
    isBusy() {
      return this.$store.state.isBusy;
    },
    error() {
      return this.$store.state.error;
    }
  },
Why are computed properties important here? Because that's the path to make sure that the properties are reactive, and so changes to isBusy and error mark changes to the views. Just using the global $store object gives you access to the underlying reactive object and ensuring that the object (or its properties) change means that you really should use computed properties.
You can simply change the use of the computed values to be simpler markup:
<div class="alert alert-warning"  v-if="error">
    {{ error }}
</div>
<div v-if="isBusy">
    <i class="fas fa-spinner fa-spin"/>
    Please Wait...
</div>
At this point, you might be frustrated. To get this simple piece of data exposed, there's a boilerplate. Stay with me. We're headed somewhere amazing.
At this point, you might be frustrated. To get this simple piece of data exposed, there's a boilerplate. Stay with me. We're headed somewhere amazing.
The magic happens when you use Vuex's helpers. In the view, you can import a few helpers, including mapState, mapMutations, mapActions, and mapGetters. Let's start with mapState to see how this works:
import { mapState } from "vuex";
export default {
  computed: mapState(["error", "isBusy"])
}
This simplifies the mapping from the store to the state you want to expose. This allows you to simply pick the parts of the state that this view uses and map them as computed properties. The result is that your views can use most of the Vuex as standard data and methods that you're already used to implementing. Let's look at mutations next.
Mutations
Now you have state, but no way to change them. That's where mutations come in. Mutations are simple functions that make the change:
mutations: {
    setError(state, error) {
      state.error = error;
    },
    setBusy(state, busy) {
      state.isBusy = busy;
    }
},
The first parameter of a mutation is always the state object, and the second is the properties sent to the mutation. Mutations are called by using the commit call on the store:
this.$store.commit("setError", "Failed to get sites");
Of note, if you need to send more than one parameter, you'll need to wrap it in an object because mutations always take only one parameter. For example:
this.$store.commit("setError",
{
  message: "Failed to get sites",
  exception
});
If you have to do this, you can easily destructure it in the mutation:
mutations: {
    setError(state, { message, exception }) {
      state.error = message;
    },
    setBusy(state, busy) {
      state.isBusy = busy;
    }
},
Although it's more uncommon, you can use the mapMutations helper to map your mutations to methods on your view:
methods: {
    ...mapMutations(["setError", "setBusy"])
}
In the case of mapMutations, you'll need to use the spread operator (...) to expand the mutations as separately named methods. Like the mapState, it takes an array of strings that represent the name(s) of mutations. In this way, you can just call the mutation like any other method:
try {
    this.setBusy(true);
    await this.loadRegions();
} catch {
    this.setError("Failed to load regions");
} finally {
    this.setBusy(false);
}
One thing to be sure of is that you should do as little work in the mutation as possible. Mutations are required to be synchronous, so that means that you should change the state and move on. If you have other work to do, that's what actions are for. Let's look at those next.
Mutations are required to be synchronous, so that means that you should change the state and move on. If you have other work to do, that's what actions are for.
Actions
Actions are where a lot of the work happens in Vuex. Actions are simply methods that have access to the store but can be asynchronous as well. Typically, I use actions for where to do network operations and search operations. Although I usually keep the actual API calls in a separate class, using async and await in actions seems to be a natural fit for API calls. For example, assume that you have a state for a set of regions and you want to be able to set the regions and load the regions:
export default new Vuex.Store({
    strict: true,
    state: {
        error: "",
        isBusy: "",
        regions: []
    },
    mutations: {
        setError(state, error) {
              state.error = error;
        },
        setBusy(state, busy) {
              state.isBusy = busy;
        },
        setRegions(state, regions) {
             state.regions = regions;
        },
    },
    actions: {
        async loadRegions({ commit }) {
            let regions = await Api.loadRegions();
            commit("setRegions", regions);
        }
});
What this generally means is that most of the interesting work you're doing ends up in actions. The idea here is that these things chain together:
- Actions execute mutations
- Mutations change state
- Views bind to state (or getters, as you'll see soon)
To execute an action, you can use the dispatch function:
this.$store.dispatch("loadRegions");
Again, using the Vuex helpers can simplify this:
import { mapState, mapMutations, mapActions } from "vuex";
export default {
  computed: mapState(["regions"]),
  // ...
  methods: {
    ...mapActions(["loadRegions"])
  }
};
This really means that if you use the mappings, your views and view code shouldn't even realize that they are using Vuex. This means that Vuex should be a transparent way to integrate with your components. The fact that you need to do the mapping should just be the glue between the state management and the components.
Getters
Finally, the last part of Vuex (and likely the least used) are getters. Think of getters as computed values for Vuex:
getters: {
    siteCount(state) {
        return state.currentSites.length;
    }
}
You're passed the state (and, optionally, the getters object itself) so that you can compute a value if necessary. These are accessed via the getters object in the store and can be accessed like properties:
let count = this.$store.getters.siteCount
Getters are treated like computed values, so that multiple calls to the getters cache the value instead of re-executing the code. And because the getters are like computed values, they respond to reactivity by re-executing the code if the underlying state changes.
Getters also support a function-like syntax that can take a variable number of arguments, using arrow functions:
getters: {
    siteCount(state, getters) {
        return state.currentSites.length;
    },
    findSite: (state) => (siteId) => {
        state.currentSites.find(s => s.id == siteId);
    }
}
Using the method-type access requires you call it like a function:
let site = this.$store.getters.findSite(1);
Unlike property-style getters, method-style getters aren't cached and are executed every time they're called.
Probably unsurprisingly, Vuex helpers support mapping getters as well:
import {
  mapState,
  mapMutations,
  mapActions,
  mapGetters
  } from "vuex";
export default {
  name: "home",
  computed: {
    ...mapState(["regions"]),
    ...mapGetters(["siteCount"])
  },
If you need to map getters and state, you'll need to use the spread operator to mix them.
Where Are We?
At this point, you can see the value of centralizing your state with Vuex. I've talked about the benefits of controlling where change can happen to prevent unintended state change. I've also talked about increasing the testability of code that uses Vuex. Hopefully, walking through an existing application and seeing how I'd add Vuex to it will help you get started with Vuex, as you can see in Listing 1. Although it's common to start with Vuex, it's also not uncommon to migrate an application once it's reached some level of complexity to Vuex. You can download the source code at: https://github.com/shawnwildermuth/VueStateManagementExample.
Listing 1: Complete Store
// store.js
import Vue from "vue";
import Vuex from "vuex";
import Api from "@/services/api";

Vue.use(Vuex);

export default new Vuex.Store({
  strict: true,
  state: {
    error: "",
    isBusy: "",
    regions: [],
    currentSites: [],
    siteCart: []
  },
  mutations: {
    setError(state, error) { state.error = error; },
    setBusy(state, busy) { state.isBusy = busy; },
    setRegions(state, regions) { state.regions = regions; },
    setCurrentSites(state, sites) { state.currentSites = sites; },
    addToCart(state, site) { state.siteCart.push(site); },
    clearCart(state) { state.siteCart = []; }
  },
  actions: {
    async loadRegions({ commit }) {
      let regions = await Api.loadRegions();
      commit("setRegions", regions);
    },
    async loadSites({ state, commit }, key) {
      let region = state.regions.find(r => r.key == key);
      if (region) {
        let sites = await Api.loadSites(region);
        commit("setCurrentSites", sites);
        return;
      }
      commit("setError", "Failed to get sites");
    }
  },
  getters: {
    siteCount(state, getters) {
      return state.currentSites.length;
    }
  }
});