In Part 1 of this series on building WPF business applications, you learned to create a new WPF business application using a pre-existing architecture. You added code to display a message while loading resources in the background. You also learned how to load and close user controls on a main window. In Part 2 of this series, you're going to display a status message by sending a message from a View Model class to the main window. You're going to reuse the splash screen area that you built in Part 1 to display informational messages. A timer will be used to have these informational messages disappear after a specific amount of time. Finally, you'll create a WPF login screen with an image, a title area, and input fields for a user name and password. The user name and password data is validated and appropriate validation messages are displayed to the user.
This article is the second in a multipart series on how to create a WPF business application. Instead of starting completely from scratch, I've created a starting architecture that you can learn about by reading the blog post entitled “An Architecture for WPF Applications” located at https://pdsa.com/Resources-BlogPosts/20-WPF-Architecture.pdf. Download the samples that go with the blog post to follow along step-by-step with this article. This series of articles is also a Pluralsight.com course that you may view at https://bit.ly/2SjwTeb.
Display Status Messages
In the MainWindowViewModel.cs file, there's a property named StatusMessage. This StatusMessage property is bound to a text block control at the bottom of the main window (Figure 1). The main window uses this text block to display information about the current user control displayed. You can also use this StatusMessage property to display status messages from anywhere in your application such as classes, windows, or user controls.
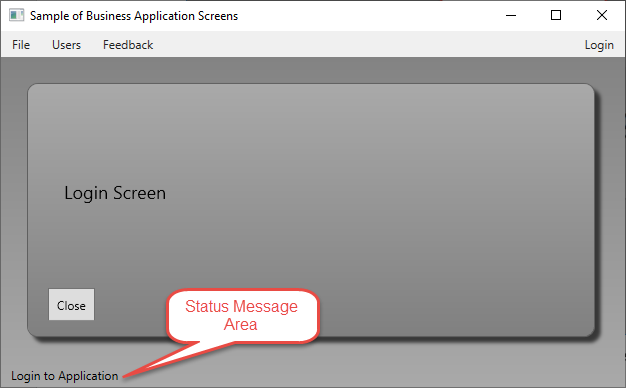
Use the message broker system to send a message to display in the text block on the main window. Open the MainWindow.xaml.cs file and modify the Instance_MessageReceived event to respond to the DISPLAY_STATUS_MESSAGE event and set the StatusMessage property on the main window's view model class. Because the StatusMessage property is bound to the text block control on the main window, modifying this property updates the UI and displays the text.
private void Instance_MessageReceived(object sender, MessageBrokerEventArgs e)
{
    switch (e.MessageName)
    {
        case MessageBrokerMessages.DISPLAY_STATUS_MESSAGE:
            // Set new status message
            _viewModel.StatusMessage = e.MessagePayload.ToString();
            break;
        case MessageBrokerMessages.CLOSE_USER_CONTROL:
            CloseUserControl();
            break;
    }
}
Add a Status Message to the Login Screen
When you load a user control, set the status message to the text you want to display on the main window. Open the LoginViewModel.cs file and add a constructor to this class. In this constructor, send a status message using the DisplayStatusMessage() method that's a part of the ViewModelBase class.
public class LoginViewModel : ViewModelBase
{
    public LoginViewModel() : base()
    {
        DisplayStatusMessage("Login to Application");
    }
}
The DisplayStatusMessage() method uses the message broker to send a DISPLAY_STATUS_MESSAGE with the text sent to this method. In the case of the code snippet above, the text Login to Application is displayed on the main window.
Try It Out
Run the application, click on the Login menu and notice that the status message on the main window changes. Click the Close button and notice that the status message does NOT go back to the previous status message. This needs to be fixed and is what you're going to learn to do in the next section.
Reset the Main Window Status Message
The StatusMessage property is initially set in the XAML on the main window. When the main window is first created, grab that status message and place it into a private variable that you may restore later. Add a new private variable in the MainWindow class for the status message for the application.
// Hold main window's original status message
private string _originalMessage = string.Empty;
Retrieve the StatusMessage property in the constructor of the main window and assign it into the new private variable you just created. as shown in the code snippet below.
public MainWindow()
{
    InitializeComponent();

    // Connect to instance of the view model created by the XAML
    _viewModel = (MainWindowViewModel)
    this.Resources["viewModel"];

    // Get the original status message
    _originalMessage = _viewModel.StatusMessage;

    // Initialize the Message Broker Events
    MessageBroker.Instance.MessageReceived += Instance_MessageReceived;
}
When a user control is closed, use the _originalMessage variable to restore the status message to the original value. Modify the CloseUserControl() method in the MainWindow class, as shown below.
private void CloseUserControl()
{
    // Remove current user control
    contentArea.Children.Clear();

    // Restore the original status message
    _viewModel.StatusMessage = _originalMessage;
}
Try It Out
Run the application, click on the Login menu item, and view the status message for the login control. Click the Close button on the Login control and the original status message for the application is now restored.
Add Status Message to User Feedback Screen
In Part 1 of this article series, you created a view model for the user feedback screen. Open the UserFeedbackViewModel.cs file and add a constructor. Add a line of code to the constructor to display a status message just like you did in the login View Model class.
public UserFeedbackViewModel() : base()
{
    DisplayStatusMessage("Submit User Feedback");
}
Add Status Message to the User Maintenance Screen
In Part 1 of this article series, you created a view model for the user maintenance screen. Open the UserMaintenanceViewModel.cs file and add a constructor. Add a line of code to the constructor to display a status message just like you did in the login View Model class.
public UserMaintenanceViewModel() : base()
{
    DisplayStatusMessage("Maintain Users");
}
Try It Out
Run the application and click on the Feedback and the Users menus. Ensure that the appropriate status message is displayed for each screen. When you close each screen, make sure the original status message is re-displayed.
Informational Messages
Sometimes you want to display a message to the user that isn't a status message but is a little more prominent, and only stays around for a short amount of time. Use the same control you used for the splash screen and add a timer to make the message disappear after a specified amount of time.
Add a Timer to the Main Window View Model
Open the MainWindowViewModel.cs file and add a using statement to the Timers namespace. A .NET Timer class is in this namespace and is the best class to use for measuring an interval of time.
using System.Timers;
Add a private variable in the MainWindowViewModel class named InfoMessageTimer of the type Timer. Add another private variable, InfoMessageTimeout to hold the number of milliseconds before the timer fires its Elapsed event.
private Timer _InfoMessageTimer = null;
private int _InfoMessageTimeout = 1500;
Expose the InfoMessageTimeout as a public property so it can be set by the application.
public int InfoMessageTimeout
{
    get { return _InfoMessageTimeout; }
    set
    {
        _InfoMessageTimeout = value;
        RaisePropertyChanged("InfoMessageTimeout");
    }
}
Two methods are required to work with a timer in .NET. The first one creates the timer and sets the specified time until the Elapsed event is fired. Create a method named CreateInfoMessageTimer() to create a new instance of a Timer and hook this up to an Elapsed event, as shown in the following code snippet.
public virtual void CreateInfoMessageTimer()
{
    if (_InfoMessageTimer == null)
    {
        // Create informational message timer
        _InfoMessageTimer = new Timer(_InfoMessageTimeout);

        // Connect to an Elapsed event
        _InfoMessageTimer.Elapsed += _MessageTimer_Elapsed;
    }

    _InfoMessageTimer.AutoReset = false;
    _InfoMessageTimer.Enabled = true;
    IsInfoMessageVisible = true;
}
After ensuring that your timer is created, set the AutoReset property to false. This tells the timer that it should only fire the Elapsed event one time, then disable the timer. Set the Enabled property to true to start the timer running. Set the IsInfoMessageVisible property to true so the splash screen area is made visible on the main window.
The event procedure to create is called MessageTimer_Elapsed. This event is fired when the timer expires after the specified amount of time set in the InfoMessageTimeout property.
private void _MessageTimer_Elapsed(object sender, ElapsedEventArgs e)
{
    IsInfoMessageVisible = false;
}
The only thing you need to do in this event procedure is to make the splash screen area invisible. Set the IsInfoMessageVisible property to false to raise the PropertyChanged event for this property name. This property is bound to the Visibility property of the splash screen area on the main window, so setting this property to true or false makes that area visible or invisible.
Respond to Time Out Message
Just as you have done with other messages that need to be responded to, add a set of case statements in the main window. Open the MainWindow.xaml.cs file and locate the Instance_MessageReceived event. Add two new case statements: one to display an informational message on the text block control bound to the InfoMessageTitle property, and the other to display an informational message on the text block bound to the InfoMessage property.
case MessageBrokerMessages.DISPLAY_TIMEOUT_INFO_MESSAGE_TITLE:
    _viewModel.InfoMessageTitle = e.MessagePayload.ToString();
    _viewModel.CreateInfoMessageTimer();
    break;
case MessageBrokerMessages.DISPLAY_TIMEOUT_INFO_MESSAGE:
    _viewModel.InfoMessage = e.MessagePayload.ToString();
    _viewModel.CreateInfoMessageTimer();
    break;
Set the number of milliseconds to display one of these informational messages. You do this by setting the InfoMessageTimeout property on the MainWindow.xaml file. Add a new attribute to the MainWindowViewModel resource, as shown in the code snippet below.
<Window.Resources>
  <vm:MainWindowViewModel x:Key="viewModel"
                          InfoMessageTitle= "Please Wait ..."
                          InfoMessageTimeout="1500"
                          StatusMessage="Sample WPF Application" />
</Window.Resources>
Display Informational Message from Login Screen
To test out the informational message functionality, when the login screen is closed, send an informational message. Open the LoginViewModel.cs file and override the Close() method from the ViewModelBase class with the following code.
public override void Close(bool wasCancelled = true)
{
    if (wasCancelled)
    {
        // Display Informational Message
        MessageBroker.Instance.SendMessage(MessageBrokerMessages.DISPLAY_TIMEOUT_INFO_MESSAGE_TITLE, "User NOT Logged In.");
    }
    base.Close(wasCancelled);
}
Try It Out
Run the application, click on the Login menu, then click on the Close button. You should see an informational message appear for about 1.5 seconds.
Create a Login Screen
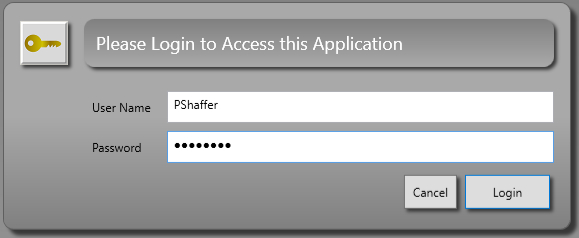
Now that you have the basic functionality for your screens to open, close, and send messages, let's build the actual screens for the user to interact with. The first one to create is a login screen, as shown in Figure 2. The user enters a user name and password, those fields are validated, and then they're verified against a table in a SQL Server database.
Modify the XAML in Login User Control
Open the LoginControl.xaml file and remove the <StackPanel> control and everything within it. Add the following XAML within the <Border> element to create a gradient that goes in the reverse direction from the gradient on the main window.
<Border.Background>
  <LinearGradientBrush StartPoint="0.5,0.5" EndPoint="0.5,1">
    <GradientStop Color="DarkGray" Offset="0" />
    <GradientStop Color="Gray" Offset="1" />
  </LinearGradientBrush>
</Border.Background>
Create Grid for Login Screen
To layout the login screen, you need four rows and three columns. Create a Grid below the closing </Border.Background> element to define these rows and columns, as shown in the following code.
<Grid DataContext="{Binding Source={StaticResource viewModel}}">
  <Grid.RowDefinitions>
    <RowDefinition Height="Auto" />
    <RowDefinition Height="Auto" />
    <RowDefinition Height="Auto" />
    <RowDefinition Height="Auto" />
  </Grid.RowDefinitions>
  <Grid.ColumnDefinitions>
    <ColumnDefinition Width="Auto" />
    <ColumnDefinition Width="Auto" />
    <ColumnDefinition Width="*" />
  </Grid.ColumnDefinitions>
</Grid>
Add Key Image
After the closing </Grid.ColumnDefinitions> element and before the </Grid> element, add an Image control to display the key. The Source property for the key image is in the Images folder of the WPF.Common project. The Effect property is set to a style resource in the StandardStyles.xaml file located in the WPF.Common project.
<Image Grid.Row="0"
       Grid.Column="0"
       Margin="4,4,12,20"
       Effect="{StaticResource buttonShadow}"
       Source="pack://application:,,,/WPF.Common;component/Images/Key_Color.png" />
Add Title Border
To the right of the image, add the raised border (Listing 1) to display the words “Please Login to Access this Application”. This border uses the same resource for the Effect property as the image you just added. The background for this border is another linear gradient that goes in the same direction as the gradient on the main window, but opposite of the gradient of the login screen. These linear gradients help the different parts of the login screen stand out from one another.
Listing 1: Add a Linear gradient to surround the title of the login screen.
<Border Grid.Row="0" Grid.Column="1" Grid.ColumnSpan="2" Effect="{StaticResource buttonShadow}" Margin="4,4,4,20" CornerRadius="10">
  <Border.Background>
    <LinearGradientBrush EndPoint="0.5,1" StartPoint="0.5,0">
      <GradientStop Color="Gray" Offset="0" />
      <GradientStop Color="DarkGray" Offset="1" />
    </LinearGradientBrush>
  </Border.Background>
  <Label FontSize="18" Style="{StaticResource inverseLabel}" Content="Please Login to Access this Application" />
</Border>
Add Labels and Text Boxes
After the closing </Border> element, add the labels and text boxes to display the user input area. Place each label and text box control into a different row and column of the grid you defined for the login screen.
The PasswordBox property can NOT be bound to a view model property using WPF data binding. Instead, you set the Name property, so you can access the Password property in the code behind. Because data binding to a password causes an event to be raised and the value to be retrieved, this causes a security risk. Thus, you can't data-bind to any password in WPF.
The PasswordBox property can NOT be bound to a view model property using WPF data binding.
Add Buttons
Add a StackPanel into which you can place the Cancel and Login buttons. There are styles for the cancel and submit buttons defined in the StandardStyles.xaml file in the WPF.Common project. These styles don't make these buttons look very different, but I like having styles for each kind of button in case I wish to modify them later.
<StackPanel Grid.Row="3" Grid.Column="2" HorizontalAlignment="Right" Orientation="Horizontal">
  <Button ToolTip="Don't Login" Content="Cancel" IsCancel="True" Style="{StaticResource cancelButton}" Click="CancelButton_Click" />
  <Button ToolTip="Login to Application" Content="Login" IsDefault="True" Style="{StaticResource submitButton}" Click="LoginButton_Click" />
</StackPanel>
Create the CancelButton_Click and LoginButton_Click event procedures in the code-behind of the login user control. Move the _viewModel.Close(); line of code from the CloseButton_Click() event to the CancelButton_Click() event, as shown in the code snippet below.
private void CancelButton_Click(object sender, RoutedEventArgs e)
{
    _viewModel.Close();
}
Once the line of code is moved, remove the entire CloseButton_Click() event procedure.
Try It Out
Run the application and click on the Login menu to view the new login screen. Click on the Cancel button to close the screen.
Modify Login View Model
You now need to write the code to validate the login credentials entered by the user. Open the LoginViewModel.cs file and add two using statements, as shown in the following code snippet.
using System;
using WPF.Sample.DataLayer;
Add a private variable and public property to this class of the type User. The User class is part of the WPF architecture defined in the blog post referenced at the beginning of this article. The Entity property holds the data entered by the user into your login screen. Use this entity object to validate the data entered. Do this both through checking the properties for valid data and by passing the data to the Entity Framework to verify that the user exists in the User table of your SQL Server database.
private User _Entity;

public User Entity
{
    get { return _Entity; }
    set
    {
        _Entity = value;
        RaisePropertyChanged("Entity");
    }
}
In the constructor of the LoginViewModel class, create a new instance of the User class and default the UserName property to the currently logged in user on the computer.
public LoginViewModel() : base()
{
    DisplayStatusMessage("Login to Application");
    Entity = new User { UserName = Environment.UserName };
}
Stub Validation Methods
Later in this article, you're going to add validation logic to check whether the user has entered a user name and password. For now, just add a Validate() method to return a true value.
public bool Validate()
{
    bool ret = true;
    return ret;
}
If the user has entered a valid user name and password, use the Entity Framework to locate the user name in the User table and ensure that the password entered matches what's in the table. Add a ValidateCredentials() method where you'll eventually write that code, but for now, just return a true value.
public bool ValidateCredentials()
{
    bool ret = true;
    return ret;
}
Add a Login Method
Add a method named Login(), as shown in Listing 2, to call the Validate() and ValidateCredentials() methods to ensure that the user is valid. If both of these methods return a true value, use the message broker to send a message that the login was successful. Call the Close() method to send a message that this user control may be closed. If either the Validate() or the ValidateCredentials() method fails, send a message that the login failed. You will write code later to respond to these two messages.
Listing 2: The Login() method validates input and validates against a database table.
public bool Login()
{
    bool ret = false;

    if (Validate())
    {
        // Check Credentials in User Table
        if (ValidateCredentials())
        {
            // Mark as logged in
            Entity.IsLoggedIn = true;

            // Send message that login was successful
            MessageBroker.Instance.SendMessage(MessageBrokerMessages.LOGIN_SUCCESS, Entity);

            // Close the user control
            Close(false);

            ret = true;
        }
    }

    return ret;
}
Modify Login User Control
Because the PasswordBox control doesn't support data binding, you must write code in the Click event of the login button to transfer the password in the Password property to the Entity property in the view model. After setting the Password property, call the Login() method to validate the credentials. Open the LoginControl.xaml.cs file and modify the LoginButton_Click() event procedure to look like the following:
private void LoginButton_Click(object sender, RoutedEventArgs e)
{
    // Add the Password manually because data binding does not work
    _viewModel.Entity.Password = txtPassword.Password;
    _viewModel.Login();
}
Try It Out
Run the application and click on the Login menu, then click on the Login button to see the login screen disappear. Next, you're going to display the user name entered on the menu of the main screen.
Modify the Main Window Functionality
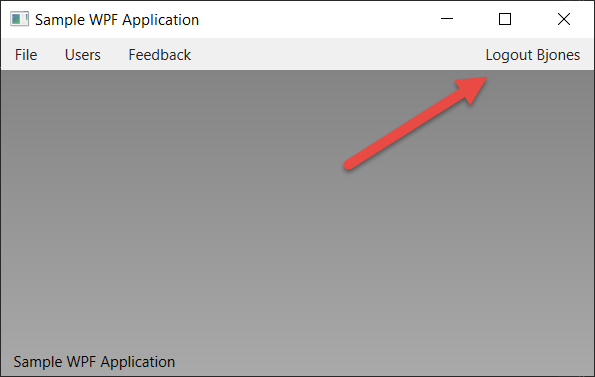
If the user logs in correctly, change the Login menu to display Logout [UserName], as shown in Figure 3. This gives a visual indication to the user that they're logged into the application. If you remember, the Login menu item is bound to the LoginMenuHeader property in the MainWindowViewModel. You need to modify some code in the code behind of the MainWindow to display either Login or Logout [UserName].
Modify the Main Window View Model
In the login screen, you bound the data input by the user to an instance of the User class. That instance of the User class is sent in the Login Successful message from the login screen. Store that instance of the User class in the main window's view model class so you can use the user name on the main window. Open the MainWindowViewModel.cs file and add a using statement so you can reference the User class in the DataLayer project.
using WPF.Sample.DataLayer;
Add a private and public property to hold the instance of the User class.
private User _UserEntity = new User();

public User UserEntity
{
    get { return _UserEntity; }
    set
    {
        _UserEntity = value;
        RaisePropertyChanged("UserEntity");
    }
}
Modify the Main Window XAML
Open the MainWindow.xaml file and locate the Login menu item. Change the Tag property to login. This is a command, like the exit command you used to exit from the application.
<MenuItem
    Header="{Binding Path=LoginMenuHeader}"
    HorizontalAlignment="Right"
    Click="MenuItem_Click"
    Tag="login" />
Modify the Main Window Code-Behind
Open the MainWindow.xaml.cs file and add a using statement so you can reference the User class in the DataLayer project.
using WPF.Sample.DataLayer;
Locate the Instance_MessageReceived() event and add two new case statements to process the login and logout messages.
case MessageBrokerMessages.LOGIN_SUCCESS:
    _viewModel.UserEntity=(User)e.MessagePayload;
    _viewModel.LoginMenuHeader = "Logout " +
    _viewModel.UserEntity.UserName;
    break;
case MessageBrokerMessages.LOGOUT:
    _viewModel.UserEntity.IsLoggedIn = false;
    _viewModel.LoginMenuHeader = "Login";
    break;
Locate the ProcessMenuCommands() method and add a new case statement to handle the login command from the Tag property.
case "login":
    if (_viewModel.UserEntity.IsLoggedIn)
    {
        // Logging out, so close any open windows
        CloseUserControl();

        // Reset the user object
        _viewModel.UserEntity = new User();

        // Make menu display Login
        _viewModel.LoginMenuHeader = "Login";
    }
    else
    {
        // Display the login screen
        DisplayUserControl("WPF.Sample.UserControls.LoginControl");
    }
    break;
In the case statement, check to see if the user is logged in. If they are, close the current user controls, reset the instance of the User class to wipe out the user name, and reset the LoginMenuHeader property to read Login. If they aren't logged in, display the login user control so the user can login to the application.
Try It Out
Run the application and click on the Login menu. Enter any credentials and click the Login button. The login screen will close and the user name you entered will appear on the main window's menu. Click on the Login [UserName] and the menu should revert to the text Login.
Validating Login Data in WPF
Now that you have the Login screen created, it's time to check for valid credentials. There are two steps to this process that will be covered in this article. First, check to ensure that a user name and password is entered into the screen before you try to validate the data against a database table. You could even set some minimum length restrictions on each field if you want. Second, use the Entity Framework (or other data access method) to check the user name and password against a record in a database table.
Validate the User Name and Password
Open the LoginViewModel.cs file and locate the Validate() method (as seen in Listing 3). The reason for writing a custom validation method in the view model instead of using data annotations is that you have a lot of other fields in your User table and you don't want to have all those business rules checked when all you're doing is a login process. You only need to check the user name and password fields. Write the code shown in Listing 3 in the Validate() method.
Listing 3: The validate methods checks the user input.
public bool Validate()
{
    bool ret = false;

    Entity.IsLoggedIn = false;
    ValidationMessages.Clear();
    if (string.IsNullOrEmpty(Entity.UserName))
    {
        AddValidationMessage("UserName", "User Name Must Be Filled In");
    }
    if (string.IsNullOrEmpty(Entity.Password))
    {
        AddValidationMessage("Password", "Password Must Be Filled In");
    }

    ret = (ValidationMessages.Count == 0);
    return ret;
}
Add ListBox to Login Screen
There are many ways to display validation messages to the user. I'll keep it simple and display those messages in a ListBox control. Feel free to display them however you want. Open the LoginControl.xaml file and add a new row after all the other row definitions. This adds a new row at the bottom of the login screen.
<RowDefinition Height="*" />
Add a line just before the closing </Grid> element and add the following XAML.
<!-- Validation Message Area -->
<ListBox Grid.Row="4"
         Grid.Column="2"
         Style="{StaticResource validationArea}"
         Visibility="{Binding IsValidationVisible, Converter={StaticResource visibilityConverter}}"
         ItemsSource="{Binding ValidationMessages}"
         DisplayMemberPath="Message" />
This list box is visible only when the IsValidationVisible property is set to a true value. The code in the AddValidationMessage() method, located in the ViewModelBase class, sets this property to true. The list box is bound to the ValidationMessages property, again located in the ViewModelBase class.
Try It Out
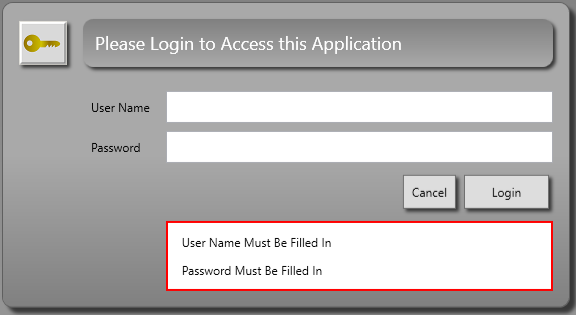
Run the application and click the Login menu to display the login screen. Clear both the fields on the Login screen and click the Login button. You should see the error messages at the bottom of the login screen, as shown in Figure 4.
Compare the Login Against User Table
Once the Validate() method passes its tests, use the Entity Framework to validate these credentials against the User table. Open the LoginViewModel.cs file and add a using statement at the top of the file.
using System.Linq;
Locate the ValidateCredentials() method and modify this method to look like Listing 4. The code in Listing 4 uses a Where() method on the Users collection to compare the UserName field in the User table against the UserName property in the Entity object. If a record is returned, the user is valid; if not, a validation message is displayed to the user.
Listing 4: Use the Entity Framework to validate login data against the user table.
public bool ValidateCredentials()
{
    bool ret = false;
    SampleDbContext db = null;

    try
    {
        db = new SampleDbContext();

        if (db.Users.Where(u => u.UserName == Entity.UserName).Count() > 0)
        {
            ret = true;
        }
        else
        {
            AddValidationMessage("LoginFailed", "Invalid User Name and/or Password.");
        }
    }

    catch (Exception ex)
    {
        PublishException(ex);
    }

    return ret;
}
Notice that I'm not using the password field in this validation. I left this out on purpose because you don't want to have plain-text passwords in your user table and I didn't want to have to show encryption and decryption in this article. Also note that the data in the user table has a plain-text password. You wouldn't do this in a real application, but I want to keep the code simple for this article.
Try It Out
Run the application and click on the Login menu. Enter a bogus name and password and click the Login button. You should see a message appear that says, Invalid User Name and/or Password. Enter a valid user name and any password from the User table, and then click the Login button and you should be logged in. Valid users are shown in the following table/list.
- UserName
- JSmith
- BJones
- PShaffer
Turn Off Menus Until Logged In
When the user first opens the application, the Users and Feedback menu items should be disabled until the user has logged in. Upon successful login, the IsLoggedIn property on the User object is set to true. You can bind this property to the appropriate menus on the MainWindow. Open the MainWindow.xaml file and locate the Users and Feedback menu items and add the code shown below to each.
<MenuItem Header="Users"
    Click="MenuItem_Click"
    IsEnabled="{Binding UserEntity.IsLoggedIn}"
    Tag="WPF.Sample.UserControls.UserMaintenanceControl" />
<MenuItem Header="Feedback"
    Click="MenuItem_Click"
    IsEnabled="{Binding UserEntity.IsLoggedIn}" Tag="WPF.Sample.UserControls.UserFeedbackControl" />
Try It Out
Run the application and you should see that those two menu items are disabled. Login as one of the valid users and you should see those two menus items become enabled.
Summary
In this article, you wrote the code to display a status message for each user control as it's displayed on the main window. You also restored the original status message for the application when the user control closes. Using a .NET Timer class, you can display informational messages for a short period of time and then have them automatically disappear.
You also built a login screen to allow a user to enter their user name and password. You then validated the data entered by checking to see if they were blank and checked them against data in a user table in SQL Server. You added a WPF List Box control to the Login screen to display any validation errors. In the next article, you'll build a user feedback screen.