Continuing the established pattern of annual release cycles, Apple recently released iOS 11 to the public. The release included a number of updates and features for end users, but it also brought with it a suite of new developer tools and technology to take advantage of. With the introduction of tools like ARKit, MusicKit, Core ML, PDFKit, and others, developers have new ways to create amazing mobile experiences.
Not only did Apple recently release this new software, but they also released new Hardware. This year, we saw the incremental release following up the 7/7+ line with an upgraded 8/8+, as expected, but Apple also released a new model called the iPhone X. The iPhone X, unlike its predecessors, has a Super Retina edge-to-edge screen and no home button. It's a new form factor and, as you might expect, these changes impact developers.
In this article, you'll take a look at the tools that iOS 11 introduces and how you can use them. You'll also get the rundown on everything you need to know about the iPhone X and how it might impact your development cycles.
iOS 11
The eleventh iteration of Apple's mobile operating system comes on the 10th anniversary of the original release and brings a host of new toolsets for developers including:
- ARKit: A framework for creating Augmented Reality experiences
- Core ML: A new machine-learning framework that supports the integration of a broad range of model types
- MusicKit: Lets users play their Apple Music and local music library from your applications
- PDFKit: Lets you display and manipulate PDF documents in your application
- Drag and Drop: A new feature allowing users quick ways to move text, images, and files among applications
Additionally, iOS 11 introduces a redesigned AppStore experience. This new AppStore provides developers further flexibility with app listing and deployments, giving you more control over how your application is presented to the end user.
ARKit
ARKit is packed with powerful tools that help merge digital objects with the physical world around you, letting developers take their apps beyond the screen and enable them to interact with the real world in new and exciting ways. It does this using Visual Inertial Odometry (VIO) to track the world around you. VIO takes in your camera sensor data and marries it to the outputs from Core Motion to allow your phone to accurately sense how it moves in a room.
ARKit's powerful tools let developers take their apps beyond the screen and interact with the real world in new and exciting ways.
ARKit is also able to find horizontal planes in a specified space that it's evaluating. By doing this, it's able to identify things like tables and floors and then use those planes to position virtual items in a life-like manner. Additionally, using the camera sensors to assess available light, it's able to approximate shadows and other variables for increased realism on any virtual object in the display.
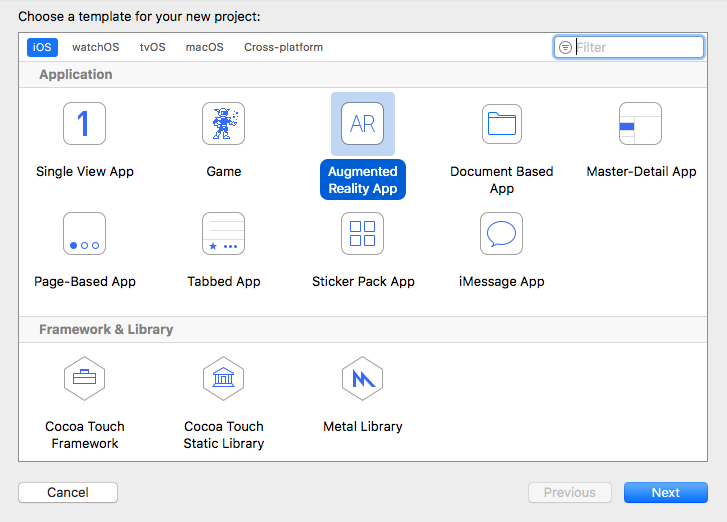
Although ARKit may look intimidating, getting started is easy. You can experiment with the basics by creating an ARKit sample template project through Xcode. Simply launch XCode and go to File > New > Project and then select Augmented Reality App, as shown in Figure 1.
After selecting the application template, name your application on the following screen and choose SpriteKit as the Content Technology. This generates a sample application for you to start playing with. SpriteKit is a 2D framework and provides a good starting point for experimenting with ARKit. With this sample, you can drop your 2D sprite into the physical world and watch it reposition and twist in the 3D space as you walk around with the phone camera.
Before running the sample application, let's jump into the source and make sense of what's happening. You'll notice that there's a view controller that has an ARSKView sub-view. This view is the bridge between ARKit and SpriteKit. You can use it to present an SKScene with special ARKit configurations like the ARWorldTrackingConfiguration. Apple defines that as “a configuration that uses the rear-facing camera, tracks a device's orientation and position, and detects real-world flat surfaces.” This results in the scene asking for camera permissions and then showing a full screen camera view lens preview to the user.
If you take a look inside that SKScene you'll notice the following code in the touchesBegan method:
guard let sceneView = self.view as? ARSKView
    else { return }
// Create anchor using the camera's

if let currentFrame = sceneView.session.currentFrame {

    // Create a transform with a translation
    // of 0.2 meters in front of the camera
    var translation = matrix_identity_float4x4
    translation.columns.3.z = -0.2
    let transform = simd_mul(currentFrame.camera.transform, translation)

    // Add a new anchor to the session
    let anchor = ARAnchor(transform: transform)
    sceneView.session.add(anchor: anchor)
}
This code creates an anchor point relative to the position on screen that the user touches. In SpriteKit, you might be used to creating nodes and adding them to the scene, but in ARKit you work with anchors. Anchors represent a placeholder within the scene and have an associated ID but no actual content. These anchors then get turned into nodes later using the nodeFor method in the view controller. Let's take a closer look at how the anchor is created. Consider the following lines:
// Create a transform with a translation
// of 0.2 meters in front of the camera
var translation = matrix_identity_float4x4
translation.columns.3.z = -0.2
let transform = simd_mul(currentFrame.camera.transform, translation)
The first variable “translation” represents a standard transform matrix. A transform matrix is a complicated unit that can represent device orientation, rotation, pitch, roll, yaw, and a number of other relevant bits of information when dealing with the 3D space. If you'd like to read more about how these matrices work, check the sidebar. The transform matrix also holds x, y, and z values. In the second line, you alter the z coordinate, which positions the anchor to a distance relative to the camera. Once you modify the z value, the translation is applied to the origin of the camera at the time the screen is pressed, and then that transform is used to create an anchor 0.2 meters from the camera at the location where the user taps the screen.
The anchor is only a placeholder, so this code alone isn't enough to show any visible feedback to the user. However, if you jump into the view controller you'll notice the following method:
func view(_ view: ARSKView, nodeFor anchor: ARAnchor) -> SKNode? {
    // Create and configure a node for the
    // anchor added to the view's session.
    let labelNode = SKLabelNode(text: "Enemy")
    labelNode.horizontalAlignmentMode = .center
    labelNode.verticalAlignmentMode = .center
    return labelNode;
}
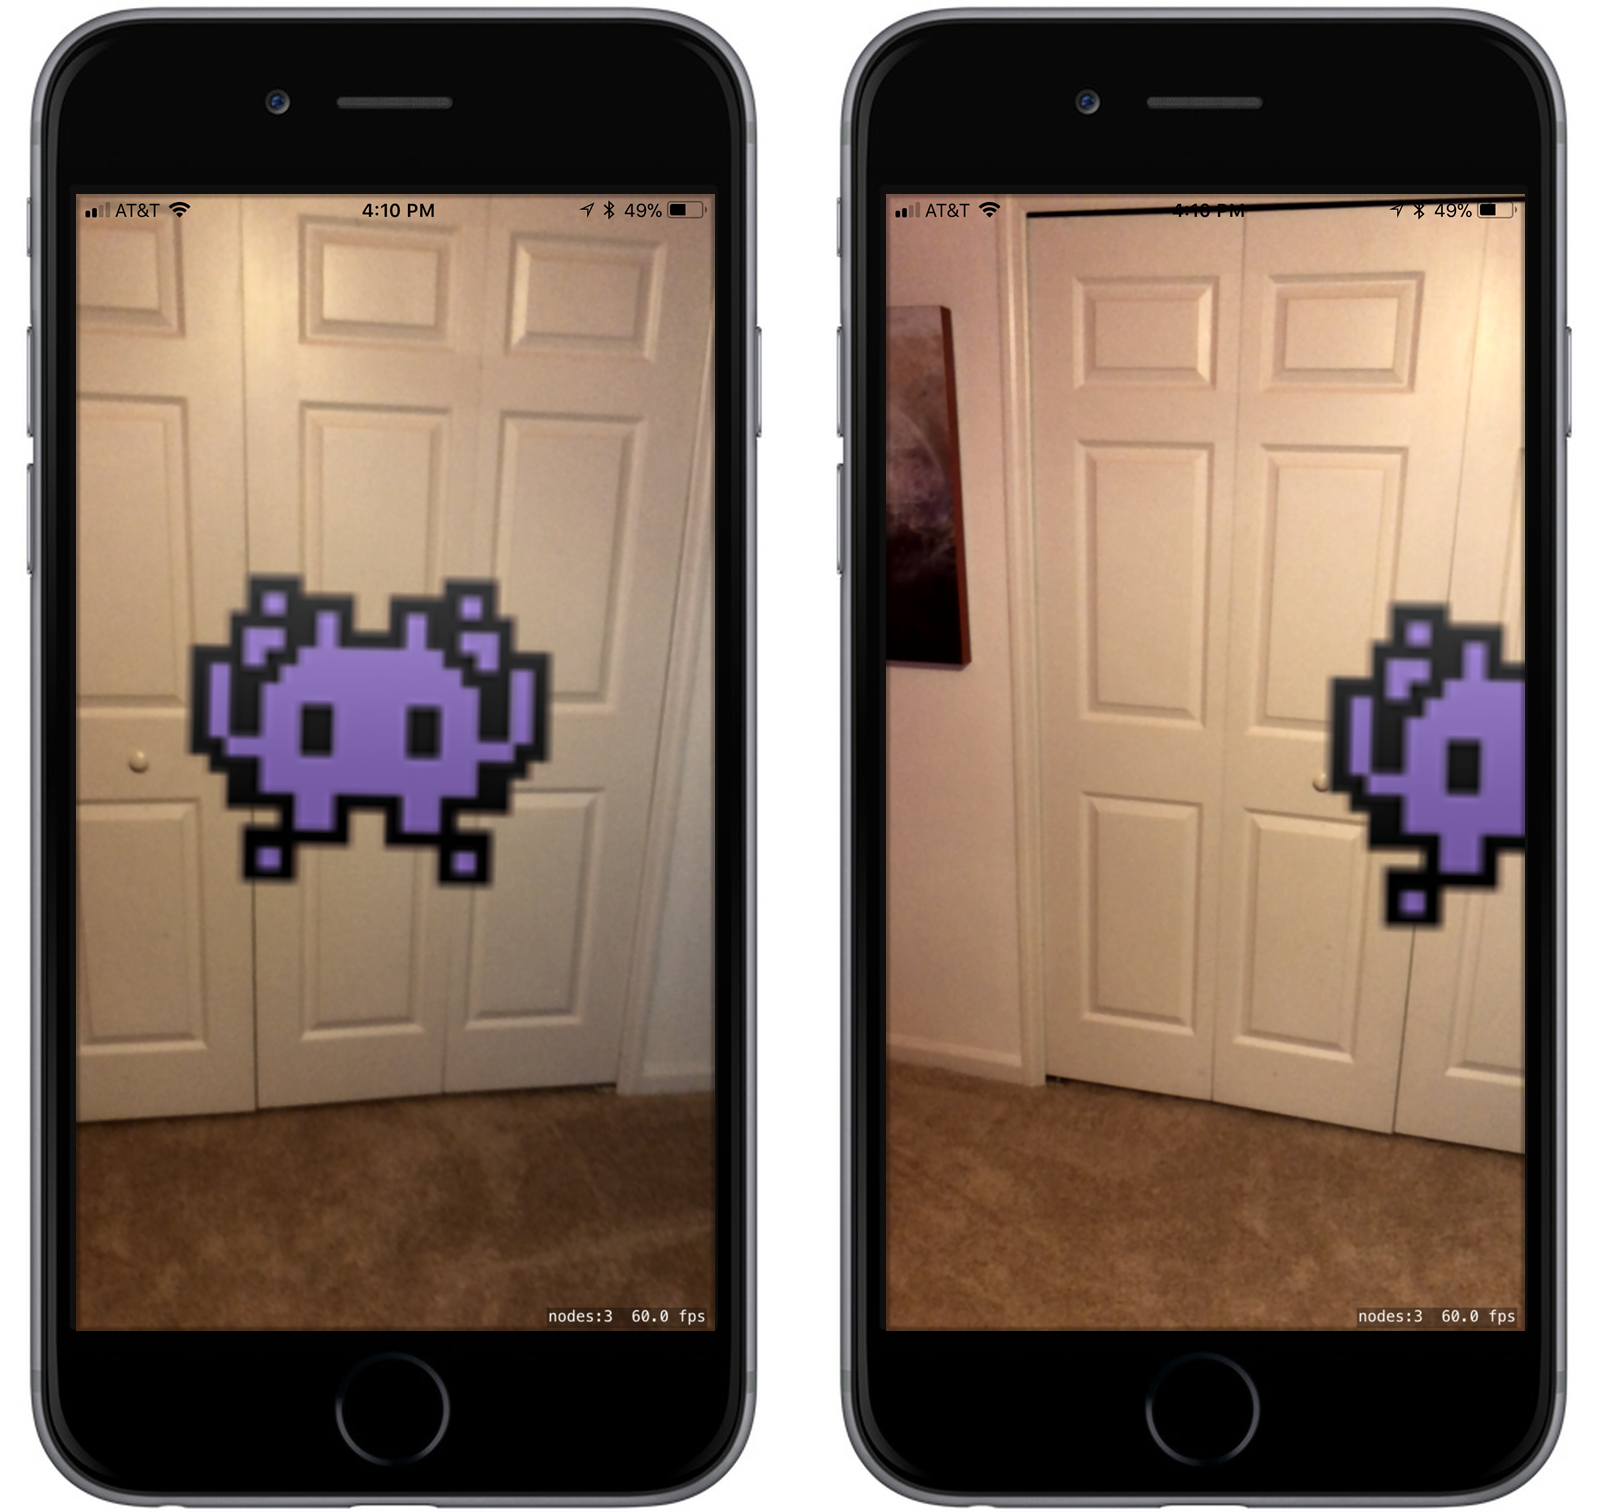
For each anchor in the scene, this method is called to return a node for display relative to that anchor. In this case, a label is created and returned. In the sample, you'll notice that it's using an emoji character that resembles a small alien instead of standard text. The end result is pictured in Figure 2. Notice that the first screenshot represents a single touch on the screen. The second screenshot demonstrates that as the phone is moved to the left, the alien is anchored in the physical space.
As the sample project demonstrates, anchoring 2D objects in a 3D space is achievable without any heavy lifting using ARKit. In fact, the template project is less than 50 lines of code. For more on this kit and how you can apply it to your own projects, refer to the sidebar for additional links and reference material.
Core ML
The ML in Core ML stands for “machine learning.” It's the same machine learning framework that Apple uses within its own services such as Siri, Camera, and QuickType, and now it's available to you as well. Machine learning is a catchy buzz phrase but what does it translate to in terms of useable technology that you can apply? To answer this, let's look at a specific component of Core ML called “Vision.” Apple describes Vision as a framework whose features include face tracking, face detection, landmarks, text detection, rectangle detection, barcode detection, object tracking, and image registration.
Let's say, for instance, that you wanted to determine whether any particular picture is of a bedroom or not. If you had a single image of a bedroom and needed to code against that alone, it would be a tough problem to solve. However, if you built a trained model using a number of sample images, all featuring bedrooms, eventually you could train the application on what to look for. As the model analyzes more and more samples, it gets smarter over time.
In fact, once you have a model to compare against, working with Core ML is almost trivial. However, creating the model, especially when dealing with images, isn't trivial at all. Luckily, Apple provides a number of models for you to take advantage of out of the box (see sidebar for links). One particular model, Places205-GoogLeNet, detects the scene of a specified image from 200+ categories, including “bedroom.” Once you have the model loaded and your image converted over to the needed CVPixelBuffer format, analyzing it through an established model is relatively simple, as demonstrated in the following snippet:
let model = GoogLeNetPlaces()
guard let prediction = try? model.prediction(sceneImage: pixelBuffer!)
else { return }
print(prediction.sceneLabel)
XCode auto generates a class that wraps an imported model so you can refer to it with ease, as shown in the declaration of the model variable. In this case, the print at the end of the prediction reads “bedroom.” The processing and analysis of the image all takes place locally on the device without the need for network calls.
MusicKit
MusicKit lets you integrate Apple Music directly into your custom applications. Once the user approves access to an Apple Music account, you can create playlists, add songs to their library, and play any of the songs from Apple Music's offerings. If the user isn't currently an active Apple Music member, you can prompt them for a free trial without having to leave your application.
When working with MusicKit, most of the functionality is inaccessible until the user grants you permission to the account. Two different permission levels exist:
- Media Library Authorization: grants access to the user's media library
- Cloud Service Authorization: grants ability to play back music from the Apple Music catalog or add items to the user's iCloud Music Library
To request access to the user's media library, you use the MPMediaLibrary APIs like this:
// check authorization status
guard MPMediaLibrary.authorizationStatus() == .notDetermined else { return }
// request auth
MPMediaLibrary.requestAuthorization { (_) in
    // handle response
}
If you're interested in using the cloud services, you'll have to use the SKCloudServiceController APIs. Although similar in format, the authorization request differs from the MPMediaLibrary, as demonstrated in the following snippet:
// check authorization status
guard SKCloudServiceController.authorizationStatus() == .notDetermined
else { return }

// request auth
SKCloudServiceController.requestAuthorization {
    [weak self] (authorizationStatus) in switch authorizationStatus {
        case .authorized:
        // user granted auth
        default:
        break
    }
}
After obtaining a user's permission, if you plan to make a call to the Apple Music API, each request must be signed with a developer token. This is different than the dev certificates you use to sign your application. It's a specific token for use with MusicKit. To obtain that token, you first need to create a MusicKit signing key within your Apple Developer Program account. Specific instructions on how to do that can be found at http://developer.apple.com/go/?id=apple-music-keys-and-tokens. That link also demonstrates the not-so-straightforward process for how you then take your signing key and use it to construct a developer token. MusicKit uses a JWT spec (JSON Web Tokens) and requires you to create a header JSON payload, with specific information, in order to authenticate properly to the service.
Not only will you need a developer token and user permission, but if you want to make requests to the music API that targets user-specific data, you'll also need to obtain a user token. You can do this using the requestUserToken method on the SKCloudServiceController() object.
MusicKit has a series of challenges to overcome in terms of tokens, permission, and authorization, but once you hurdle those obstacles, the service is relatively easy to work with. Let's look at an example where your application wants to create a new playlist for a user. The following code snippet demonstrates how you would achieve that using MPMediaLibrary.
/*
Create an instance of `UUID` to identify the new playlist.  If you wish to be able to
retrieve this playlist in the future, save this UUID in your application for future use.
*/
let playlistUUID = UUID()

// this represents the metadata to associate with the new playlist.
var playlistCreationMetadata = MPMediaPlaylistCreationMetadata(name: "My Playlist")
playlistCreationMetadata.descriptionText = "This playlist contains awesome items."

// Request the new or existing playlist
MPMediaLibrary.default().getPlaylist(with: playlistUUID, creationMetadata:
playlistCreationMetadata) {
    (playlist, error) in guard error == nil else {
        // Handle Error accordingly
    }

    self.mediaPlaylist = playlist
}
In this example, self.mediaPlaylist is an instance of MPMediaPlaylist. This object has a method called addItem that you can then use to add songs to the playlist you just created. Apple has a sample project that further demonstrates and expands on this functionality. You can find it linked in the side bar.
PDFKit
Originally an OSX framework, Apple has now made PDFKit's functionality fully available on iOS 11. As the title suggests, PDFKit is used to manipulate and display PDF documents to users within your applications. It also supports more advanced features, such as annotations. PDFKit comes stocked with two view options:
- PDFView: encapsulates the functionality of PDFKit into a single view widget that you can add to your app using Interface Builder. This view lets you display a PDF, select content, navigate via pages, set zoom level, copy textual content, and even tracks page history.
- PDFThumbnailView: view that contains a set of thumbnails, each representing a page from a PDF document. This view has several methods to track user selection of pages and other interactions.
PDFKit even supports advanced features, like annotations.
Loading a PDF in a PDFView takes very minimal effort. The following snippet of code demonstrates what that implementation looks like:
// add PDFView to the display
pdfView = PDFView()
view.addSubview(pdfView)

// .. set up constraints for subview ..

// load PDF and display it immediately
let url = Bundle.main.url(forResource: "code-mag-demo", withExtension: "pdf")!
pdfView.document = PDFDocument(url: url)
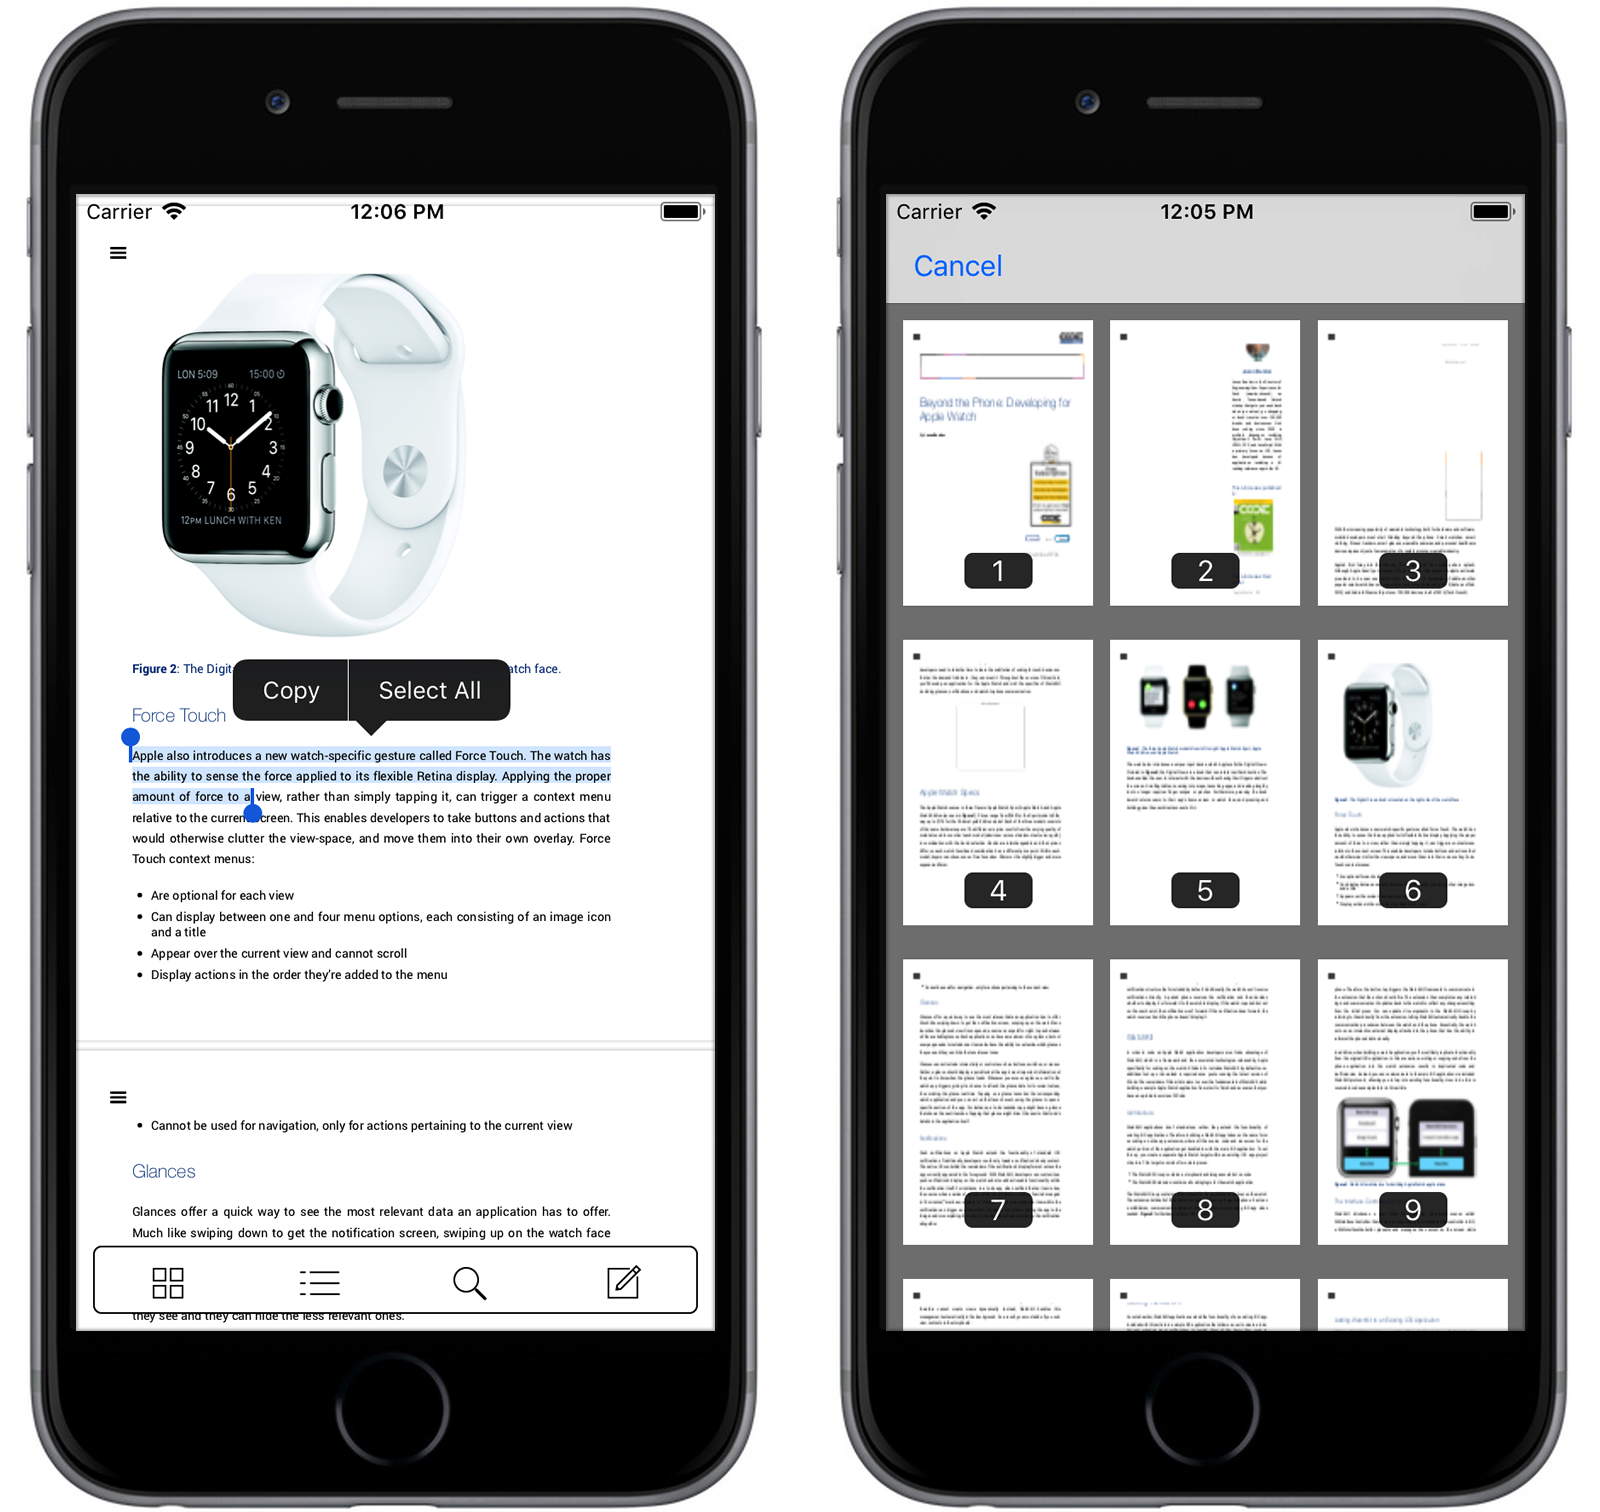
Although the PDFView class simplifies things for you, if you desire a more robust or custom solution, you can create a custom PDF viewer using the PDF Kit utility classes directly. Figure 3 demonstrates a PDF running within PDFView and its corresponding page display using PDFThumbnailView. Check out the GitHub link in the sidebar for access to the source of this sample application.
Drag and Drop
The aim of iOS 11 is to improve multitasking with the introduction of Drag and Drop; adding a system-wide way for users to move text, images, and files among applications. Although this is mostly useful on iPad devices, the functionality does exist in a more limited capacity on phones as well. Drag and Drop only works within a single app on iPhone whereas iPad devices can drag and drop contents between different apps. Drag and Drop also supports multi-touch, letting you select and manipulate multiple items simultaneously.
UITableView and UICollectionView also got an upgrade with built in drag and drop support. Each of those classes now has a dragDelegate and dropDelegate property. Whichever class you assign as the drag and drop delegate must then adhere to the UITableViewDragDelegate and UITableViewDropDelegate protocols. Additionally, to support drag functionality, you'll want to enable the dragInteractionEnabled property on the respective table or collection view. The drag protocol introduces the following method:
func tableView(_ tableView: UITableView,
itemsForBeginning session: UIDragSession,
at indexPath: IndexPath) -> [UIDragItem] {
    // your code here
}
This method gets called whenever the user initiates a drag operation by holding down a finger on a table cell. The method's responsibility is to return an array of dragged items that the user is now manipulating. If this method returns an empty array it's the equivalent to declining the drag operation. Once the user has an item or series of items they're dragging, they need a place to drop them. UITableViewDropDelegate requires the following method:
func tableView(_ tableView: UITableView,
performDropWith coordinator:
UITableViewDropCoordinator) {
    // your code here
}
This method is a bit more involved as it must handle several different scenarios. For instance, the functionality to handle a dropped item might differ based on the number of items being dropped or by the location where the user dropped them. It's possible to get back a location of the drop but it's also plausible that the user released the items over some whitespace in the table and there's no corresponding destination path reported as a result. So, an example of how you might have to handle this could look like:
let dropDestinationPath: IndexPath

if let indexPath = coordinator.destinationIndexPath {
    // if drop destination was captured
    dropDestinationPath = indexPath
} else {
    // if no given drop destination, use the last row of the last
    // section as the path for inserting the dropped items
    let lastSection = tableView.numberOfSections - 1
    let lastRow = tableView.numberOfRows (inSection: section)
    dropDestinationPath = IndexPath(row: row, section: section)
}
Here, you calculate the index to insert the dropped items by first checking whether the drop location could be determined by the user drop event. If not, you simply grab the last row of the last section, which you can use to insert the items at the end of the table. This is merely an example of what you could do, but it's by no means the only way to handle dropped items. Once you've determined where you're going to put the items being dropped, you need to obtain the dropped items. The coordinator has a session property that you can use to call coordinator.session.loadObjects to retrieve those items.
There's an extended set of functionality within this feature set for you to take advantage of. It's definitely worth reading more about and you can do that here https://developer.apple.com/ios/drag-and-drop/.
Other Notable Features
The features mentioned previously only represent part of what iOS 11 offers. It also includes several other notable features and functionality worth mentioning.
- Files: iOS 11 introduces the new Files app, providing a centralized space to search, browse, and organize files. Your custom applications can read and write files to that application as well.
- NFC Reading: iPhone 7 introduced NFC hardware support and with iOS 11, developers can now use that support to detect NFC NDEF tags nearby.
- Metal 2: Offers significant increases to performance with near-direct access to the GPU. There are new APIs, such as imageblocks, tile shading, threadgroup sharing, and more.
- Business Chat: Lets you connect to your customers directly through iMessage. It's essentially a customer-service platform that allows your customers to reach you via a seamless native experience, regardless of whether or not you have a native application. For instance, if your business is registered in Business Chat, Safari automatically shows the chat button when a user searches your business in Google. The chat integrates directly with Safari, Siri, Spotlight, and Maps to make it easier than ever for customers to reach you. This feature is still in developer preview and hasn't launched to the public yet. Find out more here: https://developer.apple.com/business-chat/.
The iOS 11 App Store
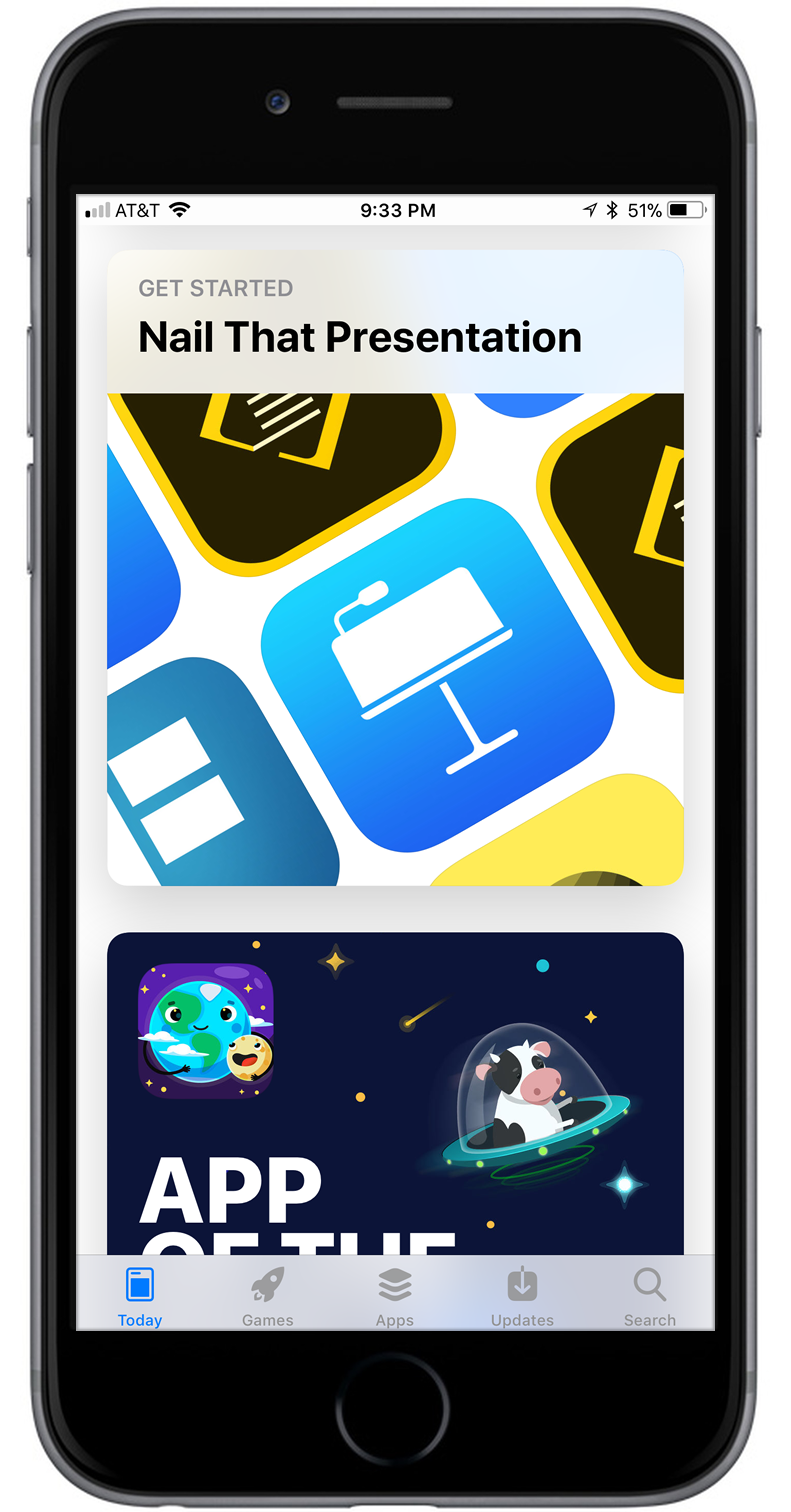
The AppStore underwent major changes in iOS 11. Not only did the storefront and app listings get visual changes, but developers also got new deployment options. In terms of visual changes, the most noticeable is the introduction of the “Today” tab. The Today tab is your destination for original stories, premiers, new releases, app of the day, and game of the day. Think of it as your AppStore news feed. Many of these stories feature quotes from the developers and offer a unique perspective on some of the applications you use on a daily basis. Figure 4 demonstrates what the Today tab looks like.
Rather than simply being an app category, games now live as a separate entity within the AppStore. They have their own dedicated tab that's formatted into sections similar to what you'd expect from the normal apps landing page: recommendations, videos, top charts, categories, and hand-picked collections.
The meatiest change is the product details page when you tap into an application, as shown in Figure 5. A slew of new options exist to help you better showcase your work. You can show more of your user experience using up to three app previews that auto play, making it easier than ever for customers to see how your app works or how your game plays. You can also now localize all of your app previews and screenshots. Additionally, the new “subtitle” field allows you to add a tag line beneath your app title, giving you space to convey the intention or value proposition of your application. The listing also shows where your application ranks within its category. Ratings have also been moved to front and center, with a large display at the top of the listing.
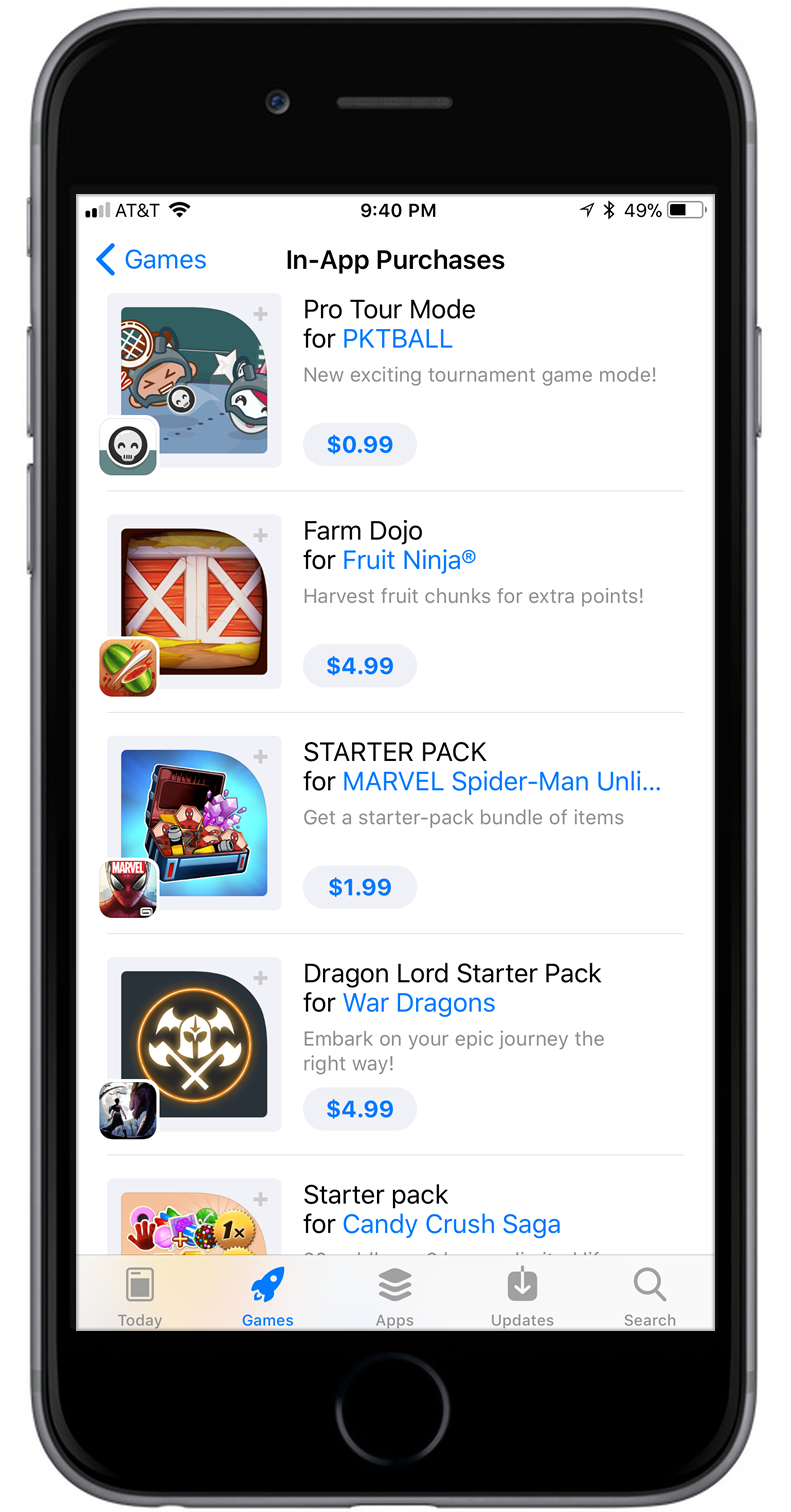
Apple also made a significant change to how in-app purchases get showcased on your app details page. You can promote up to 20 in-app purchases, including subscriptions, from the details page, and even let users start a purchase before downloading your application. In-app purchases can also appear in search results and even get featured by the editorial team. Figure 6 gives you an idea of how this looks.
In terms of deployment options; developers have a few new choices when they deploy an application update:
- Phased Release: Lets you gradually release your application update over a seven-day period to users who have automatic updates enabled. Users can override this via a manual update. You can pause a phased release for up to 30 days or choose at any point and time to release to all users.
- Reset Summary Rating: Lets you reset your application's summary rating for all territories when you release a new version. However, once released with this option, you won't be able to restore a previous rating summary. This doesn't erase customer reviews. It affects the star rating display at the top of your listing. This is especially helpful if you had a bad release and got an influx of negative reviews, follow it up with a fix, and want to clear out the resulting negativity. It's also nice not having your stars reset to zero with every minor update.
The iPhone X
Apple recently released the iPhone X that brings its own set of changes. Most notable is the display. It's an edge-to-edge Super Retina display that has an unconventional form factor. The top and bottom of the display are designated “safe areas” that are reserved for specific system UI or gestures. Although your applications still exist in that space, there is a new set of interface guidelines to adhere to in terms of what you can and cannot do in those spaces. Most notably, there shouldn't be actionable items in the safe area. Depending on how your application is currently laid out, you might end up with your old UI overlapping with these spaces and you'll likely need to make some changes to optimize. Figure 7 demonstrates a traditional iPhone display in conjunction with the iPhone X. Notice that the navigation and tab bars are extended in height, leaving blank space where the safe areas are defined.
Introducing a new SafeAreaLayoutGuide, iOS 11 lets you base constraints off of the safe area bounds rather than positioning items relative to the superview. Basically, these smart guides position your content relative to the safe area when on a device that needs or requires it, and position elements relative to the superview bounds otherwise. Figure 8 gives you an idea of where the designated safe areas are on the iPhone X. This is the primary means for updating your current applications to be iPhone X compatible. If you're using interface builder and auto-layout, it's as simple as selecting your constraint and changing it to be relative to the safe area rather than the superview.

The status bar is also a different height on the iPhone X. If your application is using a fixed status bar height, you'll likely need to rework that to support the change. It's also worth noting that the status bar on the iPhone X doesn't change height when background tasks like voice recording or location tracking are active. The interface guidelines also restrict you from masking or calling attention to the key display features such as the rounded corners, sensor housing, or home screen indicator. Basically, using black bars at the top and the bottom or creating visual adornments that interact with those spaces are considered grounds for rejection by the store.
XCode is now equipped with an iPhone X simulator so you can test your latest designs to make sure they are compatible. You'll want to pay extra attention if your application supports both portrait and landscape mode, as the safe areas shift as the device is rotated.
There's also an entirely separate set of considerations for optimizing your mobile Web experiences for the iPhone X. Apple has done a good job documenting those approaches over at https://webkit.org/blog/7929/designing-websites-for-iphone-x/.
The iPhone X brings with it more than a new form factor. It also comes equipped with face-tracking technology. You can take advantage of this tech via ARKit, allowing you to animate 3D content that follows the user's face and matches a user's facial expressions. Earlier, I talked about launching an ARKit session using a world-tracking configuration. ARKit also has a ARFaceTrackingConfiguration. Using this configuration, ARKit automatically attaches ARFaceAnchors to the scene that contain information about the face, including orientation and position, using the face anchors so that you can position 3D items relative to the face. This is great for interactive photo filters and other features where you want to manipulate the appearance of a user's face. It's worth noting that ARKit only tracks one face at a time. If more faces are present, it decides which is the most prevalent.
The iPhone X comes equipped with face-tracking technology, allowing you to animate 3D content that follows the user's face and matches a user's facial expressions.
Wrapping Up
Hopefully, this article has shown you the potential of iOS 11 and what it has to offer developers. As Apple continues to iterate and innovate, developers have an ever-increasing tool kit to create amazing experiences for end users. Make sure to check out the sidebars for additional links to reference material and code samples for new iOS 11 features and frameworks.