In my last three articles for CODE Magazine, you learned to use AngularJS to search and select data. You also saw how to add, edit, and delete data. In this article, you'll see how to add validation to the page in order to catch any input errors prior to sending the data to the server. Of course, you're not going to get rid of your server-side validation; you still need to protect the data in case someone bypasses your client-side validation.
This article builds upon the sample from the last article. If you don't have that code and wish to follow along, visit www.pdsa.com/downloads, select PDSA Articles, then select Code Magazine - The Journey to Angular - Part 3 from the drop-down list.
Related Articles
Add a Form Tag
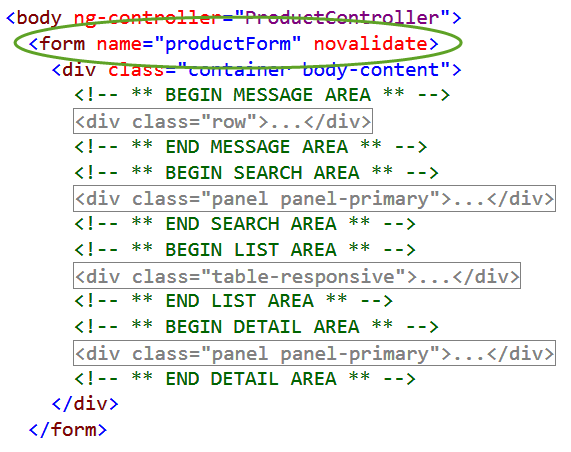
The first step is to add a <form> tag around all of your data entry fields. Be sure that the <form> tag is within the ng-app="app" and the ng-controller="productController" statements, as shown in Figure 1. Give the <form> tag a name and add the novalidate attribute. Although this may seem counter-intuitive to add novalidate, this is what Angular needs because it's going to take over all data validation and doesn't want the browser to do any validation on its own.
Add Validation Attributes
For each field on your screen, you need to decide on which fields to perform validation. Of those you need to validate, determine which type of validation you can accomplish within the attributes available in HTML/HTML5 and Angular. Later in this article, you'll learn to create your own custom validation directives. In Table 1, you'll find a list of the attributes you can use with Angular validation.
Each input field must have the name attribute in addition to the id attribute. The name attribute, combined with one or more of the attributes listed in Table 1, is what Angular uses to determine the set of fields that need to be validated. Go ahead and add the name attribute to each of the input fields in the detail area of the page. Make the value of the name attribute the same as value of the id attribute.
Add the appropriate validation attributes to the input fields, as shown in Listing 1. To the ProductName field, add the attributes required, ng-minlength, and ng-maxlength. Add the required attribute to the IntroductionDate and URL input fields. To the Price input field, add required, min, and max to enforce a minimum and maximum value that may be entered.
Listing 1: Modify input fields to use Angular validation
<div class="form-group">
    <label for="ProductName">
        Product Name
    </label>
    <input class="form-control"
           id="ProductName"
           name="ProductName"
           required
           ng-minlength="4"
           ng-maxlength="150"
           ng-model="product.ProductName"
           type="text" />
</div>
<div class="form-group">
    <label for="IntroductionDate">
        Introduction Date
    </label>
    <input class="form-control"
           id="IntroductionDate"
           name="IntroductionDate"
           required
           ng-model="product.IntroductionDate"
           type="text" />
</div>
<div class="form-group">
    <label for="Url">Url</label>
    <input class="form-control"
           id="Url"
           name="Url"
           required
           ng-model="product.Url"
           type="text" />
</div>
<div class="form-group">
    <label for="Price">Price</label>
    <input class="form-control"
    id="Price"
    name="Price"
    required
    min="0.01"
    max="9999.99"
    ng-model="product.Price"
    type="text" />
</div>
Display Error Messages
You can display error messages for each of the validation attributes you added to the input fields in Listing 1. On the HTML page, there's an unordered list used to display any error messages. You can also use this list to display validation errors that Angular reports.
Angular performs validation on all input fields as you modify them. The current state of the validation is retrieved via the FormController that's automatically set up by Angular on your <form> tag. Use either the $error or $valid properties on each input field to determine validity of the data in the field. The $error allows you to determine exactly what the error is. The $valid tells you whether or not the input field contains valid data according to all of the validation on that field.
The $error property has additional properties you can query to determine the exact cause of the validation failure. The valid properties are required, max, maxlength, min, minlength, pattern, email, number, url, date, datetimelocal, time, week, and month. You query these properties by specifying the name of the form, the name of the input field, $error and the name of the property. Some examples are shown in the following code snippet.
productForm.ProductName.$error.required
productForm.ProductName.$error.maxlength
productForm.ProductName.$error.minlength
productForm.Price.$error.max
productForm.Price.$error.min
Each of the properties above returns a true or false, indicating whether or not the input field meets the criteria expressed in the attribute. If there's no value contained in the ProductName input field, the $error.required property returns a true value. You use these properties in combination with the ng-show or ng-hide directives to display an error message to the user. Add list item elements with an appropriate error message to the unordered list message area on your page, as shown in Listing 2. As you can see from the code in Listing 2, adding the ng-show directive and querying one of the $error or $valid properties, you determine whether or not that particular error message is displayed in the list.
Listing 2: Add error messages to the message area
<ul>
    <li ng-repeat="msg in uiState.messages">
        {{msg.message}}
    </li>
    <li ng-show="productForm.ProductName.$error.required">
        Product Name is Required
    </li>
    <li ng-show="!productForm.ProductName.$valid">
        Product Name must have more than 4 characters and less than 150
    </li>
    <li ng-show="productForm.IntroductionDate.$error.required">
        Introduction Date is Required
    </li>
    <li ng-show="!productForm.IntroductionDate.$valid">
        Invalid Introduction Date
    </li>
    <li ng-show="productForm.Url.$error.required">
        Url is Required
    </li>
    <li ng-show="productForm.Price.$error.required">
        Price is required
    </li>
    <li ng-show="!productForm.Price.$valid">
        Price must be between $0.01 and $9,999
    </li>
</ul>
Initialize the Product Object
When the user clicks on the Add button, it's often a good idea to initialize some of the fields of the vm.product object to valid start values. Open the productController.js file and add a new function named initEntity(), as shown in the following code snippet.
function initEntity() {
    return {
        ProductId: 0,
        ProductName: '',
        IntroductionDate: new Date().toLocaleDateString(),
        Url: 'http://www.pdsa.com',
        Price: 0
    };
}
When you click on the Add button, the ng-click directive calls the addClick() function. In this function, you call the initEntity() function and assign the return value to the vm.product variable. All of the properties of this object are bound to the input fields on the HTML page and thus the values created in this function are then displayed in each of the fields. Run the form right now and click the Add button to see these values displayed. The validation doesn't work yet, but you'll hook that up next.
function addClick() {
    vm.product = initEntity();
    setUIState(pageMode.ADD);
}
Using the Product Form
When you add the <form> tag and assign a name to it, Angular creates a FormController object. The name used in this article, productForm, can be queried from the vm variable in the controller. In the saveClick() function, modify the code to use this form controller object to check to see whether the form is valid or not. If it isn't, display the messages area so all of the validation messages are displayed in the unordered list. Modify the saveClick() function to look like the following code snippet.
function saveClick() {
    if (vm.productForm.$valid) {
        vm.productForm.$setPristine();
        saveData();
    }
    else {
        vm.uiState.isMessageAreaVisible = true;
    }
}
You can see that if the form is valid, you're going to set the form back to a pristine state. Call the $setPristine() function to reset all internal properties of the form controller object back to a valid state. The form also needs to be set to pristine, as you will read about a little later in this article.
The other change you're going to make is to modify the saveData() function. Modify this function so it looks like the following code snippet. You're removing some code from a function that was written in a previous article and is no longer needed.
function saveData() {
    // Insert or Update the data
    if (vm.uiState.mode === pageMode.ADD) {
        insertData();
    }
    else if (vm.uiState.mode === pageMode.EDIT) {
        updateData();
    }
}
If you run the sample html file, click on the Add button, immediately click on the Save button, and then you should see a couple of error messages show up in the unordered list. These messages are the result of Angular evaluating the validation attributes, detecting the validation failures, and then ng-showing that it has received a true value from querying the $error or $valid properties. If you wipe out all of the input fields and click Save again, you should see many errors appear.
What's interesting is that as you clear each field, the error messages appear immediately. This is because Angular constantly monitors any bound fields. When they change, the validity of each field is checked and the $error and $valid properties are updated. This causes the appropriate ng-show directives to be re-evaluated and the messages to be displayed in the unordered list.
Custom Validation Directive
Using the built-in validations is fine, but sometimes you might need something a little more specific to your own environment. You could write some JavaScript in the validate() function in your controller, but a more Angular approach is to create a directive. In Listing 3, you can see how to create a directive to enforce that an input field can't have the word “microsoft” within the entry. At the top of the productController.js file, where you define the ProductController, chain the directive() function to this definition and write some code to create your own custom directive.
Listing 3: Add some custom validation to the validate function
angular.module('ptcApp')
    .controller('ProductController', ProductController)
    .directive('urlMicrosoft', function () {
    return {
            require: 'ngModel',
            link: function (scope, element,
                            attributes, ngModel) {
        ngModel.$validators.microsoft = function (value) {
            if (value) {
                return value.indexOf("microsoft") == -1;
            }
        }
      }
    };
});
You pass two arguments to the directive() function: the name of the directive and a function that's executed each time the model value is updated by the user typing into the input field. The name of the directive needs to be created in camel case. When used as an attribute, you separate the lower case portion and the word with the upper case letter by a dash ("-"). For example, in Listing 3 the name of the directive is urlMicrosoft; when added as an attribute to an HTML element, it's expressed as url-microsoft.
The function you write creates an object with two properties: require and link. As you're going to be using this as a validation directive, you require the ngModel. The link property is a function that accepts four parameters: scope, element, attributes and ngModel. Attach your own property name to the ngModel.$validators collection. In this case, I'm using the name “Microsoft”, but feel free to name it whatever you want. Assign a function to this new property that's passed the model value that the user just typed in. This function returns a true or a false value based on whether or not the value typed is valid.
To use the validation directive, apply the attribute to the appropriate input field. In this case, add it to the URL field to make sure someone doesn't type in www.microsoft.com. In the code snippet below, you can see the directive applied using the dash notation mentioned previously.
<input class="form-control"
       id="Url"
       name="Url"
       ng-model="product.Url"
       required
       url-microsoft
       type="text" />
Locate the unordered list in the messages area and add one more list item to display an error message when the $error.microsoft is set to a true value.
<li ng-show="productForm.Url.$error.microsoft">
    Url cannot have the word 'microsoft' in it
</li>
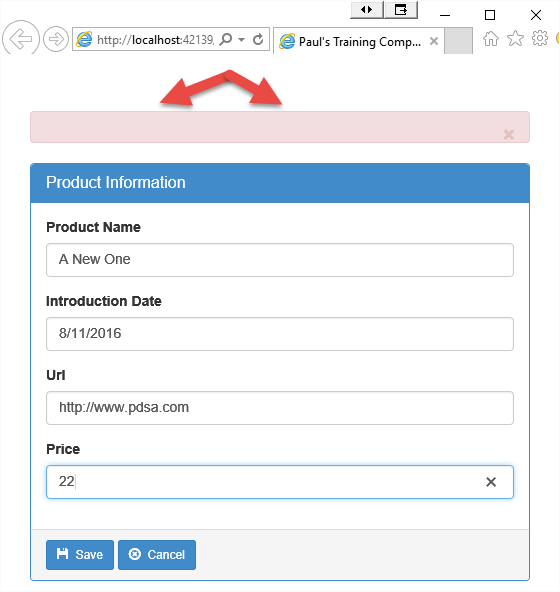
The property “microsoft” is dynamically added to the $error property because that's what you defined in the directive. Run the sample again and click on the Add button, and then immediately click on the Save button. You should see a couple of error messages. Click into the URL input field and type the word “microsoft” anywhere in this field. As soon as you do, you should see your new error message in the messages area. Remove the word “microsoft”, fill in a valid product name, and the error messages disappear. Note that the message area doesn't go away, as shown in Figure 2.
To fix this problem, you're going to take advantage of the form controller and its properties. Modify the <div> that surrounds the message area. Currently, it looks like the following:
<div ng-show="uiState.isMessageAreaVisible" class="row">
Instead of using the ng-show, you're going to use the ng-hide directive. The expression you use to determine whether or not to display the message area should look like the following code snippet.
<div ng-hide="!uiState.isMessageAreaVisible ||
              (productForm.$valid &&
              !productForm.$pristine)"
     class="row">
You want the message area to be hidden if the isMessageAreaVisible property is set to false, or if the product form is valid and the product form is no longer pristine. This means that you've modified the form data in some way. After making these changes, go ahead and run the form again, click Add and press the Save button to display an error message. Fix the product name field so that it has valid data in it, and you should see the message area removed from the page. The use for the productForm.$pristine is why as soon as the data is valid on the page, in the saveClick() function, you want to call the $setPristine() function on the product form. This allows the message area to once again be hidden.
Server-Side Validation
Client-side validation can be bypassed fairly easily, so you always need to validate your data once you post it to the server. In this article, I haven't used any database objects, only some hard-coded mock data. If you're using Entity Framework, you're probably using Data Annotations so that required values, min and max lengths, and data types are taken care of. I'm going to use the ModelStateDictionary that the Web API provides as part of the System.Web.Http.ModelBinding namespace. Note that this model state dictionary is different from the one that the Entity Framework uses. If you're using the Entity Framework, you need to transfer any data annotations messages from one model state dictionary to another.
For the purposes of this article, I'm only going to show you how to add validation messages to the System.Web.Http.ModelBInding.ModelStateDictionary, serialize that object, and report the messages on the HTML page. The first step is to open the ProductController.cs file and add a using statement at the top of the file.
using System.Web.Http.ModelBinding;
Next, add a property of the type ModelStateDictionary and set the name to ValidationErrors. This property is what you're going to fill in with any validation errors. The values in this property are serialized and passed back as part of a BadRequest() Web message.
public ModelStateDictionary
       ValidationErrors { get; set; }
Create a Validate Method
Add a Validate() method to your product controller, as shown in Listing 4. I added just one additional rule just to show you how to add a validation error. The additional rule I added was to ensure that the IntroductionDate property contains a date that is greater than January 1, 2010. If it doesn't, add a model error to the ValidationErrors collection using the AddModelError() method.
Listing 4: Write additional validation code
protected bool Validate(Product product) {
    bool ret = false;

    ValidationErrors = new ModelStateDictionary();

    // Add custom validation
    if (product.IntroductionDate <
            Convert.ToDateTime("1/1/2010")) {
        ValidationErrors.AddModelError(
            "Introduction Date",
            "Introduction Date Must Be Greater Than 1/1/2010");
        }

// Add more validation here to match
// client-side validation

ret = (ValidationErrors.Count == 0);

return ret;
}
You should write any other if statements to verify that required fields are filled, and that minimum and maximum lengths and values are enforced. You need to write any validation logic that matches all of the attributes you added to your input. Or, if you're using Data Annotations on your entity objects, you can retrieve the ModelStateDictionary object, get the errors from the annotations and add those to the ValidationErrors collection property.
Modify Put and Post methods
After writing the Validate() method, modify both the Put() and Post() methods (Listing 5 and Listing 6) in your controller to call the Validate() method prior to running the other code that exists in these methods. If the validation fails, set the IHttpActionResult return value to BadRequest, passing in the ValidationErrors model state dictionary that contains all of your validation errors to display on your HTML page.
Listing 5: Call the Validate() function when updating data
public IHttpActionResult Put(int id, Product product) {
    IHttpActionResult ret = null;

    if (Validate(product)) {
        if (Exists(id)) {
            if (Update(product)) {
                ret = Ok(product);
            }
            else {
                return InternalServerError();
            }
        }
        else {
            ret = NotFound();
        }
    }
    else {
        ret = BadRequest(ValidationErrors);
    }

    return ret;
}
Listing 6: Call the Validate() function when inserting data
public IHttpActionResult Post(Product product) {
    IHttpActionResult ret = null;

    if (Validate(product)) {
        if (Add(product)) {
            ret = Created<Product>(Request.RequestUri +
                                    product.ProductId.ToString(),
                                    product);
        }
        else {
            ret = InternalServerError();
        }
    }
    else {
        ret = BadRequest(ValidationErrors);
    }

    return ret;
}
Handle Server-Side Validation Errors on the Client-Side
When you return the BadRequest Web message, this triggers the error function in your data service call. In each of these error functions, you wrote code to call the handleException() function in your productController.js file. Modify the handleException() function to handle any of the status codes that can be returned from your Web API. In each case, you add the appropriate error message to the vm.uiState.messages array. To make it simpler to add a message, create a addValidationMessage() function, as shown in the following code snippet:
function addValidationMessage(prop, msg) {
    vm.uiState.messages.push({
        property: prop,
        message: msg
    });
}
Locate the handleException() function in your productController.js file and modify it to look like Listing 7. The important part in this function is handling the case for the bad request that has a status code of 400. You know that you're passing back a model state dictionary object for any bad request generated from your Web API, so you get that dictionary object in the ModelState property attached to the error.data property.
Listing 7: Add a case statement to check for validation errors from the server
function handleException(error) {
    vm.uiState.messages = [];

    switch (error.status) {
        case 400:   // 'Bad Request'
            // Model state errors
            var errors = error.data.ModelState;

            // Loop through and get all
            // validation errors
            for (var key in errors) {
                for (var i = 0;
                    i < errors[key].length;
                    i++) {
                        addValidationMessage(key,
                                        errors[key][i]);
                    }
            }
            break;

        case 404:  // 'Not Found'
            addValidationMessage('product',
                    'The product you were ' +
                    'requesting could not be found');
            break;

        case 500:  // 'Internal Error'
            addValidationMessage('product',
                    error.data.ExceptionMessage);
            break;

        default:
            addValidationMessage('product',
                    'Status: ' +
                    error.status +
                    ' - Error Message: ' +
                    error.statusText);
            break;
    }

    vm.uiState.isMessageAreaVisible = (vm.uiState.messages.length > 0);
}
Loop through all of the errors in this ModelState property and extract the key. From this key name, you can access the message property and pass in both the key name and the message to the addValidationMessage() function to add the message to the vm.uiState.messages array. Once this message is in the array, the message is automatically displayed in the unordered list in the messages area on your HTML page. To ensure that the message area is visible, set the vm.uiState.isMessageAreaVisible equal to true at the end of the handleException() function.
Run the sample one last time. Click on the Add button and set the product name field to a valid value, but set the introduction date to 1/1/2000, or any date prior to 1/1/2010. Click the Save button to post to the server. You should now see the appropriate error message, telling you that the introduction date must be greater than 1/1/2010.
Summary
In this article, you learned the basics of adding validation to your Angular page. You took advantage of the built-in validation attributes and learned how to display error messages within an unordered list. You learned to create a custom validation directive for functionality that was beyond what the standard validation can do. Finally, you learned how to check additional values on the server-side and return a bad request (HTTP status of 400) to trigger an exception on the client-side. You then extracted the messages returned from the Web API and added those to your messages array so those messages could be displayed on your HTML page.
Table 1: Validation attributes you may add to any input field
| Attribute | Type | Description |
|---|---|---|
| required | HTML | The field must contain a value. |
| min | HTML | A minimum value for a numeric input field |
| max | HTML | A maximum value for a numeric input field |
| ng-minlength | Angular | The minimum number of characters for a field |
| ng-maxlength | Angular | The maximum number of characters for a field |
| ng-required | Angular | The field must contain a value. Same as "required" |
| ng-pattern | Angular | A regular expression the input value must match |