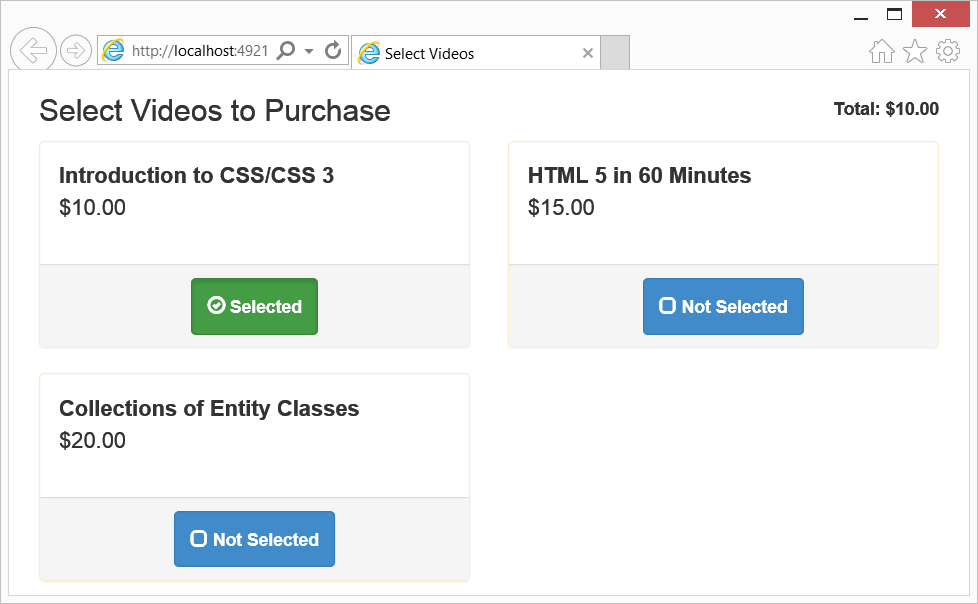
As you can tell from my recent articles, I've been working a lot with Bootstrap. I've been learning how to extend Bootstrap with my own customizations. In this article, I'll show you how to create a custom product selection system like the one shown in Figure 1. To build this system, you'll use the Bootstrap panel classes, button groups, and glyphs. Along with these classes, you'll write a little jQuery to keep a running total of the selected products and make the glyphs change on the button groups. Finally, a little CSS is used to enhance the look of your product selection system.
Create a Product Box
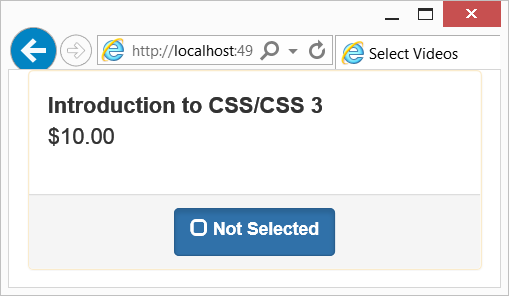
To start, create a product box using the Bootstrap panel classes. Figure 2 shows an example of a single product box. The description and price of the product are contained in the panel-body class within an HTML div element. Each of these are in their own span element and some CSS is applied to these span elements.
To style the product description, the price, and the size of the panel body, you need the CSS shown in the following code snippet:
.desc {
    display: block;
    font-weight: bold;
    font-size: 1.25em;
}
.price {
    font-size: 1.25em;
}
.panel-body {
    min-height: 7em;
}
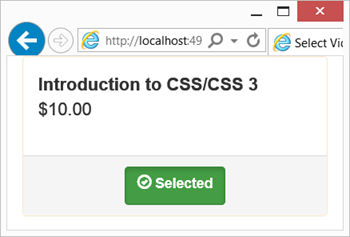
In the div with the Panel-Footer class is something that looks like a button (Figure 2), but has a glyph and some words next to it. As you can see from the code in Listing 1, you build this using the Bootstrap class btn-group and a data- attribute called data-toggle=“buttons”. This class gives you the appearance of a button, but you place a check box inside it to give the ability to toggle the button between a checked and an unchecked state. This toggling makes it ideal for showing a user those products they have selected for purchase (Figure 3) and those they haven't (Figure 2).
Listing 1: A simple panel to contain product information
<div class="panel panel-warning">
    <div class="panel-body">
        <span class="desc">Introduction to CSS/CSS 3</span>
        <span class="price">$10.00</span>
    </div>
    <div class="panel-footer text-center">
        <div class="btn-group" data-toggle="buttons">
            <label class="btn btn-primary">
                <span class="glyphicon glyphicon-unchecked"></span>
                    <input id="chk1" type="checkbox" name="products" />
                    <label for="chk1">Not Selected</label>
            </label>
        </div>
    </div>
</div>
The nice thing about check boxes expressed this way is that you can tell that the label is a part of the check box. These buttons are also much easier to press on a mobile device than a normal check box. With just a little bit of jQuery, you can toggle the color and the glyph on these buttons.
When the user clicks on the button/check box to select a product, you need to do three things: change the glyph used, change the color of the button, and change the words on the button. The HTML to express the selected state of the button is shown in the following code snippet.
<div class="btn-group" data-toggle="buttons">
    <label class="btn btn-primary active">
        <span class="glyphicon glyphicon-ok-circle">
        </span>
        <input id="chk1" type="checkbox"
            name="products"
            checked="checked" />
        <label for="chk1">Selected</label>
    </label>
</div>
You add the Active class to the label element, change the glyph to glyphicon-ok-circle, add checked="checked" to the check box, and change the words in the label to “Selected”. After setting all of these, your button will look like the one shown in Figure 3.
You need to change each button dynamically in response to a user clicking on the button. For that, you'll need to use jQuery, as discussed in the next section. By the way, feel free to use whatever icons you want. Font Awesome (www.fontawesome.io) has a lot of different CSS glyphs that you can use instead of the limited options in Bootstrap.
Change Glyphs Dynamically Using jQuery
Bootstrap takes care of toggling the Active class on the label elements for you because of the btn-group class and the data-toggle="button" attribute. However, you need to write jQuery to change the glyphs, the color, and the text on the buttons. Listing 2 shows the jQuery you need to write in order to connect to the change event of the check boxes, determine whether the check box is checked or unchecked, and add or remove CSS classes as appropriate.
Listing 2: Simple, hard-coded jQuery to toggle the buttons
<script>
$(document).ready(function () {
    $("input[type='checkbox']").change(function () {
        if ($(this).prop('checked')) {
            $(this).prev().removeClass('glyphicon-unchecked')
                          .addClass('glyphicon-ok-circle');
            $(this).parent().removeClass('btn-primary')
                            .addClass('btn-success');
            $(this).next().text("Selected");
        }
        else {
            $(this).prev().removeClass('glyphicon-ok-circle')
                          .addClass('glyphicon-unchecked');
            $(this).parent().removeClass('btn-success')
                            .addClass('btn-primary');
            $(this).next().text("Not Selected");
        }
    });
});
</script>
The jQuery in Listing 2 is very straight-forward. When the user clicks on the check box, you determine if the check box is checked or unchecked. Based on this setting, you either add or remove the appropriate classes from the span element that is just prior to the check box control. You modify the btn- class on the label element that is the parent element to the check box. Finally, you change the text on the next element, which is the label after the check box.
Make the jQuery Generic
Although the code shown in Listing 2 works, it leaves a little to be desired. First off, if you wish to change the glyph you're using, you have to change it in a couple of places. The same goes for the class you use for the btn- classes. A nicer approach would be to create a JavaScript object into which you can define the properties for each item that you wish to replace. The following code snippet is a JavaScript object definition that you might create.
var checkOptions = {
    id: "",
    checkedGlyph: "glyphicon-ok-circle",
    uncheckedGlyph: "glyphicon-unchecked",
    checkedBtnClass: "btn-success",
    uncheckedBtnClass: "btn-primary",
    checkedText: "Selected",
    uncheckedText: "Not Selected"
};
Once you have this data setup, let's break out the lines of code in the if statement and the else statement in Listing 2 into two separate functions that'll use this JavaScript object. The first function is called setChecked() and is used to assign the appropriate values when the user changes the check box to a checked state.
function setChecked(ctl) {
    $(ctl).prev()
        .removeClass(checkOptions.uncheckedGlyph)
        .addClass(checkOptions.checkedGlyph);
    $(ctl).parent()
        .removeClass(checkOptions.uncheckedBtnClass)
        .addClass(checkOptions.checkedBtnClass);
    $($(ctl).next()).text(checkOptions.checkedText);
}
The second function is called setUnchecked() and is used to assign the appropriate values when the user changes the check box to an unchecked state. You pass in the check box that the user clicked on to each of these functions.
function setUnchecked(ctl) {
    $(ctl).prev()
        .removeClass(checkOptions.checkedGlyph)
        .addClass(checkOptions.uncheckedGlyph);
    $(ctl).parent()
        .removeClass(checkOptions.checkedBtnClass)
        .addClass(checkOptions.uncheckedBtnClass);
    $($(ctl).next()).text(checkOptions.uncheckedText);
}
You now rewrite the code within the $(document).ready() function to call the setChecked() and setUnchecked() functions, as shown in Listing 3. There are a couple more changes to make within this new jQuery code. Instead of using a simple jQuery selector to search for input[type='checkbox'], you should make the selector a little more targeted in case you have other check boxes on your page that aren't product select buttons. Fill in the checkOptions.id property with the identity of a div element where all of your product boxes are located. For example, if you wrap a div around the HTML that contains all your product panels, and give that div an ID of “products”, then you modify the checkOptions.id to be "#products". To further qualify the group of check boxes to connect to, you target those contained within the .btn-group class. These two options together ensure that this code is only run against those check boxes that are your product selection buttons.
Listing 3: Call the two new methods to set checked and unchecked states.
$(document).ready(function () {
    // Connect to 'change' event in order to toggle glyphs
    $(checkOptions.id + " .btn-group input[type='checkbox']")
        .change(function () {
        if ($(this).prop("checked")) {
            setChecked($(this));
        }
        else {
            setUnchecked($(this));
        }
    });

    // Detect checkboxes that are checked and toggle glyphs
    var checked = $(checkOptions.id + " .btn-group input:checked");
    setChecked(checked);
});
One last item in Listing 3 is detecting those check boxes that are set to checked in the HTML when the page is loaded and making sure the appropriate glyphs, the text, and the button's color are set. This is accomplished using the jQuery selector $(checkOptions.id + " .btn-group input:checked") to retrieve a list of all checked check boxes. Call the setChecked() function passing in this list of check boxes so the appropriate attributes can be set.
Calculate Total
Each time a user selects or un-selects a product, you'll want to update the total amount of selected products in the upper-right hand corner of the page (Figure 1). First, get the total amount by selecting the text within the text box with the id="total". The price of the product has currency symbols that need to be stripped so you only have the numeric value in order to add or subtract from the total. Second, determine whether or not the product was checked or unchecked. Based on this, you'll either add or subtract the price of the product from the total displayed. Third, format the new total as a currency value and redisplay it back in the total area in the upper right-hand corner of the page. All of this logic is in the calculateTotal() function shown in Listing 4.
Listing 4: Calculate the total each time the user selects or un-selects a product.
function calculateTotal(ctl) {
    // Get the total amount
    var total = $("#total").text();
    // Strip currency symbols and thousands separator
    total = stripCurrency(total);

    // Get the price from within this panel
    var price = $(ctl).closest(".panel").find(".price").text();
    // Strip currency symbols and thousands separator
    price = stripCurrency(price);

    if ($(ctl).prop("checked")) {
        // Add to total
        total = parseFloat(total) + parseFloat(price);
    }
    else {
        // Subtract from total
        total = parseFloat(total) - parseFloat(price);
    }
    // Format the total and place into HTML
    $("#total").text(formatCurrency(total));
}
When the page is loaded, you need to do two things, as shown in Listing 5. First, connect to the change event of the check boxes in order to run the calculateTotal() function to add or subtract from the total. Second, calculate the total of any pre-checked items by calling the calculateTotal() function for each check box that has checked="checked" set when the page loads.
Listing 5: When the page is loaded, calculate the total of any products selected.
$(document).ready(function () {
    // Connect to 'change' event to get price data
    $(checkOptions.id + ".btn-group input[type='checkbox']")
        .change(function () {
            calculateTotal($(this));
    });

    // Get checkboxes that are checked
    var checked = $(checkOptions.id + ".btn-group input:checked");
    // Add all 'checked' values to get total
    for (var i = 0; i < checked.length; i++) {
        calculateTotal($(checked[i]));
    }
});
Additional Numeric Functions
There are two functions called by the calculateTotal() function: stripCurrency(), which is shown in Listing 6, and formatCurrency(), shown in Listing 7.
Listing 6: This function strips any non-numeric characters from a string.
function stripCurrency(value, symbol, separator) {
    symbol = (typeof symbol == 'undefined' ? '$' : symbol);
    separator = (typeof separator == 'undefined' ? ',' : separator);

    value = value.replace(symbol, "")
        .replace(separator, "")
        .replace(" ", "");

    return value;
}
Listing 7: This function formats a decimal value in any currency format.
function formatCurrency(value, decimals, decpoint,
    symbol, separator) {
    decimals = (typeof decimals == 'undefined'? 2 : decimals);
    decpoint = (typeof decpoint == 'undefined'? '.' : decpoint);
    symbol = (typeof symbol == 'undefined'? '$' : symbol);
    separator = (typeof separator == 'undefined'? ',' : separator);

    var parts = value.toFixed(decimals)
        .toString()
        .split(decpoint);
    parts[0] = parts[0]
        .replace(/\B(?=(\d{3})+(?!\d))/g, separator);

    return (symbol + parts.join(decpoint)).toLocaleString();
}
The Strip Currency Function
The stripCurrency function has two optional parameters: symbol and separator. If you don't pass them, they default to the US currency symbol ($) and a comma (,) respectively. Use the replace function on the string to remove the symbol, the separator, and spaces from the value passed in. This leaves you with a numeric value that you can then use to calculate a total.
Format Currency Function
The formatCurrency() function has four optional parameters: decimal, decpoint, separator, and symbol. Similar to the stripCurrency() function, these parameters default to US currency values: two places after the decimal, period, dollar sign, and comma respectively. Use the toFixed() and split() functions to break apart the pieces so you can add the separator (a comma), and add the currency symbol to the front of the numeric value.
Summary
In this article, you learned to use the Bootstrap panel class, a little bit of jQuery, and some CSS to create a product selection system. Use these product selection panels when you need a small set of items from which a user can select or unselect. In addition, you learned how to work with some numeric formatting functions, and to calculate totals from the selected items. As you can see, using Bootstrap for som` functionality and adding just a little bit of your own jQuery can make creating new components very simple.