Microsoft unveiled the Windows Developer Preview, a pre-beta version of Windows 8 for developers, at the Microsoft BUILD conference in September 2011. The most compelling new feature for developers and users alike is the new Metro style user interface.
In this article I will introduce you to Metro apps. Hopefully I can clear up some misconceptions about Metro apps and explain how this new UI paradigm relates to you and your existing skillset as a .NET developer. Lastly, I will demonstrate building a Metro app using HTML and JavaScript to jumpstart your journey into building Metro apps.
What Is Metro?
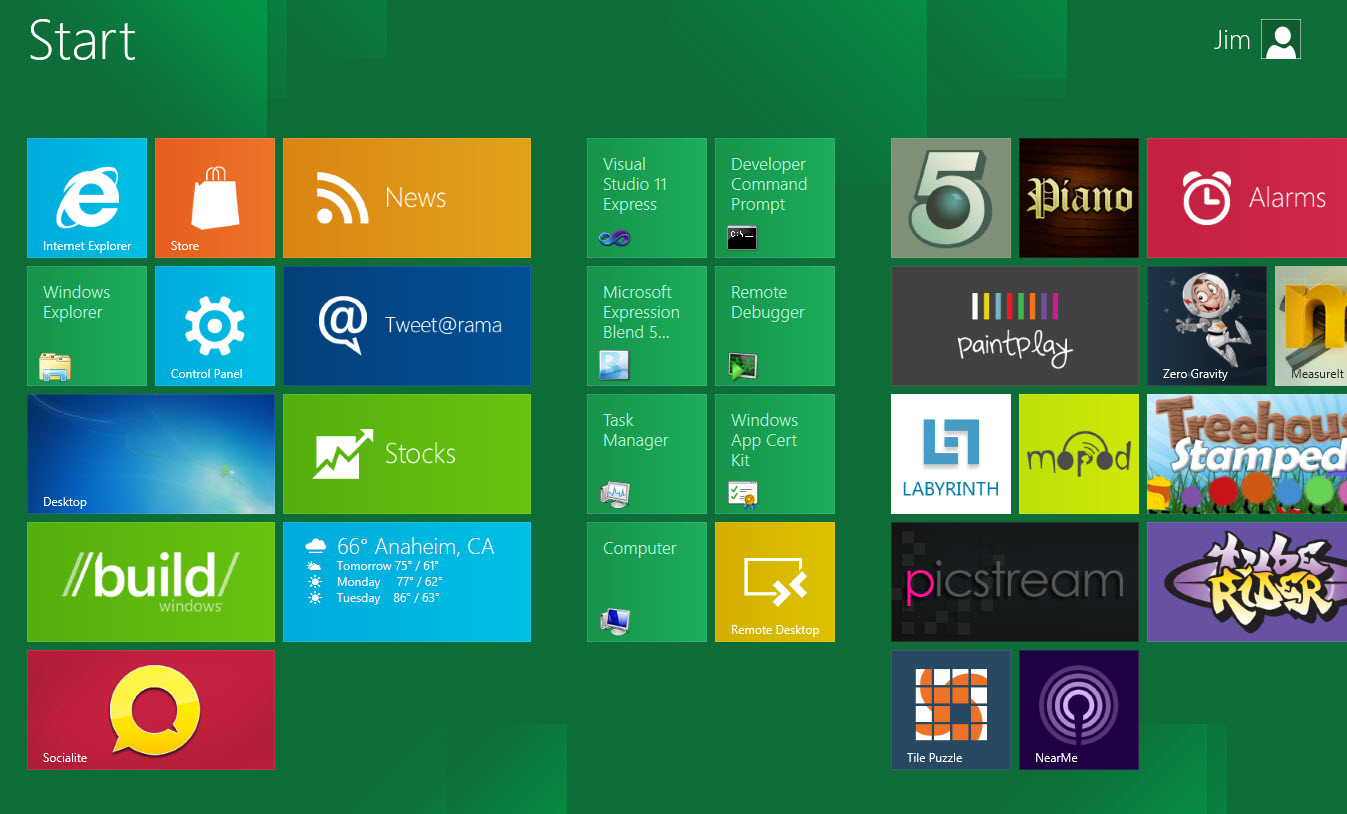
Metro is Microsoft’s newest client-side user interface paradigm targeting touch-enabled devices. You are already familiar with the UI style if you have seen or used a Windows Phone 7. While Microsoft claims the Metro style UI is equally at home with a mouse and keyboard, clearly you achieve the optimal user experience using touch-enabled devices. Figure 1 provides you with the opening start screen for the Windows Developer Preview.
Developers View from 30,000 Feet
During the opening keynote at the Microsoft BUILD conference, Steven Sinofsky, President of the Microsoft Windows and Windows Live Divisions, introduced the world to the new paradigm for Windows 8 applications (Figure 2).
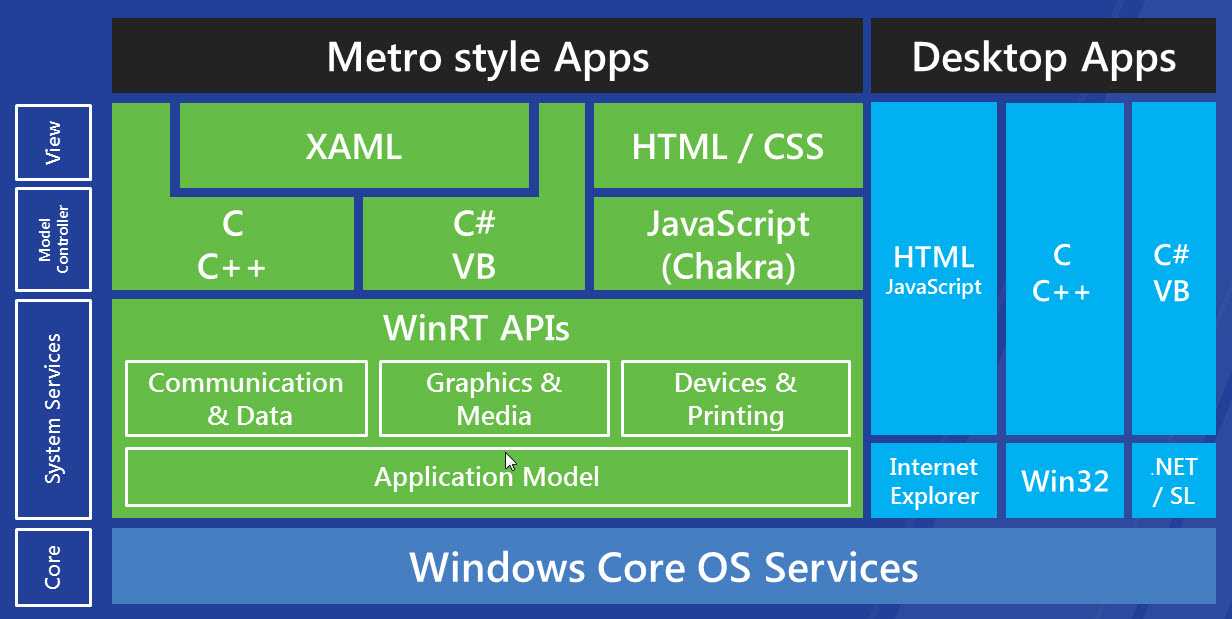
Windows 8 applications are either Metro style Apps (referenced in the green area of Figure 2) or they are Desktop Apps (referenced in the light blue area of Figure 2).
Metro Style Apps
Unlike other competitor platforms that dictate that you build apps with a specific language, Microsoft provides two distinct tracks for building Metro applications. If you have experience creating WPF and/or Silverlight applications than you can leverage those skills by building new, or converting existing applications to, Metro apps with XAML and your choice of language (C#, VB, C or C++). If you have experience creating traditional standards-based web applications than you can leverage those skills by building Metro applications with HTML/CSS3 and JavaScript. The UI technology you select will dictate which language you’ll use and vice-versa. Existing investments in either XAML-based or HTML/CSS-based design assets will not be lost since you can leverage either based on which option you choose. In the end, WPF and/or Silverlight developers, as well as HTML and JavaScript developers, will all find themselves right at home building Windows 8 Metro applications.
Initially I wondered if there is a tool provided that will convert HTML/CSS into XAML or XAML into HTML/CSS. There is not. I also wondered if I can mix and match UI design assets and languages, for example using HTML/CSS and C#. The answer is no. XAML works with the traditional .NET languages and HTML/CSS works with JavaScript.
Both XAML-based and HTML/CSS-based apps take advantage of a new unmanaged runtime engine called the Windows Runtime library or WinRT.
WinRT
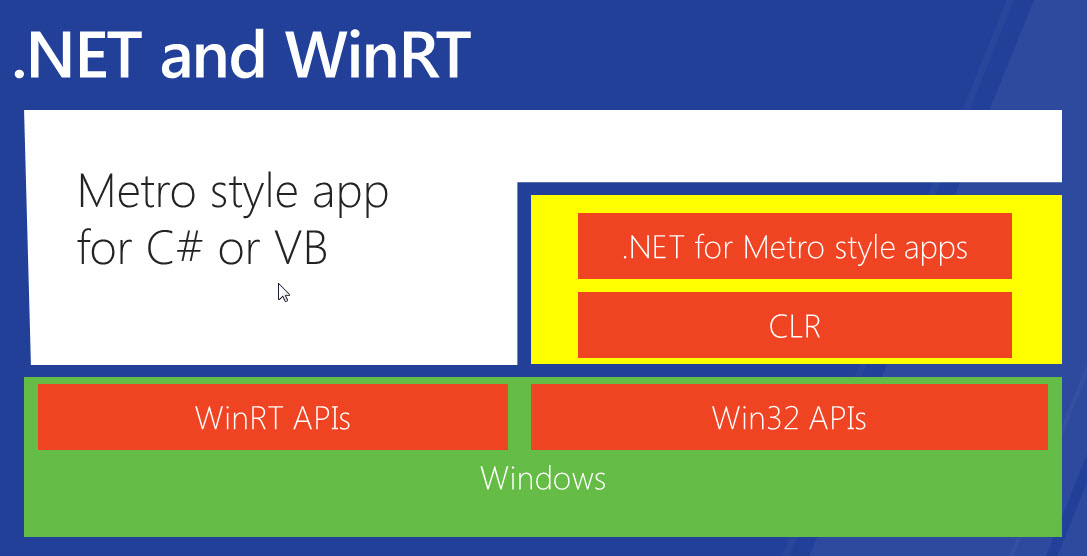
WinRT provides system services for Windows 8 Metro applications. WinRT has over 1,800 different objects providing services for you to use. These services include file system access, communications and networking access, device and printing access and so on. WinRT is not a layer on top of Windows; it is Windows (Figure 3). If you think this sounds like the .NET Framework you are right but WinRT does not replace .NET, it coexists with it much like the Win32 API coexists with the .NET Framework in Desktop Apps mode (more about Desktop Apps below). WinRT contains many of the same types of categories you have grown accustomed to in .NET but with a different API. I think you will find that working with WinRT feels very natural and intuitive.
I think you will find that working with WinRT feels very natural and intuitive.
Metro style Apps and Desktop Apps both use the new .NET Framework 4.5 though each uses it a little differently. Metro apps use the .NET for Metro Style profile and Desktop Apps use the .NET Client profile. Each are simply profiles within the .NET Framework and not separate versions. The Metro Style profile is a subset of the Desktop Client profile because Metro style Apps run within an app container that restricts what an application can do in order to protect the user’s machine from malicious apps. Regardless of whether the app is a Metro App or a Desktop App, if it’s a C# or Visual Basic app it compiles to the same MSIL. Both C# and Visual Basic can call directly into WinRT for system resources not available in .NET, accessing the sensor inputs for example. C, C++ and JavaScript Metro style Apps only access WinRT. Think of using WinRT like you used to call the Win32 API to access the operating system services, but instead of having to use something difficult like P/Invoke() or COM, you’re doing it in a much more familiar way. The functionality of the following code isn’t important for the moment, but notice the using statements and the reference to FileOpenPicker. Windows.Storage and Windows.Storage.Pickers are WinRT references and FileOpenPicker is a new WinRT class for selecting files.
using Windows.Storage;
using Windows.Storage.Pickers;
var picker = new FileOpenPicker();
picker.FileTypeFilter.Add("*");
var files = await picker.PickMultipleFilesAsync();
foreach (StorageFile file in files)
{
   listBoxFiles.Items.Add(file.FileName);
}
I think you will find working with WinRT is much more natural than the WIN32 API but the objective is the same: accessing system services.
Some functionality has been moved from .NET directly into WinRT. This means that your code referencing those migrated .NET features will not compile and will require minor modifications to reference the correct WinRT objects.
The classes available to your Metro app via the .NET for Metro Style profile are restricted based on what is considered safe for a Metro app to use within the app container. This is exactly how things work with Silverlight and Windows Phone 7 apps. Silverlight features that aren’t safe or don’t make sense for the phone environment are restricted.
Using HTML and JavaScript
Metro apps are not cross-platform. They are native applications designed to run on Windows 8 exclusively. This is an important distinction that developers who are using HTML/CSS/JavaScript need to keep in mind. Just because you are developing with HTML, CSS and JavaScript that does not mean you are creating a cross-platform web application.
Metro apps are not cross-platform. They are native applications designed to run on Windows 8 exclusively. Developing with HTML, CSS and JavaScript does not mean you are creating cross-platform web applications.
Desktop Apps
All this Metro talk means that .NET and its related technologies like WPF, Silverlight, and WinForms are all dead technologies, right? Wrong. Referring to the light blue blocks on Figure 2, all your existing .NET and Win32 applications will continue to run just fine in Windows 8 as Desktop Apps. Microsoft understands that not all applications are suited to be Metro apps. Take Visual Studio for example. It is firmly entrenched in the Desktop Apps world and it isn’t going anywhere soon. Does this mean that you can continue to build new applications and maintain existing applications with WPF, Silverlight and WinForms? Yes. The good news is that your .NET skills and design assets are protected in the new world of Metro apps and that should you or your organization not make the move to Metro application development right away, you will be just fine in the Desktop Apps environment.
All this Metro talk means that .NET and its related technologies like WPF, Silverlight, WinForms are all dead technologies, right? Wrong.
What Happens to .NET Moving Forward?
The answer to that question is “nothing and everything.” Nothing in that nothing in .NET is going away or being discontinued and everything in that everything in .NET will continue as it is and will continue to be enhanced in the future. If you need proof, look no further than the enhancements made to .NET 4.5 including the new async programming features, performance improvements, Entity Framework improvements, and so on.
Building Metro style applications is an option. It isn’t the exclusive way to build applications for Windows 8 but it is the option of choice for building touch-enabled applications. The traditional approach using WinForms, WPF, Silverlight, etc., are all perfectly good choices for developing Windows 8 Desktop Apps.
HTML, CSS & JavaScript Metro Apps
Before we jump into creating a Metro application, let’s cover a few topics relative to developing Metro apps in HTML and JavaScript. Microsoft’s goal is to empower you to build great Metro style apps using HTML, CSS, and JavaScript quickly and easily.
All of the HTML, CSS and JavaScript features you expect when building web applications are available when building a Metro app. In addition, you also have access to all of the objects in WinRT. When creating a Metro style app, you will be building a standards-based web application that runs within the Metro version of Internet Explorer 10. The Metro version of Internet Explorer 10 does not support plugins (Flash, Silverlight, etc.) but the desktop version of Internet Explorer 10 does.
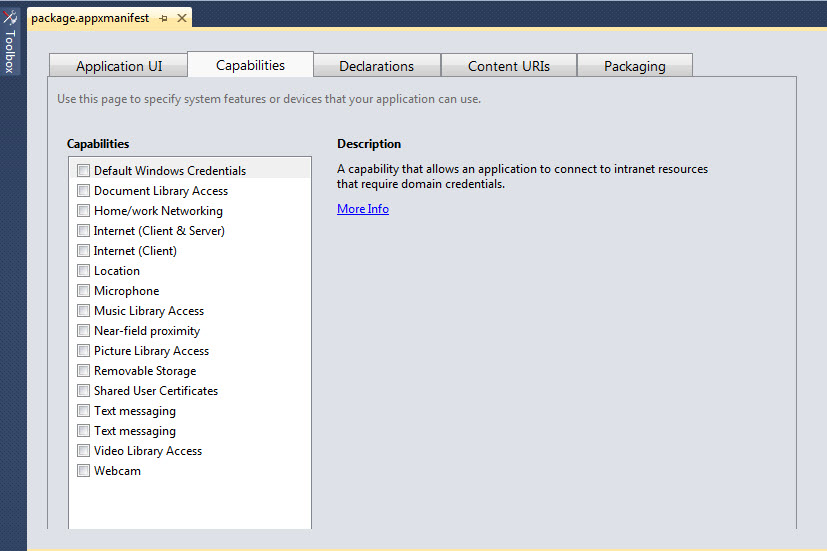
As I mentioned earlier, Metro apps run within an app container that limits what an app can do to protect the user from malicious apps. If your app requires access to specific system resources, you can select to provide access to specific system resources through the Capabilities tab on the package.appxmanifest dialog. I will address the package.appxmanifest dialog later in the article.
What Is WinJS?
As a JavaScript developer you’re likely very accustomed to working with JavaScript libraries, jQuery for example. It’s time to add another JavaScript library to your toolkit, WinJS. WinJS is a Microsoft library for building Metro style apps with JavaScript. It provides the Metro style design, support for touch as well as keyboard/mouse user interaction, common UI controls and scales across different screen sizes and form factors. You will find the WinJS library files in the winjs folder in your project.
Process Lifecycle and Session State
A Metro app exists in one of three states: not running, running and suspended. Fortunately, Windows handles the transitions from state to state for us, but we as developers are responsible for managing any information that the user is expecting to be saved between states. When a running app is suspended because another app has been switched to (or launched), the running app receives a suspend notification from the operating system. At this point that we can handle saving any data during the transition. A Metro app offers three ways to store session state information. You will use the first way to save session information, using sessionState, to store temporary data or option selections that the user expects to be maintained when they switch back to the suspended app. For example, suppose a user is filling out a data entry form and switches to another app for a moment or two and then they switch back. They will expect their values to remain in the form.
WinJS.Application.sessionState.firstName =
document.getElementById("firstName").value;
When an app resumes from a suspended state, you can use the data from sessionState to reload your app with data.
document.getElementById("firstName").value =
WinJS.Application.sessionState.firstName;
You will use the second way to save session state information, using Windows.Storage.ApplicationData, for saving application-specific data like configuration settings.
The third way involves saving the information the user has entered into the app. In the text editing app example, this would involve saving the actual text the user typed to a permanent data store such as a relational database or XML file. How you perform this is up to you as the developer.
Application Activation Process
Knowing the app launch event firing order is critical to getting your app prepared to interact with your users.
Referring to Figure 4, the DOMContentLoaded event fires while the splash screen is being loaded and provides the first opportunity to run any code. Here you will load your app data, setup your event handlers and initialize your controls and other UI elements. While the splash screen remains on the screen, the Activated event fires and provides you an opportunity to load any saved state data and accept any parameters being passed in.
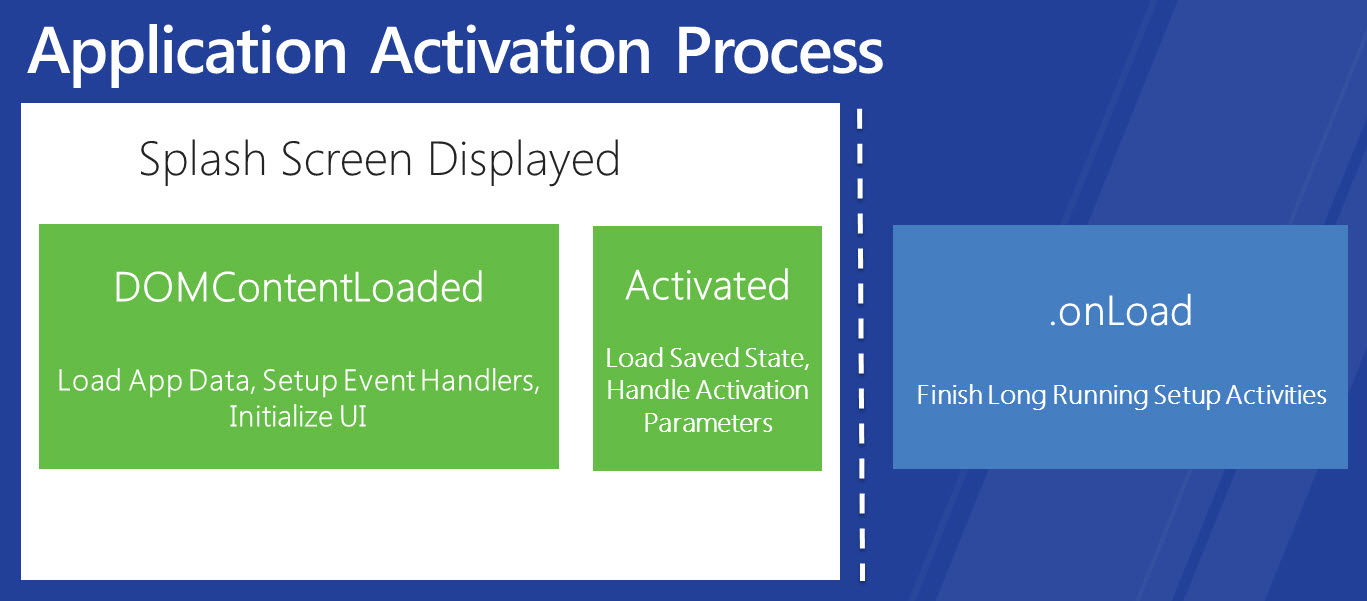
At this point, the splash screen disappears from view and the onLoad event fires. Here you will finish up your activation work by running any final long running setup routines.
At this point I have given you enough information to begin your first Metro style app so let’s get started!
Let’s Get Started
As is always the case with learning new software technologies, you’re going to need to install some beta (or pre-beta) software to get started. Of course the usual “don’t install beta software on your production machine” caveat applies. The two items you’re going to need to download and install are the Windows 8 Developer Preview and Visual Studio 2011 Developer Preview, both of which were released at the BUILD conference.
Software You Are Going to Need
Running Metro apps requires you to have the Windows Developer Preview installed on the target machine. You can download it here: http://msdn.microsoft.com/en-us/windows/apps/br229516.
If you would like to install it in a dual boot configuration, Scott Hanselman authored a most excellent blog post (http://bit.ly/pU6HxM) detailing how to install the Windows 8 Developer Preview to a .vhd file. The target machine can be the same machine you develop on but it doesn’t have to be. The model I expect most developers will follow is to continue to code and do initial testing on desktops/laptops and deploy to a touch-enabled device for further user experience testing.
Writing Metro apps requires the new Visual Studio 2011 Developer Preview. You can download it here: http://www.microsoft.com/download/en/details.aspx?displaylang=en&;id=27543.
New Project Templates
Now that you have the Visual Studio 2011 Developer Preview installed and running, you’re ready to begin creating your first Metro app. There are a number of new templates provided for building Metro apps (Figure 5). The Grid Application and Split Application templates are very recognizable patterns.
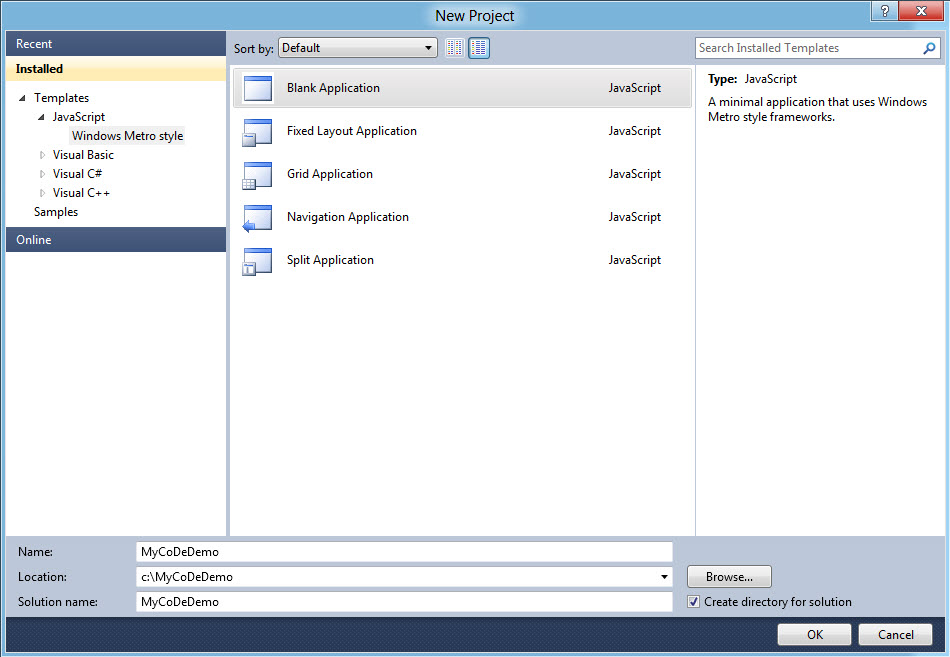
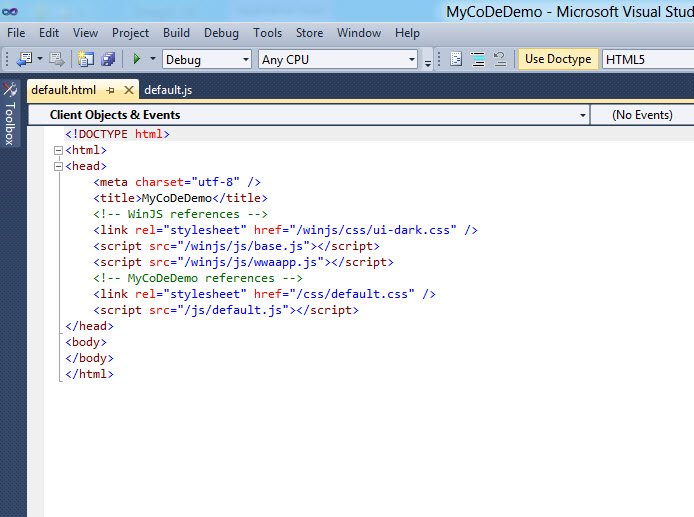
I’m going to keep things simple and select Blank Application and call my app MyCoDeDemo. By default, your new project will have default.html and default.js files (Figure 6).
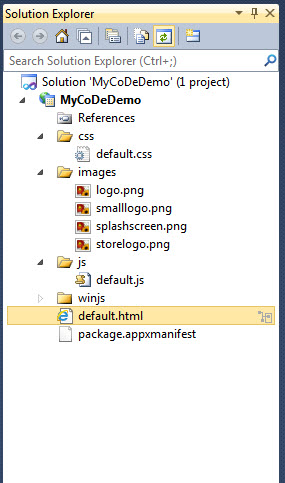
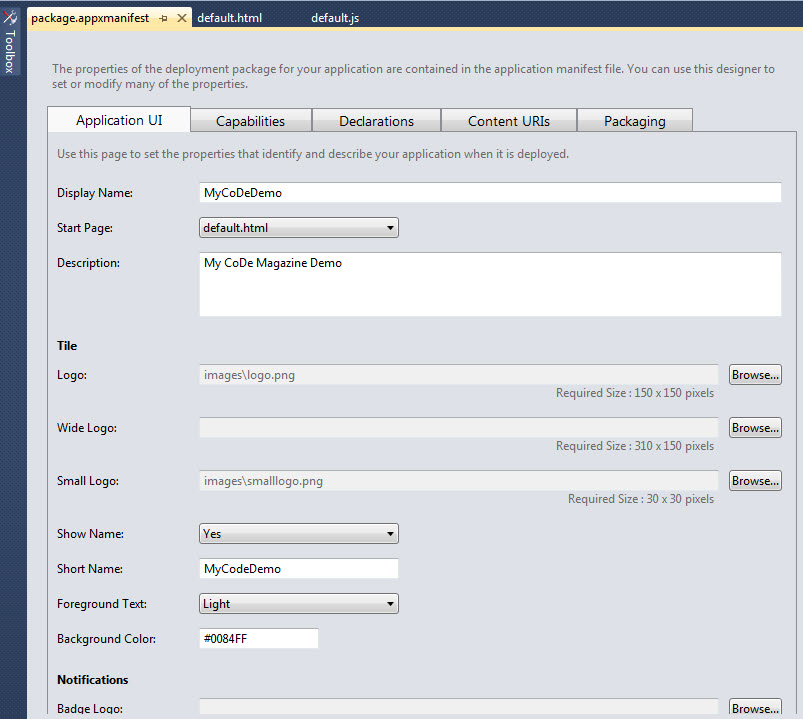
A number of other files and folders are created when you create a new project. The css folder contains the css file(s) for the app, called default.css in my sample app. The images folder contains the image file(s) for the app. It’s important to make sure you add any image files you’re going to use to the project so that when the app is packaged up for distribution, those images are included. The js folder contains the initial JavaScript file(s) used by the project, default.js in my example. The default.html file contains the initial HTML code generated for the app. The final file in my sample project is package.appxmanifest. It contains all of the descriptive and project metadata (Figure 7). Information on the Application UI tab contains the app name, start page, logos to be displayed on the Metro launch page, name of the splash page graphic and other information related to the app (Figure 8). The capabilities tab (Figure 9) contains a list of system resources available to your app. Since your app runs within the confines of the app container, you need to explicitly specify which system resources your app is going to use. For example, if you are building an app that has video chat capabilities, you must check the webcam and microphone options.
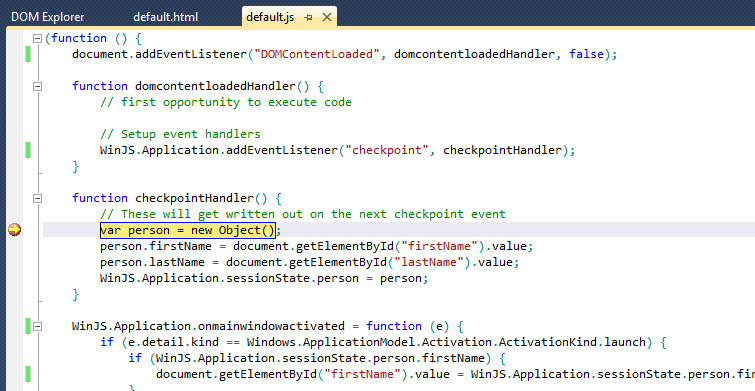
I’ve revised the default.html page to add a couple of textbox controls to begin working with (Listing 1). The default.js file contains the JavaScript code for the app. The first line adds an event handler for the DOMContentLoaded event. In the domcontentloadedHandler function, I add an event listener for the checkpoint event. The checkpoint event fires periodically throughout the life of your app including for a suspend event. It is an ideal place to add code to save your app’s sessions state. I am writing the values from the textboxes into the WinJS.Applocation.sessionState.
The onmainwindowactivated function determines how the app was called. The code checks the ActivationKind value and if it equals launch then I repopulate the textboxes with their current values.
Debugging Options
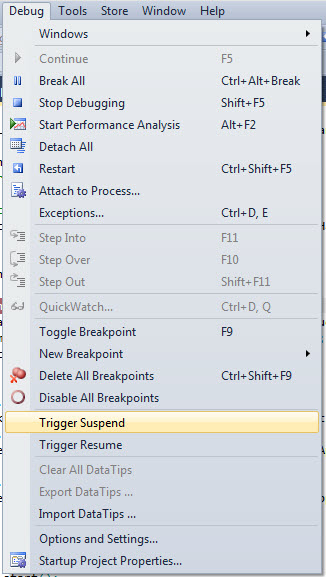
When the user switches between applications, a suspend message is sent to the previously active app. This causes a checkpoint event to fire and the checkpointHandler function is prepared to handle the checkpoint event. While you are debugging your app things work a little differently because you don’t really want your app to suspend while you’re testing. You can force a Suspend event to fire by selecting Trigger Suspend from the Debug menu (Figure 10). This sends a suspend message to the running sample app and a breakpoint causes the code to stop executing so we can step through the code (Figure 11).
Ship It!
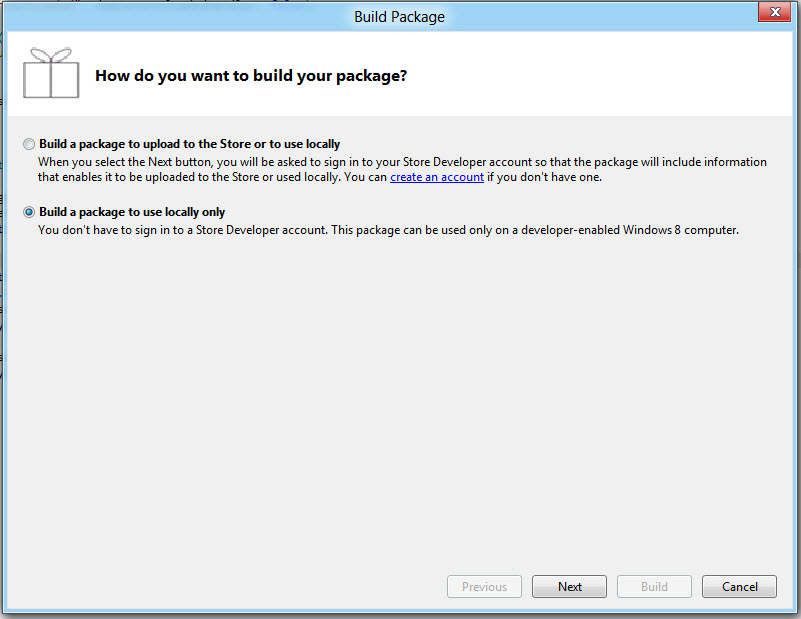
When your app is ready for prime time it’s time to package it up and ship it. Fortunately, Visual Studio makes this process quick and simple. Selecting Store | Create App Package launches the Build Package dialog (Figure 12). Creating a package involves taking all of your development assets (HTML files, css files, .js files, images, etc.) and compressing them into a single install file that can be downloaded from the Microsoft App Store by your customers.
Plenty of SDK Samples to Learn From
Now that you’ve had some exposure to building Metro apps, it’s time to head over to the Metro App samples page (http://bit.ly/rouj6V) and let the downloading commence to push your knowledge even farther.
Summary
With Windows 8, I think Microsoft has demonstrated a compelling response to its competitors in the tablet market. Additionally, Metro app support aside, Windows 8 has an impressive list of new features that will make it an attractive desktop operating system upgrade for both IT managers and users alike. Microsoft has also prioritized compatibility with prior versions to ensure existing applications continue to run without revision.
Metro apps introduce a new and easy-to-use touch-based interface which leverages the skillsets of the extensive ecosystem of Microsoft-centric developers. No matter what route you choose, be it developing Metro style applications or sticking with Desktop applications (WPF, Silverlight, WinForms, etc.), developing for the Windows platform remains very attractive and with the introduction of the new Windows App store - a potentially lucrative place to be.