Automate high-friction, unpredictable tasks in your environment to regain sanity and achieve a rapid, sustainable pace.
Every environment has them: The dreaded manual tasks that drain productivity from the team and adds instability to the processes. We usually only dedicate half our brain power and never enough time to deal with them, which only compounds the problem. What if you could easily automate out the most painful tasks and gain a huge boost in productivity and speed of delivery?
Anyone who has worked on a large project, especially one with multiple developers, knows the pain of dealing with code change conflicts, “works on my machine!” syndrome, “magic” builds, and other process and procedure anti-patterns. Developers hate having to deal with these things, nonetheless we always get stuck having to do them. In this article, I’ll walk you through, step-by-step, how you can make some simple changes to your environment to eliminate the non-code related headaches. By producing reliable, quality builds every time and easing the pain of deployment to multiple environments you’ll be able to get back to doing what you really love: Coding!
Keep Your Tools Sharp
Everyone raise your hand if you love preparing a release build for production development or release-to-customer? If you didn’t raise your hand, you’re like most people involved in software projects. Sure, you know that there are many new and old tools that help you automate these things, but it takes time to get up to speed on them and use them correctly. It’s an old problem. Stephen Covey’s book The Seven Habits of Highly Effective People uses a really great tree-chopping analogy for this concept: “I don’t have time to sharpen the saw, I’m busy sawing!” If you don’t take the time to sharpen your saw, eventually the growing inefficiency of dull tools and over-work will choke your productivity. Time invested in keeping your tools sharp can pay back handsomely.
Remove Friction and Surprises
Repeatability is a virtue. That is, something you strive for and a goal to be achieved. Identify friction/pain points and try to automate them as soon as possible. One fact I have observed in my projects is that automating a frequently-repeated task is always worth it. Whatever time it takes to automate it is usually recaptured after the 3rd or 4th time the task is repeated. So the ROI is extremely quick. The key to automating these tasks, however, is to have the right tools and know how to use them.
In summary, you should strive to eliminate all “magic” in your software process. If you can do it on one developer’s box, you should be able to do it on any developer’s box. You should be able to eliminate all surprises as quickly as possible. You should automate all manual tasks in the critical path in order to mitigate risk to the maximum extent possible.
Key Aspects of Repeatability
I’ll cover five key aspects of a repeatable environment in this article.
Previous issues of CoDe Magazine have covered many of these topics. Wherever possible, I’ll mention these articles so that you can look them up and go deeper on that particular subject.
Source Control
The code should have its primary home in a central, well-known location.
Eliminate the guess-work of who has the most recent source code files. This is especially crucial on a project involving multiple developers as the situation can quickly get out of hand. Eliminate the waste involved in having to manually “diff” files or look at last-modified dates to try to figure out which version of a given source code file is the correct one. Eventually you’ll move on to other projects and someone else will have to maintain this code. Will they be able to find it and feel confident that this is the latest code that matches what’s actually deployed? Source control helps address all these problems.
You can find several very good offerings on the market today for source control management including both free/open-source and commercial offerings. Several of the more common/popular ones include: Microsoft Visual SourceSafe, Visual Studio Team System Team Foundation Server, and Subversion (open source). I personally like Subversion, so I will use that in this example of how to get source control going.
A Quick Introduction to Subversion
Rick Strahl covered Subversion in more detail in his July/August 2008 CoDe Magazine article (Quick ID: 0807081). You should definitely check it out if you want to go deeper.
Subversion uses a different mode of operation from what you might be used to if you come from a Visual SourceSafe background. SourceSafe uses a library approach (i.e., “lock, edit, unlock”) mode. Subversion uses a collaborative approach (i.e., “copy, edit, merge”). You retrieve the latest working copy from the server and then just start working on your local copy. When ready, you commit your changes to the repository. Subversion will merge your changes with other people’s changes. If Subversion encounters any troubles, it will ask for your help. In my experience, this is somewhat rare, but when it does happen, there are powerful tools that some with the TortoiseSVN GUI client (more on that later) that help you easily deal with merge conflicts. Compared to the alternative of having to shout across the cube farm to tell Frank to unlock a file you need, I consider merge conflicts a small price to pay for all the other functionality in Subversion.
Setting Up a Subversion Server and Repository
The fastest way to get a Subversion repository up and running is to download the free VisualSVN Server product (http://www.visualsvn.com/server/) from the folks that also make the VisualSVN product (a commercial Visual Studio add-in for Subversion interaction).
Download and install VisualSVN Server on a server or other computer that will be available all the time. I don’t advise installing the Subversion repository on a developer workstation as it can hammer your disk performance when clients are performing operations, not to mention the problems created if you have to reboot or shut down. You should also set up backups of your SVN repository. This can be as simple as zipping up the repository folder and copying it to another computer or doing a proper backup according to your company’s IT backup policy.
Once set up, you may wish to add some users. I wouldn’t get too bogged down in configuring their access permissions at this point. That can come later when you’re more familiar with the system and your usage patterns.
Installing VisualSVN Server
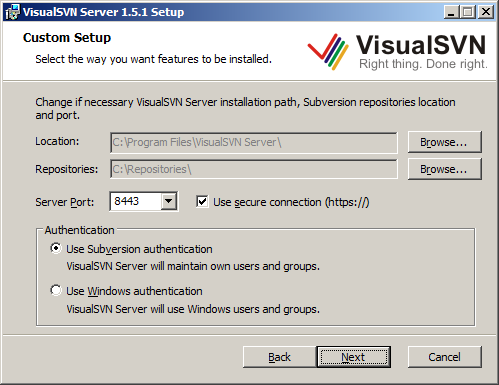
After downloading VisualSVN setup package (MSI), simply run the installer and accept the license agreement. Next you will be able to enter some important settings including the root path for your repositories, the HTTP/HTTPS port number, and which type of authentication you wish to use (see Figure 1).
-
Location: This is the location to which the VisualSVN server itself will be installed. I recommend leaving this as the default. -
Repositories: This is the folder into which all your repositories will go (you can have many). I recommend putting this on a separate drive if you have one depending on your performance needs and number of developers using the server. -
Server Port and SSL: Change this if you need to avoid port number conflicts. I recommend leaving this default and using a secure connection. VisualSVN will generate an SSL certificate for you to use internally so you don’t have to purchase a full SSL certificate for public use if you don’t need to. -
Authentication: VisualSVN Server and Subversion can maintain their own user database complete with hashed passwords. This is probably the easiest/simplest thing to do to get going quickly. If your organization requires Windows authentication or you prefer it, use that option instead.
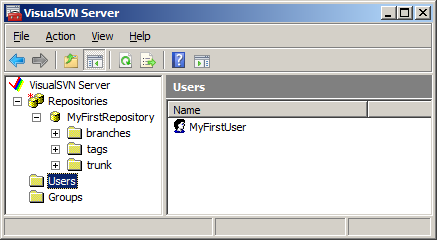
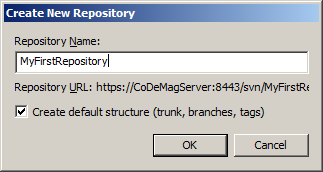
Once you’ve installed the server, open the VisualSVN server manager (Figure 2) to configure your repositories, user security, and other options (no config file munging required, unless you really want to). To create your first repository, right-click on the “Repositories” element in the tree view and choose the “Create New Repository” option. For the purposes of this article, I called mine “MyFirstRepository”. Note that as you type the repository name in the text box, the URL of your repository appears below (Figure 3). Before you click OK, you may want to jot this down or copy it to the clipboard for use in a little bit. Next, add users and groups as appropriate. For now, it may be easier to just create a single user that has access to your new repository. While you’re here, you may want to create a user called “TeamCityUser” for use later if you configure a Continuous Integration server. Beyond that, you can get fancier with user accounts later. For now, let’s proceed with the basic setup.
Now that you have a server set up as well as a new repository and associated URL, you can connect a client and start adding code!
Setting Up the Subversion Clients
On your developer workstations, I recommend installing the TortoiseSVN Subversion client for Windows (http://tortoisesvn.net/). It integrates with Windows Explorer and works really well. If you prefer a source control workflow integrated into your Visual Studio IDE, you can use the free, open source AnkhSVN (http://www.ankhsvn.com/) or the commercial VisualSVN (http://www.visualsvn.com).
To keep things simple for the purpose of this article, I’ll use TortoiseSVN as the client, but I strongly recommend you check out Ankh and VisualSVN when you get a chance.
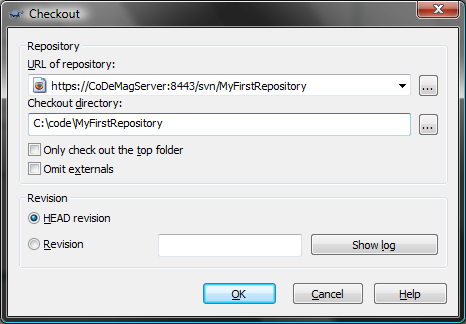
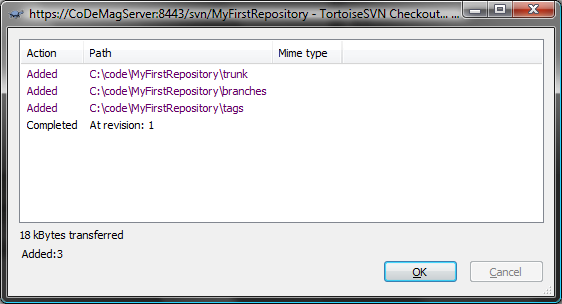
First, on your developer workstation, download and install TortoiseSVN from the link above. Next, decide where on your file system you want the code to reside. Let’s say you chose c:\Code. In Windows Explorer, create a sub-folder called “MyFirstRepository” (it can be anything, but usually you should call the folder the same thing as the repository). Then right-click on this new folder and you should now see new TortoiseSVN context menu options. Choose “SVN Checkout”. Next you will be prompted to enter the repository URL and a few other options. This is where the repository URL of the repository you just created will be necessary. See Figure 4 for an example.
Once you have filled in these options and clicked OK, and since this is the first time you’ve connected to this repository, TortoiseSVN will ask you whether you trust the SSL certificate for this server. I recommend you choose “Accept Permanently.” Next, you will be asked to enter your username and password. Use the credentials of the user you created above. You have an option to remember these credentials so you won’t have to be prompted for them every time. I recommend doing this as having to type in your login and password every time you touch the repository can be very annoying.
At this point, Tortoise has everything it needs to connect to the repository and perform a check out. You should see a screen similar to Figure 5. You’ve now set up the repository file system. You can now add, update, and delete code and other artifacts of your project.
Setting up a Global Ignore Pattern
One last thing you might want to do, before you start seriously using TortoiseSVN, is to set up your “ignore” list. By default, SVN allows you to put whatever files you want in the repository. There are several types of files that you probably don’t want in your repository at all. These include things like compiled output of your project (i.e., the \bin\Debug folder), the .SUO and .USER files that Visual Studio creates for your user-specific Solution and Project settings (stuff that is specific to your environment and aren’t appropriate for the entire team to share), and other machine-specific or transient type files.
I recommend right-clicking on any folder and navigating to the TortoiseSVN menu, then choosing “Settings”. In the dialog box that pops up, in the “Subversion” group, you should see a textbox with a label “Global ignore pattern”. Here is where you should put your ignore pattern(s). The snippet below shows the one I use which should help get you started. Feel free to customize it for your environment.
Bin */Bin bin */bin obj */obj *.suo *.csproj.user
*.log *.log.* *.rdl.data *.rptproj.user
_ReSharper* *.resharper.user build */build
This will filter out all your bin\Debug, bin\Release, obj folders, temporary log files, user settings, ReSharper (if you use ReSharper) cache folder, and any “build” products you may have. These are generally not things you would want in your repository and should be ignored.
Workflow of a Subversion User: The Check-in Dance
Now that you have the repository up and running and you have a local folder, let me show you how to add some code. Let’s assume you already have an existing project. Create a folder under the “trunk” folder called “source” and add your existing code folder(s) under there. Right-click on the “source” folder and click “Add” to add all your existing files, then right-click on “source” and choose Commit. Type in a message then click OK. Now your first committal of code is on its way into the repository. When other developers connect their clients, they will get this code when they do an “SVN Checkout” on their computers. Congratulations! Now your code is in a repository. This is a first, major step towards adding repeatability to your process.
A typical day in the life of a Subversion user usually goes something like this (colloquially known as the “Check-in Dance”):
-
Start work, perform an “Update”: Right-click on your “trunk” folder in Windows Explorer and choose “SVN Update.” TortoiseSVN will now retrieve any updates that other developers have committed since you last updated. -
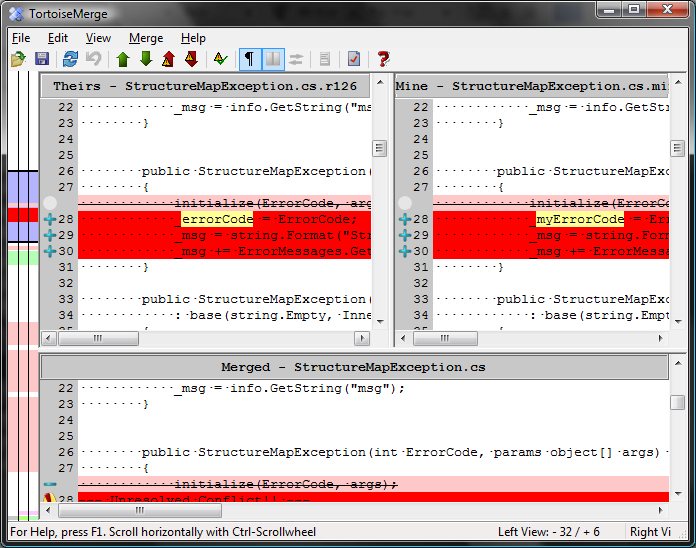
Resolve any conflicts and review any interesting changes: In the TortoiseSVN update status window, you will see the list of files that changed and their disposition (updated, merged, conflict, added, deleted, etc). If, for some reason, Subversion cannot merge one or more changes from other users into your code tree, you will have an opportunity to resolve the conflict. If you know their version is correct, you can right-click on the conflicted file and choose “Resolve conflict using theirs.” If you know your version is correct, you can choose “Resolve conflict using mine.” However, if there is no clear answer, you can select “Edit Conflicts” to use the TortoiseMerge tool to perform a manual merge. This is usually not a pleasant task, but the tools in Tortoise make them relatively simple. Of course, you can always manually merge the file in your favorite text editor/IDE, but the visual cues in TortoiseMerge can be compelling for most circumstances (Figure 6). These situations can sometimes occur if you make changes locally to the code during a refactoring, but haven’t yet committed the change and another user made some similar changes.
In addition to managing conflicts, you can also right-click on files that changed and see the differences in Tortoise’s visual diff viewer application.
-
Start making changes: Once changes are integrated into your local copy, you can start coding like normal. That is, you should code as though there was no source control in place. Add, remove, and change files as necessary without having to worry about locking or unlocking files, etc. -
Do another update to make sure you are integrating with the latest code: Once you are finished with your code changes and are ready to commit them to the source control repository, you should do one more update just in case there are any late-breaking changes that you should be aware of that might cause an integration issue with other developers. Subversion will notify you that other people have committed to the repository since the last time you updated and in most cases will not allow you to commit until you’ve done another update. Once updated and once you’ve resolved any conflicts, you should consider running any test suites or verification programs you may have set up in your process. -
Commit your changes: Finally, when you’re ready to commit your changes, right-click on your trunk folder in Windows Explorer (or you can use the IDE-integrated experience if you’re using the VisualSVN or AnkhSVN Visual Studio plug-ins) and choose “SVN Commit”. Take a minute at this point to look at the list of files that Subversion thinks should be committed. Make sure that any files that need to be added are marked as “added” and will be uploaded to the repository. Next, type in a descriptive message that describes what’s in this update you’re sending and maybe why the changes were being made. Trust me, these comments help you when you have to come back two months later and look at logs to figure out why you made a particular change to this file. When you’re ready to commit, click OK to start the commit upload process. -
Resume work: If you’re not yet done for the day, at this point you can resume working on your code and start the process over again.
This may seem like a lot of extra work but it’s not as hard as it sounds and only very rarely has it ever been more than a minor annoyance for me. I have found that it’s far less painful and annoying than fighting for locks to a file or dealing with the “Jim went on vacation and left half the source tree locked… AGAIN” sort of problems you have with lock/edit/unlock style source control systems.
The Check-in Dance helps maintain a higher level of integration among developers and also encourages a sort of source hygiene that discourages people from committing bad (i.e., build-breaking) changes that can slow down your team at the worst times.
Automated Build
The code should have an associated automated build script that requires no magic by the person running the script.
Here’s a common scenario: A new developer joins your team and she has her workstation all set up. She checks out the latest source from your source control repository and attempts to build and nothing works. She’s missing this component, doesn’t have this environment variable set up, etc, etc, etc. Maybe you’ve heard this one, too: You set up a test server to help build, test, and preview your software release packages and nothing seems to work because the server doesn’t have Visual Studio on it, or some SDK installed, or some DLL in the GAC.
Automating your build process helps remove a lot of the guesswork of building your project. You can include simple dependency checks to make sure that the system has the prerequisites for building your software installed, which will allow you to give the human a better indication as to why things are failing (i.e., “Please install the .NET Framework 3.5 SDK”).
Automated builds also serve the purpose of documenting how to build, assemble, and package your project for release. Should you win the lottery and quit tomorrow, the next person to take over after you will be able to get going rather quickly without a lot of guessing as to what’s required to run your software.
Ok, ok, enough with the sales pitch, let’s get to the meat. One particular tool I happen to like for doing automated builds is the NAnt build tool. NAnt uses a simple to read and understand XML build file format that harkens back to the MAKE days, but doesn’t have all those pesky whitespace problems. A typical NAnt build file has several “targets” that do common things like building/compiling a Visual Studio solution, running tests, generating documentation, packaging up the results and putting them in a well-known location for people to grab and use.
Getting Started with NAnt
David C. Bost wrote an article (Quick ID: 0507081) on NAnt for the July/August 2005 issue of CoDe Magazine that goes into more detail. If you get serious about NAnt, you should definitely read his article.
First, download the latest version of NAnt from its home at SourceForge: http://nant.sf.net. At the time of writing, the current release is 0.86 Beta 1. Don’t be afraid by the version numbering scheme. They’ve been at pre-version 1 since before Windows XP was released. NAnt has been one of the most reliable pieces of software I’ve ever used.
I recommend getting the bin ZIP package and grabbing the contents of the “bin” and “schema” folders. The docs and examples are there for your convenience, but these are also online and probably more up-to-date than what is in the ZIP file. Create a folder underneath your trunk/ folder in your source code tree called something like “tools” or “support.” Create a folder underneath there called NAnt and extract the “bin” folder from the NAnt ZIP package there.
The reason for keeping the NAnt binaries along with your source trunk is that you may, at a later date, add custom tasks to NAnt or apply special configuration changes that are appropriate to build your project. These changes usually end up being tied to specific versions of the software and so it ends up being beneficial to keep your NAnt version plus modifications tied to your project versioning. It takes up a little extra space, but it is usually worth it in the end.
Remember the “schema” file I told you to grab from the NAnt ZIP package? The XSD file located inside that folder can be placed into your Visual Studio XML Schemas folder in order to get IntelliSense™ when editing NAnt build files in Visual Studio. This comes in very handy especially at the beginning of the project when you’re doing a lot of build file hacking.
For Visual Studio 2005 and 2008, copy the XSD file to C:\Program Files\Microsoft Visual Studio 8.0\Xml\Schemas or C:\Program Files\Microsoft Visual Studio 9.0\Xml\Schemas, respectively, where C: is your system root drive. Note that if you’re using a 64-bit version of Windows, you will probably have to use “Program Files (x86)” instead of “Program Files.”
Now you have an installed copy of NAnt with Visual Studio support. The next thing to do is to create your first NAnt build file.
Creating the NAnt Build File
Create a new empty XML file in your \trunk folder called build.xml. The naming of this file isn’t that important as you can tell NAnt what the file name is, but by default it’ll look like a file with the name “default.build” but it helps with Visual Studio editing if the file name ends with XML. This isn’t a strict requirement, but it gets things going quicker, so I recommend it.
The next thing I do, to make things easier to use, is to create a simple batch file called build.bat which will execute the NAnt executable with the build file and any optional parameters.
@ECHO OFF
.\tools\NAnt\nant.exe -nologo /f:build.xml %*
From a command-prompt whose current working directory is your \trunk folder, you can simply type “build” and it will execute NAnt with your build script. You can also pass in any optional arguments to your build script to allow you to run a “release” build versus a “debug” build, etc.
Right now the build.xml file is still empty, so you’ll add the first parts of the build file to get a simple, working build.
The most basic NAnt build script file has the XML declaration and the root <project> element. Consider the following snippet:
<?xml version="1.0" encoding="utf-8" ?>
<project
xmlns=
"<a href="http://nant.sf.net/release/0.86-beta1/nant.xsd";>http://nant.sf.net/release/0.86-beta1/nant.xsd<;/a>"
name="CoDe.Repeatability"
basedir="."
default="build">
</project>
You can see the “project” which is the root element of the NAnt build script. The name attribute is useful for documentation purposes. The basedir attribute “.” tells NAnt that all relative paths should be rooted from that base directory. In this simple case, the basedir should also just be the current working directory. The “default” attribute specifies which target will be executed if NAnt is not told specifically which task to run. A “target” is analogous to a “method” on a class in .NET in that they are small units of functionality expected to perform a specific task and yield specific results. The snippet above does not have any targets, so NAnt will raise an error if you try to execute this build script. The next thing you need to add is a target named “build.”
This example of a basic target simply prints out something to the console:
<target
   name="build"
   description="Rebuilds the entire solution">

   <echo message="Hello I'm a build!"/>
</target>
If you run the build.bat file from the command line, NAnt will execute and call the “build” target and the output should look something like:
Target framework: Microsoft .NET Framework 3.5
Target(s) specified: build


build:

     [echo] Hello I'm a build!

BUILD SUCCEEDED

Total time: 0 seconds.
You’ve verified that NAnt is wired up properly and the build script has no errors. Now you’ll compile the Visual Studio solution.
Creating the Build Target
Once you’ve got the basic structure set up, I suggest that you create some properties (variables) for the more interesting parts of your build. It’s a pain to go back and extract these out later, so it usually helps to get them going right off the bat and not look back. I recommend always starting out with the ones in the snippet below. Feel free to name them differently.
<property
   name="project.config"
   value="debug"/>
<property
   name="dir.src"
   value="source"/>
<property
   name="sln.file"
   value="${dir.src}\CoDe.Repeatability.sln"/>
You can now reference these properties anywhere a value is allowed using the ${} syntax. You can see an example of this in the value for the “sln.file” property.
Next, you need to set up the compiler for compiling the Visual Studio solution file. As it turns out, Visual Studio 2005 and 2008 project files are actually MSBuild scripts. MSBuild is Microsoft’s build tool which is similar to NAnt in many ways and different in others. Since the VBProj and CSProj files already contain all the information for actually compiling your solution, it is actually easier to let MSBuild handle all that for you. NAnt comes in handy for all the other stuff that doesn’t involve compiling. These include cleaning up build artifacts, running tests, packaging things into a deployment package, etc. While MSBuild can do these things, I have found that it is not as easy to work with and NAnt has a much more straightforward procedural approach to these types of tasks.
I recommend using NAnt for all non-build tasks and deferring to MSBuild for the actual compiling. This has an added extra benefit in that it keeps the build situation consistent between the IDE and the build script so that you don’t get into a situation where it builds in one but not the other. Also, all the behavior of the IDE when building things (i.e., post-build behavior, output files, embedded resources, etc.) is preserved and is one less thing you need to think about in your NAnt script.
In order to call MSBuild, you will need to let NAnt know where the msbuild.exe file is. To do this, there are some handy functions in NAnt to allow you to discover where the framework directories are. I recommend that you do not hard code your framework directory but let NAnt build it for you. This will help if you ever need to run the build on another computer whose framework directory may be on another drive or in another directory for some reason. To accomplish this, you’ll set up some properties similar to what you saw before but you’ll use some special NAnt syntax:
<property
   name="curFmwk"
   value="
${framework::get-runtime-framework()}"/>
<property
   name="curFmwkDir"
   value="
${framework::get-framework-directory(curFmwk)}"/>
<property
   name="msBuildExe"
   value="${curFmwkDir}/msbuild.exe"/>
Note the function-call like syntax. NAnt can do more than just store and retrieve properties/variables, it supports a rather complex expression syntax that allows you to perform Boolean operations, call NAnt functions, and much more. We’ll get to some of that a little later. For right now, we need to call MSBuild.
One more thing before I continue. MSBuild has a large number of command-line options and I’ve found that some of them you just always want. So I usually create another property which has the “standard” command-line options I pass to MSBuild. The snippet below shows a property definition for common MSBuild options (feel free to change these per your requirements):
<property
  name="msBuildArgs"
  dynamic="true"
  value="/nologo
         /v:m
      /p:Configuration=${project.config}
      ${sln.file}" />
You should note that this is a dynamic property (dynamic=true). Setting this property to “dynamic” means that NAnt will evaluate the value of this property just-in-time, as opposed to only once at startup time. If it weren’t dynamic, then changing the value of “project.config” would have no effect. Since msBuildArgs has already been evaluated, it will always be “debug.” However, since we’ve made it dynamic, the value will only be determined when it is requested, so whatever project.config happens to be at that moment will be factored into the value of msBuildArgs. In this way, you can keep changing project.config and the value msBuildArgs, when you reference it, will reflect those changes.
Finally, update the build target to call MSBuild on your Visual Studio solution file:
<target
   name="build"
   description="Rebuilds the entire solution">

   <exec
     program="${msBuildExe}"
     commandline="/t:Rebuild ${msBuildArgs}"/>
</target>
Assuming your Visual Studio solution is in a compiling state, when you re-run build.bat, you should see something similar to this output:
Target framework: Microsoft .NET Framework 3.5
Target(s) specified: build


build:

     [exec] CopyFilesToOutputDirectory:
     [exec]   CoDe.Repeatability.Core ->
trunk\source\CoDe.Repeatability.Core\bin
\Debug\CoDe.Repeatability.Core.dll

BUILD SUCCEEDED

Total time: 0.6 seconds.
A Few Other Targets to Consider
In the previous section, you created the msBuildArgs dynamic property. This property will allow you to specify a different value for project.config and give you the ability to perform a “Release” configuration build with our Visual Studio solution. First, add a new target that changes the value of project.config to release:
<target name="releaseBuild">
   <property
      name="project.config"
      value="release"/>
</target>
Then, from the command line, execute:
build releaseBuild build
This will instruct NAnt to run the releaseBuild target followed by the build target. Notice that the output has changed slightly and is now compiling to the Release folder:
Target framework: Microsoft .NET Framework 3.5
Target(s) specified: releaseBuild build


releaseBuild:


build:

     [exec] CopyFilesToOutputDirectory:
     [exec]   CoDe.Repeatability.Core ->
trunk\source\CoDe.Repeatability.Core\bin
\Release\CoDe.Repeatability.Core.dll

BUILD SUCCEEDED

Total time: 0.6 seconds.
The basic build script is now ready to go. Listing 1 shows the entire build script as it stands right now. Also, if you’ve been following along and you have a Subversion repository already set up, this would be an ideal time to commit these changes to the repository.
Automated Testing
The code should have at least a basic success indication check test and it should be able to run in an automated fashion.
If you’re not already writing automatic unit tests for your code (using a tool like NUnit, MbUnit, or XUnit.NET), I strongly encourage you to do so. A lot of advancement in the art of unit testing in the past few years and a few patterns and practices have evolved that have a huge impact on the way I code and the quality of the software I produce. One particular practice I’ve adopted is known as “Test-Driven Development” (TDD) and its more recently refined incarnation known as “Behavior-Driven Development” (BDD). There are also other patterns such as “Test-First Development” (which is subtly different than TDD), “Test-After Development” and many more. I strongly suggest you investigate these patterns and practices (especially TDD and BDD) and I hope you find them to have as profound an impact on how you develop code as they have had for me.
Even if you decide not to pursue the automated unit testing path, you should still have at least one form of automatic test (integration test, smoke test, acceptance test) that confirms the automated build procedure you put in place from the last section not only successfully compiled the code but that the code can be verified as able to “run” where “run” is a subjective definition that varies according to your environment and requirements. For example, I consider an ASP.NET Web application verification test successful if I can compile the code and poke the “login screen” (or some landing page that triggers the startup procedures of the Web application to execute) without causing something like the ASP.NET “Yellow Screen of Death.” Even better, you might have some test that causes a login to occur and bring up the user’s home page that may involve a database round trip of some kind. This would be a good smoke test to know that the application works and that it’s able to connect to and retrieve data from the database.
Giffin Caprio wrote about unit testing in general in his November/December 2004 article (Quick ID: 0411031) for CoDe Magazine. For more information on different styles and approaches to testing, you should definitely read this one.
Installing NUnit
To get started with unit testing, I recommend you grab a unit testing framework. I recommend NUnit (though MBUnit and XUnit.NET are very good too, and have some advantages and disadvantages over NUnit and are definitely worth investigating). At the time of this writing, NUnit 2.4.8 is the current stable release version. You can download it from http://www.nunit.org/. You’ll find several flavors including an MSI (installer) and a ZIP file. I usually recommend using the ZIP file (NUnit-2.4.8-net-2.0.zip) with the binaries in it because I tend to update NUnit as soon as the next version comes out and it gets tedious uninstalling and installing MSIs all the time. Also, by having the binaries in your “tools” folder, it’s easier to maintain version compatibility among different projects.
Once you’ve downloaded the ZIP file, extract the contents of the “bin” folder to trunk\tools\NUnit. NUnit is now installed and ready to be used.
For more information on NUnit, Dan Jurden wrote an article (Quick ID: 0411051) for the November/December 2004 issue of CoDe Magazine that’s worth reading.
Adding the Test Project
It is generally a good idea to put your unit tests into a separate project. There is currently some debate among the developer community about whether unit tests should go into a separate project or not. For now, since you’re getting started, I recommend keeping them in a separate project. If you find a need to put them together later, you can move the tests into your core project(s).
Add a new class library project to your Visual Studio Solution and call it something recognizable (such as YourSolution.SomeProject.Tests) so that it appears underneath the YourSolution.SomeProject in Visual Studio’s solution explorer. Next, add a reference from your Tests project to the project that will be tested (i.e., YourSolution.SomeProject). Also, you’ll want to add a reference to the nunit.framework.dll file in your trunk\tools\NUnit folder.
Adding the First Unit Test
To keep things simple, let’s say that what you want to test is a class called SimpleCalculator. Create a new class in your testing project called SimpleCalculatorTester. Add a using directive for the NUnit.Framework namespace and then decorate the class with the [TestFixture] attribute. Add a new public, void method and decorate it with the [Test] attribute. I’ll call the first test “should_add_two_numbers_and_get_expected_result”. Your first test class should now look something like Listing 2.
You may have noticed the peculiar name of the test. I recommend that you make the tests very descriptive about what they’re doing and what they hope to accomplish. Try to avoid specific numbers or values in the test name but that’s not a hard and fast rule. Sometimes it makes sense. Tests can serve as a form of documentation and real-world requirements about your system (whatever the actual software requirement documentation may say). They can help to bring a new developer up to speed with the assumptions made about how the system should work and can help prevent all developers from breaking previous assumptions accidentally.
Next, add some actual test code to the test to flex the code and assert your assumptions. Try to keep the tests very small and focused. Ideally, you only want to test one thing per test. Try to avoid “epic” tests that test the database, a Web service, the file system, and seventeen different assumptions all in one test. These tests will be brittle and cause a lot of heartache down the road as the code evolves.
To keep things simple, I have an “Add” method on my SimpleCalculator class that takes two operands and adds them together-I know, I know, this isn’t very practical but please bear with my simple illustrations.
[Test]
public void should_add_2_and_2_and_get_4()
{
   var calc = new SimpleCalculator();

   Assert.That(
      calc.Add(2, 2) == 4,
      "2 plus 2 should equal 4");
}
Running the Unit Tests
You can execute these unit tests in a couple of ways. NUnit comes with both a GUI/Windows runner as well as a command-line runner. Both are quite capable and useful but I find that having to leave Visual Studio to run my tests adds friction to my development/test cycle. I have found two utilities that make this problem go away: 1.) TestDriven.NET (http://www.testdriven.net) and 2.) ReSharper’s UnitRunner (http://www.jetbrains.com). Both are commercial software but are well worth their money. If you’re not stuck on running them in the IDE, the NUnit GUI is free and can listen for changes to assemblies so when you recompile your application it can automatically run your tests so you can keep up to date with test failures. The automatic change detection can be just as compelling a feature running the tests directly in the IDE. Regardless of which runner you choose to use for your development, you should also add the console test runner to your automated build process so that the build is not considered an entire success unless all the tests pass also.
Adding Unit Testing to the Build
Open the build.xml file again and add a new target called “test.” This target will be dependent upon the “build” target, so you must add the depends=”build” attribute to the <target> element. Inside the target, call the <nunit2> task. Listing 3 shows an example of what the test target should look like. At this point I would also recommend changing the default target for the build script to be “test” instead of “build.”
Now, run build.bat and your output should look something like this:
Target framework: Microsoft .NET Framework 3.5
Target(s) specified: test


build:

     [exec] CopyFilesToOutputDirectory:
     [exec]   CoDe.Repeatability.Core ->
trunk\source\CoDe.Repeatability.Core\bin\Debug\
CoDe.Repeatability.Core.dll
     [exec] CopyFilesToOutputDirectory:
     [exec]   CoDe.Repeatability.Core.Tests ->
trunk\source\CoDe.Repeatability.Core.Tests\bin\
Debug\CoDe.Repeatability.Core.Tests.dll

test:

   [nunit2] Tests run: 1, Failures: 0, Not run: 0,
Time: 0.026 seconds
   [nunit2]
   [nunit2]
   [nunit2]

BUILD SUCCEEDED
Now we have a fully automated build and test setup. You can keep adding tests to the Tests project and they will be automatically detected and run by NUnit as long as you have the [TestFixture] and [Test] attributes on your test classes and methods respectively.
If you ever add another test project, remember that you will need to edit the list of <assemblies> used by the <nunit2> task in the “test” target in your NAnt build script.
Automated Deployment
The build product should be deployable to another environment with minimal human interaction.
NAnt can really pay off here. Most deployment processes I know are usually complicated, conditional, multi-step processes that involve a lot of “magic” to come out right in the end. One of the most effective ways I have found in addressing this problem is to have a master record of how, exactly, the build and deploy process works. And the best way I’ve found for documenting this process is through the actual code that performs the process. External documents or wikis can quickly get out of sync with the real process and soon become a liability rather than an asset. Using NAnt as your deployment documentation solves two problems at once.
Start by adding a new target to your build.xml file called “package” (or whatever makes more sense to you). It should depend upon the “test” target to ensure that you don’t package up a broken build.
The flow of a release target should go something like this:
- Build and test the solution.
- Make the release folder if not already there.
- Make a temp folder under the release folder.
- Copy the solution output files to the temp folder (except for PDB files and any other things you don’t want in the final release).
- ZIP up the temp folder contents into a ZIP file package into the main release folder.
- Delete the temp folder.
At the end, the basic package target will look something like Listing 4. With this you can take the ZIP file and extract it onto another computer and execute it. If your deployment process involves making an installer of some kind, this would be the place to do it. Obviously this is an extremely simple package target and most systems require many more things. I encourage you to look at the list of pre-canned tasks available in NAnt at the following URL: http://nant.sf.net/release/latest/help/tasks/
There is also a sister project to NAnt that you should be aware of known as NAnt-contrib which has even more tasks for various purposes. These tasks are outside the scope of normal NAnt usage so they have been moved into a separate project. This project involves specialized tasks such as Active Directory interaction, BizTalk utilities, FXCop execution, GAC manipulation, and integration with many different source control providers including Subversion and Microsoft Visual SourceSafe. I encourage you to check it out as you will probably be able to use one or more of these tasks.
Continuous Integration
When a commit takes place against the source control repository, a separate, objective, and impartial system should execute an automated build process and report the build result.
By now, you have probably scratched your head once or twice and asked “Why do I need to go through all this hassle again?” Some of it can be pretty trying at first. After you’ve done it a few times, it becomes rather quick to set up. There are tons of example build scripts online that you can grab to help you get started. Testing, depending on how far you go with it, can really pay dividends in the long run, but make no mistake-it is an investment.
In my experience, all these things I’ve covered so far click together and pay off to the maximum extent possible when you do them frequently and you make them part of your routine. It can become a discipline that wears like a safety belt. At first they can be rather uncomfortable and annoying, but soon you don’t even know it’s there and you can’t imagine ever not wearing one. One of the best ways for getting going and encouraging yourself and your team to stick to the discipline is to increase the visibility of the tasks and make it the responsibility of a computer to do them for you and report back the status.
The easiest way to accomplish this is by using what’s known as “Continuous Integration.” That is, every time someone on your team commits code to the source code repository, the build is run. Any compile errors, test failures, or other problems that occur from time to time due to integration problems between two or more developers will be more visible. This raised awareness of the team helps to remove friction and roadblocks and eliminates a lot of confusion about why a build failed. As time progresses and trust is built, eventually successful builds will be available as deployment packages for testers or managers to review to keep track of the team’s progress.
There are two popular software packages in the .NET space that provide continuous integration services: ThoughtWorks’ CruiseControl.NET which is free/open source and JetBrains’ TeamCity which is a commercial product (i.e., not open sourced) but is free of charge for small or medium teams. Please see their licensing terms for more details. TeamCity offers some compelling features over CruiseControl.NET including ease of setup, a more user-friendly interface, and the ability to run a build on three different computers simultaneously. JetBrains calls the build computers “agents.” The neat thing about agents is that they can be running on different platforms with different configurations. So if you wanted to, you could run your build and tests against SQL Server 2005 on Windows 2000, Oracle 9i on Windows Server 2008, and MySQL on Windows Server 2003. There is a limit to the number of projects you can host in TeamCity and the number of build agents you can use before they require you pay for the software. For most purposes, the free version of TeamCity gives plenty of room plus some for expansion. I recommend TeamCity to get up and running. If you outgrow the free TeamCity you can then evaluate whether you want to pay for the enterprise version or move to CruiseControl.NET now that you have more experience with CI in general.
Before I go into the “How” you may want to know more about the “Why” of Continuous Integration. Jeremy Miller wrote a great article (Quick ID: 0805081) for the May/June 2008 issue of CoDe Magazine. I strongly recommend you read this one.
Preparing a Integration Box
For the computer that will be running the integration and build, you can use just about any Windows XP or later computer. Windows Server 2003 and 2008 work fine also. Depending on what version of Windows you have and what type of project you’re building (.NET 2.0/VS2005 or .NET 3.5/VS2008), you’ll want to make sure that you have .NET 2.0 and the 2.0 SDK installed. If you’re using .NET 3.5/VS2008, make sure that the .NET 3.5 Framework as well as the Windows SDK 6.1 (which includes the .NET 3.5 Framework SDK) are installed. I strongly advise you not install any version of Visual Studio on your integration box. It may make setup a little easier, but it eliminates most of the impartiality that the integration box brings to your environment. The integration box becomes essentially a developer workstation.
NAnt 0.86 currently has an issue running on Windows Server 2008 that you can easily fix yourself. You should download the latest NAnt build (0.86 nightly or later) and use that in your tools\NAnt folder. Open the NAnt.exe.config file in a text editor and find where it references the “v6.0A” version of the Windows SDK and change it to “v6.1” to make it work properly with the Windows Server 2008 and .NET Framework 3.5 SDK (Windows SDK v6.1). Once you take care of these extra steps, the NAnt build should run fine on Windows Server 2008.
Setting up TeamCity
At the time of this writing, TeamCity 3.1.1 is the latest available version. You can download TeamCity from http://www.jetbrains.com/teamcity/. Make sure you get the Professional (free) edition. Run the installer (Figure 7). For the purposes of getting up and running quickly, I recommend accepting all the default paths and such. Later, you can split out build agents and work folder paths onto different disks and such as your needs demand. For right now, keep things simple.

When the installer is finished, a configuration screen (Figure 8) pops up inviting you to change any of the basic configuration settings. The default settings are usually fine and you can safely click Close. Next you’ll get the Finished screen in the installer which will give you the option to open the web management site for TeamCity. Click Finish and wait for the web management site to load for the first time. The final bit of setup you need to perform is to create the administrator account for TeamCity’s web management application. Once that’s done, TeamCity is officially installed and you can begin adding new projects.
Configuring a Project in TeamCity
After you’ve installed TeamCity you can begin creating projects. Click the “Create Project” link to get started. Give your project a name and a brief description and click Create.
Next, you will need to create a “Build Configuration.”
A configuration defines your version numbering scheme, the products of your build (TeamCity calls them “artifacts”), and how to interact with your source control system for this build. For now, add a new build configuration with a name. Leave the rest alone and click the VCS Settings button.
Attaching the Project to Subversion
This is the part where you tell TeamCity about your Subversion source control repository so it can begin listening for changes and take appropriate action.
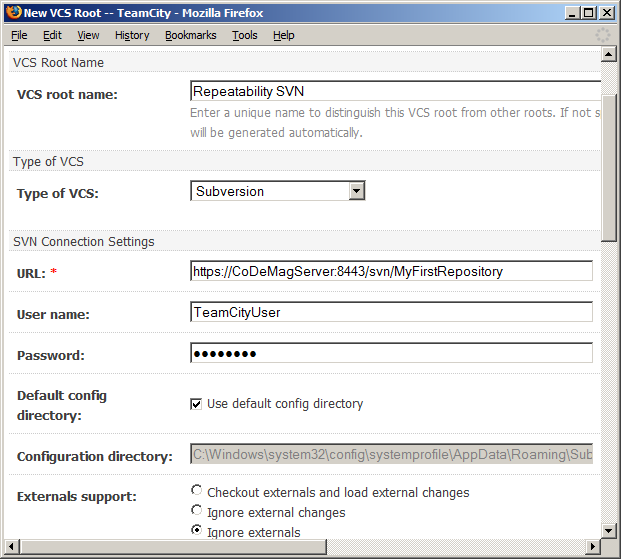
Click the “Create and attach new VCS root” link to enter the details of your Subversion repository (Figure 9). Make sure that when you enter your Subversion repository URL that you end it with “/trunk” to prevent TeamCity from grabbing all your branches and tags every time you run a build. At this point I suggest that you fire up your Visual SVN Server admin console program and add a new user for TeamCity to use when connecting to SVN. While not required, it can help later down the road with logging and access to the system.
This screen has many options. For now, I recommend leaving all alone. You can configure them later if necessary. Make sure to click the Test Connection button and, finally, Save when you’re ready.
This should take you back to the “Build Configuration” screen at which point you should click the “Choose Build Runner” button to get started telling TeamCity what to do with your source code, once it has it.
Configuring the Build Runner
On this screen, you tell TeamCity how to run your build. TeamCity supports many different types of build runners including NAnt. Choose NAnt as the runner. In the “targets” textbox, type “package.” Next, change the NAnt Home option to point to your tools folder using a special variable that TeamCity has to identify where the current code that’s being built and tested actually resides. This is a transient working directory, so you can’t simply hard-code it. Placing the value “%system.teamcity.build.checkoutDir%\tools\NAnt” for the NAnt Home option will keep things properly relative. This ensures that TeamCity is using the version of NAnt that you want for your specific project. If you ever change your version of NAnt, you won’t have to update the build server. Finally, click Save to complete this screen.
At this point, you have a basic CI environment complete with source control, automated build, test, and deployment and continuous integration among the developers.
Setting Build Triggering
One last setup step you should consider is to enable the build to automatically kick off when someone commits files to the Subversion repo. This is normally how CI works, but in TeamCity this option is off by default. On the right-hand side of the screen, when editing the Build Configuration, step number 4 is “Build Triggering.” Click this step and then check the checkbox to enable triggering.
You may also want to consider a “quiet period” of 60 seconds or so to handle the case of many people committing a bunch of code all around the same minute and triggering many builds.
Testing the Build
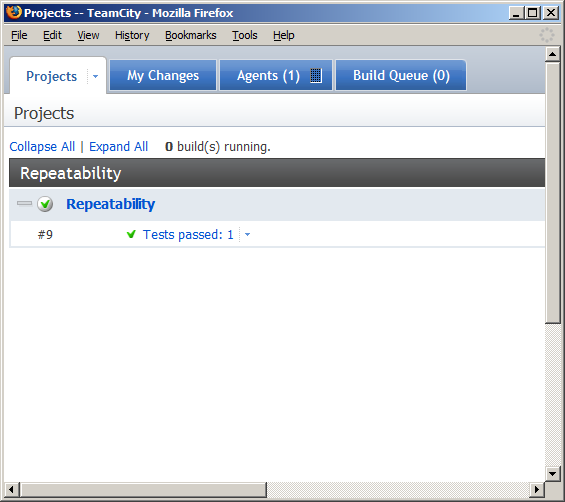
To test that the build is working, pick a file and save it (add an empty whitespace somewhere, etc). Commit the file to Subversion. Open the TeamCity web application and click on the Projects tab. After a minute or two, you should notice that your project has an active build running. If all is configured right, it will end as a success (Figure 10) and let you know how many tests passed.
Conclusion
Repeatability is all about reducing friction, surprises, and lost work due to otherwise preventable problems. While there is some startup cost and pain involved, the return on investment is fast and leads to a sustainable pace of success well into the future.
You don’t need to apply every recommendation here at once. You can add them incrementally, over time each adding on to the benefits of the previous. I encourage you to give some of them an honest try and see how well they benefit your environment and project bottom line.
Listing 1: Starter NAnt build script
<?xml version="1.0" encoding="utf-8" ?>
<project
xmlns="<a href="http://nant.sf.net/release/0.86-beta1/nant.xsd";>http://nant.sf.net/release/0.86-beta1/nant.xsd<;/a>"
name="CoDe.Repeatability"
basedir="."
default="build">
<property
name="project.config"
value="debug"/>
<property
name="dir.src"
value="source"/>
<property
name="sln.file"
value="${dir.src}\CoDe.Repeatability.sln"/>
<property
name="curFmwk"
value="${framework::get-runtime-framework()}"/>
<property
name="curFmwkDir"
value="${framework::get-framework-directory(curFmwk)}"/>
<property
name="msBuildExe"
value="${curFmwkDir}/msbuild.exe" />
<property
name="msBuildArgs"
dynamic="true"
value="/nologo
/v:m
/p:Configuration=${project.config}
${sln.file}" />
<target name="build">
<exec
program="${msBuildExe}"
commandline="/t:Rebuild ${msBuildArgs}"/>
</target>
<target name="releaseBuild">
<property
name="project.config"
value="release"/>
</target>
</project>
Listing 2: SimpleCalculatorTester
using NUnit.Framework;

namespace CoDe.Repeatability.Core.Tests
{
   [TestFixture]
   public class SimpleCalculatorTester
   {
      [Test]
      public void should_add_2_and_2_and_get_4()
      {
         Assert.Fail("TODO: Fill in this test");
      }
   }
}
Listing 3: NAnt test target
<target
   name="test"
   depends="build">

   <nunit2>
      <formatter
         type="Plain"/>
      <test>
         <assemblies>
            <include
name        ="${dir.src}/CoDe.Repeatability.Core.Tests/
bin/${project.config}/CoDe.Repeatability.Core.Tests.dll"/>
         </assemblies>
      </test>
   </nunit2>
</target>
Listing 4: NAnt package target
<target name="package" depends="test">
   <property
      name="release.dir"
      value="release"/>

   <mkdir dir="${release.dir}"/>
   <mkdir dir="${release.dir}/temp"/>

   <copy todir="${release.dir}/temp" flatten="true">
      <fileset>
         <include name=
"${dir.src}/CoDe.Repeatability.Core/bin/${project.config}/*.*"/>
         <exclude name="**/*.pdb"/>
      </fileset>
   </copy>

   <zip zipfile="${release.dir}/CoDe.zip">
      <fileset basedir="${release.dir}/temp">
         <include name="**/*"/>
      </fileset>
   </zip>

   <delete dir="${release.dir}/temp"/>
</target>