Are you moving a Windows desktop application to the browser, and sweating bullets, or perhaps just not quite sure about how all the new Web and data tools work together?
With each passing year, Microsoft offers newer and more powerful tools for building rich database applications on the Web. So many and so frequently, in fact, that it can be hard to keep up with the new tools and still meet the requirements of your job! This article will show you how to get the most out of the new features in ASP.NET 3.5. The article will also show how you can use features in LINQ, even if you only use stored procedures for data access. And finally, since most applications use reporting, I’ll throw in a few nuggets on using SQL Server Reporting Services.
The ‘411’ on Visual Studio 2008 with Respect to Web Applications
Visual Studio 2008, just recently released, includes a new version of ASP.NET (version 3.5). You may wonder why Microsoft didn’t release a version called ASP.NET 3.0-The reason is that the .NET 3.0 Framework focused on Windows Presentation Foundation, Windows Communication Foundation, Windows WorkFlow, and Windows CardSpaces. So the next version of the .NET Framework to accompany the next release of Visual Studio (2008) is 3.5.
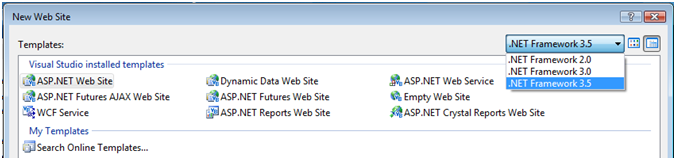
Before I talk about ASP.NET 3.5, there’s something important about the new Visual Studio 2008 environment that will greatly please developers who are building Web applications for different versions of the .NET Framework. Visual Studio 2008 allows you to “target” a project to a specific version of the framework. Figure 1 shows how you can create a new Web project and specify a specific version of the .NET Framework for use. So you can use one version of the development environment for the .NET 2.0, 3.0, and 3.5 Frameworks. (Note that .NET 1.1 is not included.)
You may wonder, “Does this mean that I can completely uninstall the Visual Studio 2005 environment?” Well, like most things, it depends. For many developers, the answer will be “yes”, you can uninstall Visual Studio 2005. However, if you are also using Business Intelligence Development Studio to create SQL Server 2005 projects for Analysis Services, Integration Services, and Reporting Services, you will want to keep the Visual Studio 2005 environment, as Visual Studio 2008 does not provide new project templates for SSIS/SSAS/SSRS.
(Alternatively, if you had SQL Server Developer Edition installed locally, you “could” remove Visual Studio 2005 altogether, and then remove/reinstall SQL Server 2005, which would give you the basic BIDS environment, though some might view that as a great deal of work for limited dividends.)
What’s on the Menu?
Let’s get right to the menu. This Baker’s Dozen article will provide 13 tips for the following:
- Using event delegation for reusable data maintenance functions (part 1 of 3)
- Using event delegation (part 2 of 3)
- Using event delegation (part 3 of 3)
- Subclassing master pages
- ASP.NET AJAX is now built directly into ASP.NET 3.5!
- Better support for nested master pages in Visual Studio 2008
- Paging result sets-why you still can’t beat a stored proc
- Using LINQ to build a basic data access piece for stored procedures
- Using LINQ to handle multiple result sets from a stored procedure
- Building a data-aware Web page with LINQ (Part 1 of 2)
- Building a data-aware Web page with LINQ (Part 2 of 2)
- Using LINQ to XML to handle large XML files
-
The Baker’s Dozen Potpourri: Some tidbits for SQL Server Reporting Services 2005
Tip 1: Building Reusable Data Maintenance Functions with Event Delegation (part 1 of 3)
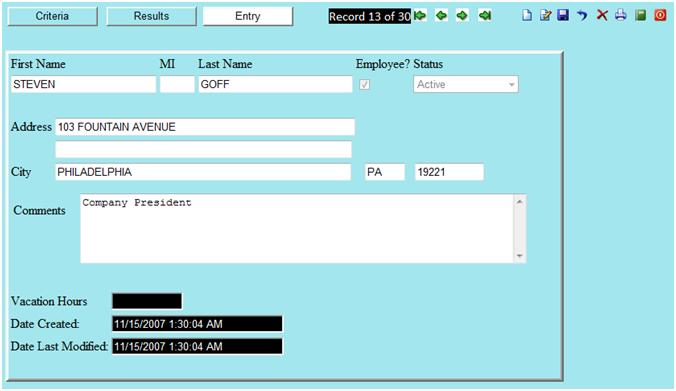
At some point, most developers have had to build a Web database application that featured several data entry screens. Most of them probably resembled something like Figure 2: an entry screen for employees (or products, or tax codes, etc.), along with a navigation toolbar, and a toolbar for other data maintenance functions.
Building these functions might seem boring or even mundane. However, there’s nothing mundane about situations where developers spend hours and hours duplicating functionality across multiple screens-or implementing the functionality inconsistently. The ideal solution is some reusable code and reusable methodologies to build these data maintenance functions quickly and efficiently.
Writing a reusable UI toolbar in a Web browser environment presents some interesting challenges, especially if you want to build a separate class for any maintenance functions associated with the toolbar options. For instance, you may have buttons to navigate through records, and the navigation methods might exist in a different library. Fortunately, you can use a technique known as event delegation. In this technique, you will do the following:
- In the user control, publish an event for each toolbar button.
- In any Web form that contains the user control, associate (or “wire”, if you will) the published event from the first step to any method. The method could be a base method from a base ASP.NET page class from which the Web form is derived.
Follow these steps to build some reusable data maintenance functions (working from the inside out):
You might be saying, “OK, that makes sense.” Or you may be saying, “Huh???” Well, fret not, the next tip will cover these steps in detail.
Tip 2: Building Reusable Data Maintenance Functions with Event Delegation (part 2 of 3)
Tip 1 covered the four general steps for producing a reusable solution. Now I’ll cover them in detail over the next two tips.
First, you need to create the ASP.NET page class that will contain public properties and virtual functions for the common editing and navigating tasks. So start by creating a new ASP.NET page class:
public class cgsBaseWebEditPage:<a href="http://System.Web.UI">System.Web.UI</a>.Page
In the ASP.NET page class, you’ll need to define properties for generic data maintenance: properties such as the number of rows in the current result set that the user is navigating, the relative row position based on the current view order, etc.
public int ParentPosition { get; set; }
public int ParentPrimaryKey  { get; set; }
public DataView ParentView    { get; set; }
Finally, in the ASP.NET page class, you’ll want to add base virtual methods to handle the core maintenance tasks. For instance, the method to navigate to the next row, based on the current view, is as follows:
public virtual void NavigateNext
      (object sender, EventArgs e)
{
   if (this.ParentPosition <
             this.ParentView.Count)
   {
      this.ParentPosition++;
      this.SetCurrentKey();
      this.RetrieveDataForKey();
   }
}
The method simply increments the ParentPosition property, sets the ParentPrimaryKey value, and retrieves the data from the database based on the ParentPrimaryKey value.
The method that sets the current key value is as follows:
public virtual void SetCurrentKey()
{
   this.ParentPrimaryKey =
      Convert.ToInt32(
       this.ParentView[this.ParentPosition]
                      [this.ParentKeyName]);
}
Finally, the method RetrieveDataForKey is simply a stub virtual method that you can override when you subclass this ASP.NET page class. In your subclassed Web page, you can access the ParentPrimaryKey value to retrieve the full row from the database for that key.
OK, hopefully that was easy. In the next tip, you’ll build the master page and create the event handlers to cover steps 2-4.
Tip 3: Building Reusable Data Maintenance Functions with Event Delegation (part 3 of 3)
Now that you’ve created the ASP.NET page class, you can focus on the master page, the event handlers, and then creating a Web page that consumes all of this.
So from the list of steps back in Tip 1, second, you’ll need to create a master page that contains all of the visual controls (toolbar and command buttons). You can create any type of master page with command buttons like Figure 2.
Third, you can create event handlers for each of the toolbar command buttons. Here is one example, based on the NavigateNext method. At the top of the master page you can specify the following event handler:
public event EventHandler NextEventClick;
protected void OnEventNext(EventArgs e)
{
   if (this.NextEventClick != null)
      this.NextEventClick(this, e);
}
Then in the Click event of the “next” command button in the MasterPage toolbar, you can insert the following code to call the OnEventNext method.
protected void btnNext_Click(object sender,
             ImageClickEventArgs e)
{
     OnEventNext(e);
}
This will, in turn, call any method that you “wire” to the NextEventClick method.
Fourth, the final step: When you create any application Web page (a customer page, a product page, etc.) you can wire the NextEventClick method to the base method NavigateNext (from the base Web edit page).
DataMaintenanceMaster oMaster =
        (DataMaintenanceMaster)this.Master;

oMaster.NextEventClick +=
    new EventHandler(this.NavigateNext);
Tip 4: Subclassing Master Pages
If you’re strong enough in object-oriented development, you may have wondered about subclassing the master page. Here is an example where you can create an abstract class for all future master pages.
public abstract class cgsBaseMasterPage
                          : MasterPage
{
   public abstract Label HeaderText { get; }
   public abstract Label FooterText { get; }
}
And then in any master page that you create, simply refer to the abstract class:
public partial class cgsAppMasterPage :
             cgsBaseMasterPage
{
   public override Label HeaderText {
        get { return lblHeader; } }
   public override Label FooterText {
        get { return lblFooter; } }

    protected void Page_Load(object sender,
                          EventArgs e)
    {

    }
}
Tip 5: AJAX Now Built In!
Roughly two years ago, Microsoft introduced ASP.NET AJAX, which allowed developers to build more responsive user interfaces. Generally, AJAX provides tools so that developers can place Web content inside update panels, for purposes of doing partial page refreshes. The end result is that refreshes appear more like a standard Windows Forms application, as opposed to the entire page refreshing.
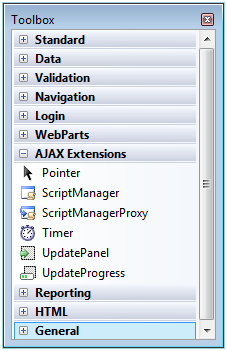
Initially, ASP.NET AJAX was a separate download, as Microsoft released AJAX after Visual Studio 2005. However, AJAX is now part of Visual Studio 2008 and ASP.NET 3.5. After you install Visual Studio 2008, you’ll immediately see the AJAX extensions as part of the toolbox (Figure 3).
Note that while Visual Studio 2008 automatically ships with the AJAX extensions, the AJAX Control Toolkit is still available as a separate download. The toolkit is a set of customizable and extensible ASP.NET AJAX extenders and controls to create interactive Web experiences. You can download the toolkit from the following site: http://www.asp.net/ajax/ajaxcontroltoolkit/
Tip 6: Better Support for Nested Master Pages in Visual Studio 2008
ASP.NET 2.0 introduced the concept of master pages, which allowed Web developers to easily build Web pages with consistent layout. ASP.NET 2.0 also allowed you to build nested master pages so you can build a master page based on another master page. Unfortunately, the WYSIWYG editor in Visual Studio 2005 didn’t allow you to edit the nested master page-you had to edit the master page manually.
Fortunately, the WYSIWYG editor in Visual Studio 2008 allows you to edit nested master pages. If you use Google to search on “VS 2008 Nested Master Page Support” and “Scott Guthrie,” you’ll find a good blog post by Scott Guthrie on this subject. Scott shows an example of creating a single-column and multi-column master page.
Tip 7: Paging: Why You Still Can’t Beat a Stored Proc
Another common task in Web applications is paging result sets. A user may run a query that results in 500 matching rows, but you may only want to show the user 20 rows at a time. Several of the data-bound controls (such as the GridView) offer paging capabilities-but these generally work by retrieving all 500 rows from the database, persisting them in the application layer, and then paging them to the user, one page at a time.
While this approach works it means that a large percentage of rows that might never be displayed will be returned from the database to the application layer, and they’ll be stored in the application layer. A more efficient (and scalable) method is to manage the paging in a database stored procedure.
In the example with the 500 rows, suppose you are showing 20 rows at a time, in name order. In SQL Server, you can execute the query to return the 500 rows into a temporary table (or a common table expression), and execute a subsequent query to retrieve and return rows 1 through 20. Then if someone clicks “Next” on a navigation toolbar, you can run the same process to return rows 21 through 40. (In the application, you’ll need to track the relative row position that you want to use as the starting point for a subsequent result set.)
SQL Server 2005 makes it easy to handle this through the ROW_NUMBER function that assigns a sequential ranking to each row in a result set, relative to whatever sort order you specify. For example, the following SQL Server 2005 code runs the first query into a Common Table Expression (CTE):
WITH CustListTemp AS
(SELECT
   CustomerID, LastName, FirstName,
   Address, City, State, Zip,
   ROW_NUMBER() OVER (ORDER BY
      CASE @SortCol
          WHEN 'LASTNAME'
              THEN LastName + Firstname
          WHEN 'ZIP'
              THEN ZIP+LastName+Firstname
          ELSE LastName + Firstname
      END)
AS RowNum
FROM Customers)
And then the subsequent query against the CTE retrieves the relative row range (e.g. rows 21-40, rows 101-120, etc.), using supplied parameters for @MaxRows and @StartRowIndex.
SELECT TOP (@MaxRows) CustomerID, LastName,
  FirstName, Address, City, State, Zip,
  RowNum FROM (SELECT CustListTemp.*,
  (SELECT COUNT(*) from CustListTemp) AS RecCount
FROM CustListTemp )CustList
  WHERE RowNum BETWEEN
      (CASE @StartRowIndex
          WHEN -1 THEN  RecCount - @MaxRows
          ELSE  @StartRowIndex END )
    AND
      (CASE @StartRowIndex
          WHEN -1 then ( RecCount )- @MaxRows
          ELSE @StartRowIndex END) + @MaxRows
              THEN 1
ELSE 0 END  = 1
I covered this technique in detail in the March/April 2007 issue of CoDe Magaine. You can find the link by searching for ArticleID 0703041 on CoDe Magazine’s website (www.code-magazine.com)
Tip 8: Using LINQ to Build a DAL for Stored Procedure Access
Before I start the next tip, I’d like to respond to something that I often see developers doing with LINQ (and until recently, I myself did as well): querying into an IEnumerable, and then looping through the IEnumerable to populate a List class. Usually, the code will look something like this:
foreach (VendorResults oRec in oVendorResults)
     oListResults.Add(oRec);
While that’s valid, you can actually use an overload of the List collection, to specify an IEnumerable.
List<VendorResults> oListResults = new
    List<VendorResults>(oVendorResults);
With that out of the way-over the last year, I’ve delivered a presentation on LINQ and LINQ to SQL for many user groups and MSDN events. I’ve found that (to my delight) most developers still wish to use stored procedures for data access. However, you can still leverage LINQ’s capabilities by calling stored procedures using strong typing. The next two tips will cover examples of this.
First, here’s a simple example of calling a stored procedure that returns one result set. LINQ to SQL contains an interface called ISingleResult that you can use to cast a return object from a LINQ call to a stored procedure.
AdventureWorks db = new
     AdventureWorks(this.GetConnString());
XElement XmlOrders = new XElement("Orders",
        new XElement("OrderIDs",
             new XElement("IDpk", 1)),
        new XElement("OrderIDs",
             new XElement("IDpk", 2)),
        new XElement("OrderIDs",
             new XElement("IDpk", 3)));

ISingleResult<GetPOSummaryResult> POHeaderData =
          db.GetPOSummary(XmlOrders);
So generally speaking, the code sample above does two things:
- Creates an XML XElement object for a variable number of keys as a stored procedure parameter (the stored procedure parameter will shred the XML into a table variable as part of the query). If you’re interested in seeing the function that shreds an XML string into a table variable, check my CoDe Magazine article in the September/October 2007 issue, Quick ID: 0709031).
- Create an object called POHeaderData, of type SingleResult<GetPOSummaryResult>. SqlMetal (which I’ll cover in the next tip) creates a default type of GetPOSummaryResult from the name of the stored procedure (GetPOSummary).
Tip 9: Using LINQ to Handle Multiple Result Sets
Many stored procedures return multiple result sets. LINQ to SQL provides the IMultipleResults interface to handle calls to these types of stored procedures:
// Call a stored proc that returns
// multiple results
IMultipleResults result =
          db.GetPODetails(XmlOrders);
IEnumerable <GetPODetailsResult1>  oHeader =
       result.GetResult<GetPODetailsResult1>();
IEnumerable<GetPODetailsResult2> oDetails =
       result.GetResult<GetPODetailsResult2>();
Tip 10: An Example with LINQ and Multiple Result Sets (1 of 2….the Back-end)
In the next two tips I’ll combine some of the LINQ content from the last two tips to build a small Web-based example. Since I often use my standard aging receivables example to illustrate reporting/result set techniques, I’ll use that one. I don’t use LINQ to SQL nearly as much as I use LINQ to XML/Objects/DataSets; however, I DO like the ability to discover stored procedures and SP parameters in a strongly-typed manner.
Suppose you want to do the following:
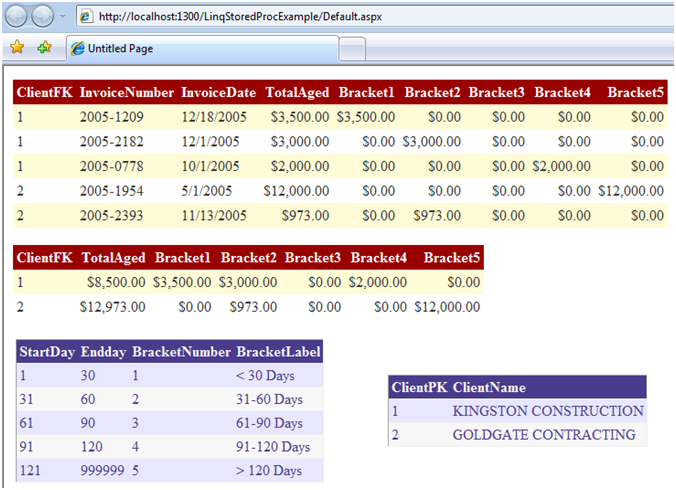
In this tip, I’ll walk through the back-end steps. In the next tip I’ll cover the front-end steps. The end goal is the test Web page in Figure 4.
First, in the interest of keeping this article from being too long, I won’t include the listing for the stored procedure here (you can download that code in the sample for this article). Suffice it to say that the specifics of the stored procedure aren’t particularly relevant here-the stored procedure receives an XML string of customer IDs, an “as-of” date, and a flag for whether to return detail and summary or just summary information.
Second, you need to create a strongly-typed context to the stored procedures in the database. You can do this by creating a LINQ to SQL DBML file, or you can use SQLMetal. SQLMetal comes with Visual Studio 2008, and is stored in the Program Files \ Microsoft SDKs \ Windows \ v6.0A \ BIN folder. You can use these command-line parameters to generate a context for the stored procedures in a database:
SqlMetal.exe /server:localhost
             /database:ConstructionDemo
             /sprocs
             /code:C:\ConstructionDemo.cs
After SQLMetal generates the context file, you can add it to your project. Listing 1 shows an excerpt of the generated context-specifically, the generated context for the stored procedure. Notice that the context class contains a method for the stored procedure along with typed references to the parameters and result sets. Note that the four result sets are GetAgingResults1, GetAgingResults2, etc. I’ll talk about those names in few moments.
There’s something “missing” from this class file, something that you’ll need. Can you guess what it is? Well, here’s a hint: while there are classes for each of the four result sets (details, summary, brackets, clients), there isn’t a single class that allows you to “combine” the four result sets into one class. You can address that by creating a composite/container class that combines (or “pairs”) sets of lists for the individual result sets.
Listing 2 shows a class called AgingResultSet that combines multiple List<> class properties for each of the Result Set names. Eventually, you’ll do the following:
- Populate four list classes for the four result sets.
- Create an instance of AgingResultSet.
- Store a List of type GetAgingResultSets1 into the List property DetailResult, GetAgingResultSets2 into SummaryResult, etc. (You’ll see this in detail when I cover Listing 3-I’m just giving you a quick look forward.)
One other note about the class in Listing 2-for each of the four result sets, there is a simple GetResults method for each of the four List class results. These are purely for the client-side data-aware controls to “discover” the Result Set classes, so that you can design against them.
Finally, now that you’ve built a strongly-typed context to the stored procedure, and you’ve established a composite class to hold the result sets, you can build a simple data access function to call the stored procedure. Listing 3 uses the technique from Tip 9 to call a stored procedure using the IMultipleResults interface. In essence, Listing 3 does the following:
- Calls the context method GetAging, and returns an instance of IMultipleResults.
- Use the IMultipleResult’s GetResult method to access each of the four result sets.
- Create a new instance of the AgingResult composite class (from Listing 2).
- Assign the four result sets into the instance of the AgingResult class. Note the use of the new object initialize syntax, where you can specify the properties of the instantiated class, without needing a constructor for the class back in Listing 2.
- Return the instance of the AgingResult class.
Tip 11: An Example with LINQ and Multiple Result Sets (2 of 2….the Front-End)
Part 2 of this process is to build the client-side piece to archive the Web page in Figure 4. The goal is to design some basic ASP.NET GridView controls against the result set classes from the context.
Prior to Visual Studio 2008 and ASP.NET 3.5, designing a GridView against any type of result set class could be a bit tricky. Fortunately, the ObjectDataSource control in ASP.NET 3.5 (used for defining the data source) has some improved visibility-this allows you to point the Web form GridViews to the result set classes, populate the GridViews with the necessary columns from the result sets, and allows you to customize the output of the GridView controls.
You’ll follow these steps:
- Create a new ASP.NET Web application and add references to any DLL(s) associated with the Listings from the previous tip.
- Create a new Web page and drop four GridView controls onto the page.
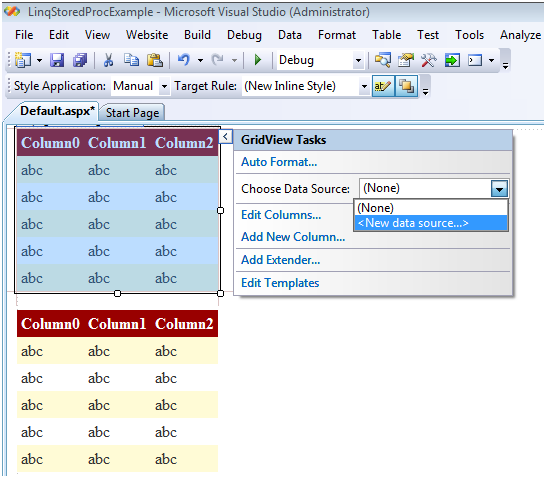
- For the first GridView, right-click and select “New Data Source” (Figure 5).
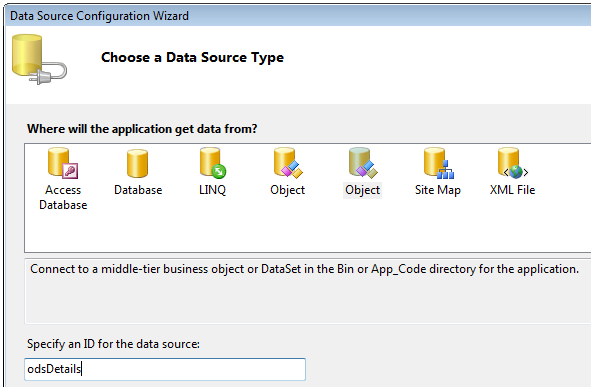
- Visual Studio 2008 will display the ObjectDataSource dialog box (Figure 6). Specify a meaningful name.
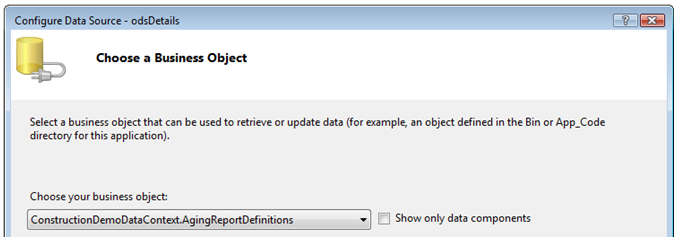
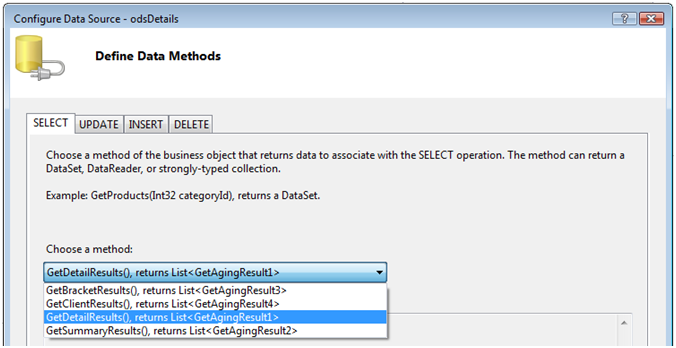
- Select the business object and method name (Figures 7 and 8, respectively) for the corresponding GridView). Repeat this process for each of the four GridViews.
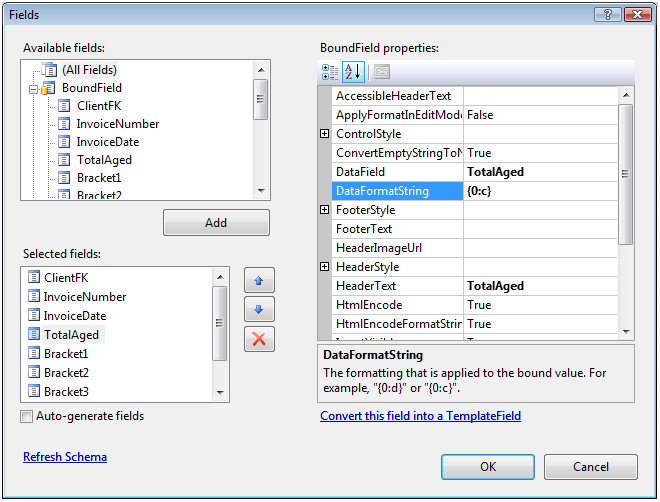
- At this point, each of the four GridView controls will have column definitions from the result set classes. You can access the column collection editor (Figure 9) for each of the GridViews, to customize alignments, change heading text, or format columns for date and currency values.
- Finally, you’ll need to write some code to call the data access class from the last tip, and to populate the GridView controls. Listing 4 provides an example of this. Note that in the code, you need to set the DataSourceID to null because you’re about to override the design-time source with an actual source (of the same type). Also note that I’m creating an instance of the composite class and that I’m using the properties from the class that were populated back in the data access class.
oResult = oDa.GetAgingData(XmlCustomers,
             new DateTime(2006, 1, 1), true);
this.gdvDetails.DataSourceID = null;
this.gdvSummary.DataSourceID = null;

...


this.gdvDetails.DataSource =
            oResult.DetailResult;
this.gdvSummary.DataSource =
            oResult.SummaryResult;
Tip 12: Using LINQ to XML to Handle Large XML Files
By now, you’ve likely seen at least one example of using LINQ to XML. Here’s a very simple example for using LINQ syntax to query XML data using C#.
XElement XmlAddr = new XElement("Addresses",
  new XElement("AddressRec",
     new XAttribute("EmployeeID", 1),
     new XElement("FirstName", "Kevin"),
     new XElement("LastName", "Goff"),
     new XElement("Address", "111 Main Street"),
     new XElement("City", "Philadelphia"),
     new XElement("State", "PA"),
     new XElement("Zip", "11111")));
XDocument oDoc = new XDocument(XmlAddr);
var xResults =
  from oXml in oDoc.Descendants("AddressRec")
    where (string)oXml.Element("State") == "PA"
    orderby (string)oXml.Element("Zip")
    select oXml;
If you use Visual Basic, here’s the equivalent code. Note first that you can create XML literals in Visual Basic, as follows:
Dim XmlAddr = _
   <?xml version="1.0" encoding="utf-8"
   standalone="yes"?>
     <Addresses>
        <AddressRec EmployeeID="1">
           <FirstName>Kevin</FirstName>
           <LastName>Goff</LastName>
           <Address>111 Main Street</Address>
           <City>Philadelphia</City>
           <State>PA</State>
           <Zip>11111</Zip>
        </AddressRec>
     </Addresses>
Then you can use Visual Basic syntax, which is considerably less complicated than the C# equivalent:
Dim Xdocument As XDocument = _
     New XDocument(XmlAddr)

Dim query = From c In _
   Xdocument.Descendants("AddressRec") _
      Where c.<State>.Value = "PA" _
      Order By c.<State>.Value _
         Select New With {c.<FirstName>.Value}

Me.DataGridView1.DataSource = query.ToList()
That’s certainly “nice”, but the proverbial 500 lb elephant in the room is how to handle large XML files. Certainly, you don’t want to load an entire large XML file into memory. What you can do is set up an extension method to perform a streaming function (Listing 5), and then refer to the extension method in the LINQ to XML IN syntax (Listing 6 and Listing 7 for C# and Visual Basic, respectively).
(Note: the code in Listing 5 comes from the Microsoft XML Team WebLog. If you perform a Google search on “Streaming with LINQ to XML” you’ll find the code and further explanation. Kudos to the Microsoft XML Team for providing this!)
So in the beginning of Listing 5, you can refer to the extension method (StreamElements) as your source for the query. The extension method will perform the streaming of the large XML for you:
from oXML in StreamElements(xmlFile,"CustOrders")
If you actually set a breakpoint and stepped through the code, you’d observe that the code does the following:
- Loop through the code in the extension method (in the while (reader.Read()) statement).
- Create an individual XElement object, read an element from the XmlReader, and then return the XElement object.
- Come back to the LINQ to XML code block (specifically the WHERE clause) and evaluate the XElement object (implicitly returned from the extension method) to see if it matches the WHERE statement.
In this context, you can almost think of the extension method as a delegate to handle the element-by-element streaming of the large XML file.
Tip 13: Baker’s Dozen Potpourri-Some Miscellaneous Tidbits for SQL Server Reporting Services 2005.
Did you just install SharePoint in a server environment where SQL Server Reporting Services 2005 resides? Did you also notice afterwards that SSRS stopped working? That’s because SharePoint can take over the port number for the default Web site. You can address that situation by going into IIS and changing the port number for your default Web site. (I changed mine to 8080.)
**Or…**are you having problems trying to run a report for a specific parameter, and also trying to send it directly to a PDF file? Here’s the “magic” URL syntax (note that I’m using Port 8080!):
int  MyCustomerID = 1001;
string OutURL =
  "http://localhost:8080/ReportServer?/";

OutURL += "MyReportProject/MyReport";
OutURL += "&rs:Command=Render&rs:Format=PDF";
OutURL += "&CustomerID=" +
MyCustomerID.ToString();
**Or…**how about this one-Have you ever tried to drag data from a report DataSet into a report header or footer? SSRS doesn’t allow this. You can get around it by doing the following:
- Define a report parameter associated with the data you want to display in the header/footer.
- Set the hidden property to true for the parameter.
- Define the default value for the parameter as the dataset/column associated with the actual database value.
- Finally, in the report heading, reference the Parameter name instead of the dataset name.
Haven’t helped you yet? How about this one? You need to develop SSRS reports so that users will only see data associated with their rights. (For example, you might have database rules in the form of tables that define User XYZ to only see data for specific product categories or specific regions.) The key is to identify the current user running the report so that you can pass that on to any database query/stored procedure. You can either obtain that information from the User!UserId collection property in SSRS, or from the System_User system variable in SQL Server.
Final Thoughts/Next Issue
Check my blog (www.TheBakersDozen.net) for any follow-up tips, additional resources, and notes on Baker’s Dozen articles. The next Baker’s Dozen article will present an article I’ve been planning for a long time and will finally put together: 13 tips for implementing common design patterns in C# 3.0.
Listing 1: Code generated by SQLMetal.exe for the stored procedure
[Function(Name="dbo.GetAging")]
[ResultType(typeof(GetAgingResult1))]
[ResultType(typeof(GetAgingResult2))]
[ResultType(typeof(GetAgingResult3))]
[ResultType(typeof(GetAgingResult4))]

public IMultipleResults GetAging(
  [Parameter(Name="CustomerList", DbType="Xml")]
                System.Xml.Linq.XElement customerList,
  [Parameter(Name="AgingDate", DbType="DateTime")]
                System.Nullable<System.DateTime> agingDate,
  [Parameter(Name="ShowDetails", DbType="Bit")]
                 System.Nullable<bool> showDetails)

 {
    IExecuteResult result = this.ExecuteMethodCall(this,
      ((MethodInfo)(MethodInfo.GetCurrentMethod())),
           customerList, agingDate, showDetails);
    return ((IMultipleResults)(result.ReturnValue));
}

public partial class GetAgingResult1
{
private System.Nullable<int> _ClientFK;
private string _InvoiceNumber;
private System.Nullable<System.DateTime> _InvoiceDate;
private System.Nullable<decimal> _TotalAged;
private System.Nullable<decimal> _Bracket1;
private System.Nullable<decimal> _Bracket2;
private System.Nullable<decimal> _Bracket3;
private System.Nullable<decimal> _Bracket4;
private System.Nullable<decimal> _Bracket5;
public GetAgingResult1()
{
}
[Column(Storage="_ClientFK", DbType="Int")]
public System.Nullable<int> ClientFK
{
Get {return this._ClientFK;}
set
{if ((this._ClientFK != value)) {
this._ClientFK = value; }
}
}

[Column(Storage="_InvoiceNumber", DbType="Char(20)")]
public string InvoiceNumber
{
Get {	return this._InvoiceNumber; }
set
{if ((this._InvoiceNumber != value)) {
this._InvoiceNumber = value; 	}
}
}


[Column(Storage="_TotalAged", DbType="Decimal(14,2)")]
public System.Nullable<decimal> TotalAged
{
Get { return this._TotalAged; }
set
{ if ((this._TotalAged != value)) {
this._TotalAged = value; }
}
}
Listing 2: Composite class to combine result sets into one class
using System;
using System.Collections.Generic;
using System.Linq;
using System.Text;

namespace ConstructionDemoDataContext
{
   public class AgingReportDefinitions
   {

     // Create a ‘set’ of the four result set collections
     // (Somewhat similar to a “DataSet”, but without the overhead

      public class AgingResultSet<GetAgingResult1,
                                  GetAgingResult2,
                                  GetAgingResult3,
                                  GetAgingResult4>
      {
           public List<GetAgingResult1> DetailResult { get; set; }
           public List<GetAgingResult2> SummaryResult { get; set; }
           public List<GetAgingResult3> BracketResult { get; set; }
           public List<GetAgingResult4> ClientResult { get; set; }

       }

        public List<GetAgingResult1> GetDetailResults()
        {
             return new List<GetAgingResult1>();
         }


         public List<GetAgingResult2> GetSummaryResults()
         {
             return new List<GetAgingResult2>();
         }

         public List<GetAgingResult3> GetBracketResults()
         {
             return new List<GetAgingResult3>();
         }

         public List<GetAgingResult4> GetClientResults()
         {
             return new List<GetAgingResult4>();
         }

    }
}
Listing 3: The Sample Data Access class
using System;
using System.Collections.Generic;
using System.Linq;
using System.Data.Linq;
using System.Text;
using System.Data.SqlClient;
using System.Collections;
using System.Xml;
using System.Xml.Linq;

namespace ConstructionDemoDataContext
{
   public class DataAccess
   {
      private string GetConnString()
      {
          SqlConnectionStringBuilder oBuilder = new
                  SqlConnectionStringBuilder();
          oBuilder.InitialCatalog = "ConstructionDemo";
          oBuilder.DataSource = "localhost";
          oBuilder.IntegratedSecurity = true;

          return oBuilder.ConnectionString;
      }

      public AgingReportDefinitions.AgingResultSet
      <GetAgingResult1, GetAgingResult2,
             GetAgingResult3, GetAgingResult4>
        GetAgingData( XElement XmlCustomers,
                      DateTime AsOfDate, bool ShowDetails)
      {

         ConstructionDemo dbContext =
      new ConstructionDemo(this.GetConnString());

         IMultipleResults MultipleResults =
        dbContext.GetAging(
             XmlCustomers, AsOfDate, ShowDetails);

         IEnumerable<GetAgingResult1> oDetailResults =
       MultipleResults.GetResult<GetAgingResult1>();
         IEnumerable<GetAgingResult2> oSummaryResults =
       MultipleResults.GetResult<GetAgingResult2>();
         IEnumerable<GetAgingResult3> oBracketResults =
       MultipleResults.GetResult<GetAgingResult3>();
         IEnumerable<GetAgingResult4> oClientResults =
       MultipleResults.GetResult<GetAgingResult4>();

         AgingReportDefinitions.AgingResultSet<GetAgingResult1,
                                         GetAgingResult2,
 						     GetAgingResult3,
  						     GetAgingResult4>
   oFinalResults = new
 	  AgingReportDefinitions.AgingResultSet
            <GetAgingResult1, GetAgingResult2,
       GetAgingResult3, GetAgingResult4>
                  { DetailResult = oDetailResults.ToList(),
                    SummaryResult = oSummaryResults.ToList(),
                    BracketResult = oBracketResults.ToList(),
                    ClientResult = oClientResults.ToList() };

           return oFinalResults;
        }
    }
}
Listing 4: Working in the front end
public void GetAndDisplayData()
{
   DataAccess oDa = new DataAccess();

   AgingReportDefinitions.AgingResultSet<GetAgingResult1,
                                        GetAgingResult2,
                                        GetAgingResult3,
                                        GetAgingResult4>
         oResult = new AgingReportDefinitions.AgingResultSet
                                        <GetAgingResult1,
                                        GetAgingResult2,
                                        GetAgingResult3,
                                        GetAgingResult4>();

   XElement XmlCustomers = new XElement("Customers",
                    new XElement("CustomerIDs",
                         new XElement("IDpk", 1)),
                    new XElement("OrderIDs",
                         new XElement("IDpk", 2)));


   oResult = oDa.GetAgingData(XmlCustomers,
             new DateTime(2006, 1, 1), true);

   this.gdvDetails.DataSourceID = null;
   this.gdvSummary.DataSourceID = null;
   this.gdvBrackets.DataSourceID = null;
   this.gdvClients.DataSourceID = null;

   this.gdvDetails.DataSource = oResult.DetailResult;
   this.gdvSummary.DataSource = oResult.SummaryResult;
   this.gdvBrackets.DataSource = oResult.BracketResult;
   this.gdvClients.DataSource = oResult.ClientResult;

   this.gdvSummary.DataBind();
   this.gdvDetails.DataBind();
   this.gdvBrackets.DataBind();
   this.gdvClients.DataBind();

}
Listing 5: Reusable class library to stream an XML file
// I won’t take credit for this, it comes from// the Microsoft XML Team WebLog
using System;
using System.Collections.Generic;
using System.Linq;
using System.Text;
using System.Collections;
using System.Xml.Linq;
using System.IO;
using System.Xml;

public class XMLStreamLibrary
{
    static IEnumerable<XElement> StreamElements
              (string XMLFile, string XMLName)
    {
       using (XmlReader reader = XmlReader.Create(XMLFile))
       {
          reader.MoveToContent();
          while (reader.Read())
          {
             if ((reader.NodeType == XmlNodeType.Element) &&
                 (reader.Name == XMLName))
             {
                XElement element =
                       (XElement)XElement.ReadFrom(reader);
                yield return element;
             }
          }
          reader.Close();
       }
    }
}
Listing 6: C# code to utilize streaming XML
DataTable dtTest = new DataTable();
dtTest.Columns.Add("CustomerNum", typeof(String));
dtTest.Columns.Add("OrderDate", typeof(DateTime));
dtTest.Columns.Add("OrderAmount", typeof(Decimal));

for (int i = 0; i < 1000000; i++)
   dtTest.Rows.Add(i.ToString(), DateTime.Today.AddDays(i), i);
dtTest.TableName = "CustOrders";

string xmlFile = "c:\\CustOrders.xml";
dtTest.WriteXml(xmlFile);

var xResults = from oXML in StreamElements(xmlFile,"CustOrders")
           where (DateTime)oXML.Element("OrderDate") >
                               new DateTime(2008,1,1) &&
                 (DateTime)oXML.Element("OrderDate") <
                               new DateTime(2008,3,31)
           select new {
             CustomerNum = (string)oXML.Element("CustomerNum"),
             OrderDate = (DateTime)oXML.Element("OrderDate"),
            OrderAmount = (Decimal)oXML.Element("OrderAmount")   };

this.DataGridView1.DataSource = xResults.ToList()
Listing 7: Visual Basic code to utilize streaming XML
' Same code as Listing 2, but using Visual Basic to call the
' XML streaming library

Dim Query = From c In XMLStreamLibrary.StreamElements _
("c:\custorders.xml", "CustOrders") _
               Where c.<OrderAmount>.Value > 100000 _
               Or c.<OrderDate>.Value > New DateTime(2008, 5, 1) _
                 Select New With _
                    {c.<CustomerNum>.Value, _
                     c.<OrderAmount>.Value, _
                     c.<OrderDate>.Value}

Me.DataGridView1.DataSource = Query.ToList()