One new features in Visual Studio 2005 is the support for smart tags.
A smart tag is a panel that displays next to a control and contains a list of commonly used properties.
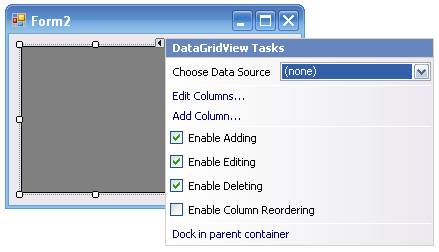
The DataGridView control in Windows Forms has a smart tag (with the header “DataGridView Tasks”) showing a list of commonly used properties (Figure 1). In .NET 2.0, developers can add the smart tag feature to their custom/user controls. In this article, I will walk you through a real world project that I have done that shows how to add your own smart tags to controls.
You can use the DaysInMonth() method from the Date class to find out the number of days in a particular month and year.
I’ll show you how to create a custom date control. My client specifically wanted an easy way to enter dates without using the mouse to select a date. In addition, they wanted the ability to customize the format in which the date is displayed-either numerically or alphabetically-to represent the month. On the surface this task looks easy to solve-simply add a couple of TextBox controls to the form and configure them to display day, month, and year accordingly. However, the client had numerous forms requiring date entry, and thus I decided that a better solution was to create a user control that aggregates all the TextBox controls into one single control. In the first part of this article I’ll show you how to create the user control and in the second part of the article I’ll show you how to add smart tag support to the user control.
Developing the User Control
Using Visual Studio 2005, create a Windows Application project named SmartTag. This Windows application will act as a host for the user control that I’ll show you how to build in this article.
Now, add a new Windows Control Library project to the existing solution. In Solution Explorer, right-click the SmartTag solution and select Add > New Project…. Select the Windows Control Library template and name the project CustomDateControl. Click OK. The left of Figure 2 shows the default design surface of the user control (default name is UserControl1.vb). Populate the design surface with three ComboBox controls shown on the right of Figure 2.
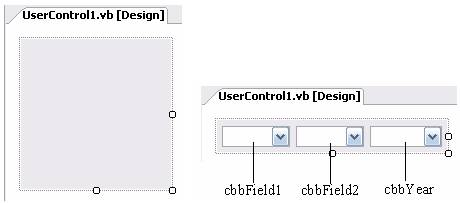
Set the properties of the three ComboBox controls with the values shown in Table 1. The first two ComboBox controls will display either the day or month (depending on the user’s configuration) while the third ComboBox control will display the year. Users can either click the ComboBox control to select a date or simply type the date using the keyboard.
Programming the User Control
With the design of the user control completed, you can now start the coding. Switch to the code behind of UserControl1.vb and add the following namespace:
Imports System.ComponentModel
The System.ComponentModel namespace provides classes that are used to implement the run-time and design-time behavior of components and controls. In this case, I will be adding attributes to my control class and its properties to customize its behavior. You will see its uses shortly.
Next, declare the Formats and Months enumeration to represent the format and months, respectively:
Public Enum Formats
    DDMMYYYY '---e.g. 29 02 2006---
    DDMmmYYYY '---e.g. 12 Jan 2006---
    MMDDYYYY '---e.g. 02 25 2006---
    MmmDDYYYY '---e.g. Jan 15 2006---
End Enum

Public Enum Months
    Jan = 1
    Feb = 2
    Mar = 3
    Apr = 4
    May = 5
    Jun = 6
    Jul = 7
    Aug = 8
    Sep = 9
    Oct = 10
    Nov = 11
    Dec = 12
End Enum
Defining the Member Variables
Change the default class name UserControl1 to DateControl and declare the member variables shown in Listing 1.
You use the ControlDesigner class for extending the design mode behavior of the user controls.
Notice the following:
The Err is an event that the control fires if there is a validation error within the control. It provides a means to communicate the error with the user of the control.
The Category attribute specifies that the Err event will be listed under the Date Settings category in the Properties window of Visual Studio 2005. The DescriptionAttribute attribute specifies the message to be displayed at the bottom of the properties window.
The DefaultEvent attribute indicates the default event handler for this control. When you drop this control on the design surface of a Windows Form, double-clicking it will automatically cause Visual Studio 2005 to insert the code for the Err event handler.
Use the _DayControl and the _MonthControl to reference the respective ComboBox controls representing the day and month.
Next, add the Format property to the class so that the user can select the format to represent the date. Depending on the format selected, the control uses the _DayControl and _MonthControl to reference the actual ComboBox controls representing the day and month. Also, when a user selects a format, the control calls the InitDates() method (defined shortly) to dynamically refresh the control to reflect the format selected (Listing 2).
The Day property allows the user to set the day of the date individually (numeric value from 1 to 31). Notice that if the day value is set to an invalid value, the control raises the Err event (Listing 3).
The Month property allows the user to set the month (numeric value from 1 to 12). While it is similar to the Day property, you need to take special care if the user has selected a format that displays the month alphabetically (such as Jan or Feb). In this case, you need to convert the numeric value of the month into its corresponding enumeration value (Listing 4).
The Year property is much more straightforward (Listing 5).
In addition to the separate properties for setting the day, month, and year, I have also added a Date (enclosed within “[]” because Date is a reserved word in VB) property to allow users to set the date using the Date class (Listing 6).
The MinYear property sets the first year to display (Listing 7).
The MaxYear property sets the last year to display (Listing 8).
Define the InitDates() subroutine as follows (Listing 9).
This subroutine basically populates the ComboBox controls with the various dates so that the user can choose from them. Once the dates are populated, these controls display the currently selected date.
Servicing the Events
When the end user clicks the ComboBox control you need to set the day, month, or year correctly depending on the format that the date is represented in. You accomplish this by servicing the SelectedIndexChanged event of the three ComboBox controls (Listing 10).
To display all these properties as items in the smart tag, you will need to add them to the DesignerActionItemCollection object. This is accomplished by the GetSortedActionItems() function, which you need to override in this class. The GetSortedActionItems() function will populate the smart tag with the list of designer action items and arrange them in the order that you specify within this function.
You must take special care for cases where the month is represented alphabetically-you need to convert the enumeration value to its corresponding numeric value.
One important issue you need to consider when dealing with dates is to ensure that the date selected by the user is a valid one. For example, you cannot have more than 29 days in the month of February and you can only have 29 days in February for leap years. In this case, you check for the validity of the date every time the ComboBox controls lose their focus. You can use the DaysInMonth() method from the Date class to find out the number of days in a particular month and year (Listing 11).
If the date is invalid, the control will display a balloon (using the ToolTip control).
Testing the Control
That’s it! You can now test the control. Right-click the CustomDateControl project in Solution Explorer and select Build to compile the user control into a DLL.
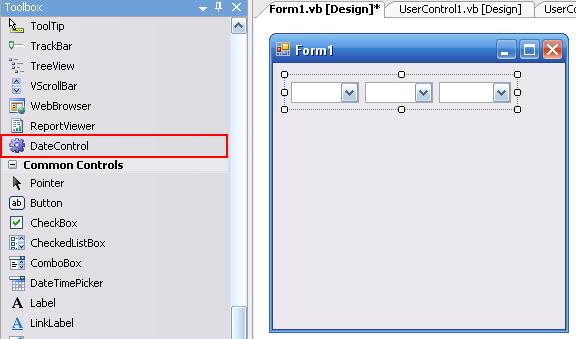
Once you have compiled the user control, add it to the ToolBox by right-clicking the All Windows Forms tab in ToolBox, and then selecting Choose Items… (Figure 3).

In the Choose Toolbox Items dialog box, click the Browse… button and navigate to the bin\Debug folder of the CustomDateControl project. Select CustomDateControl.dll, click Open, and then click OK. You should now be able to see the DateControl listed in the ToolBox.
Back in the SmartTag Windows application project, drag and drop the DateControl from the ToolBox onto the default Form1 (Figure 4).
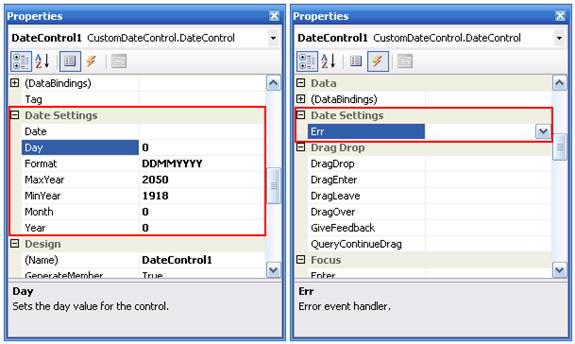
Right-click the DateControl on Form1 and select Properties to view its properties. Figure 5 shows the various properties and events of the DateControl user control listed under the Date Settings category (you must select the Categorized view in the Properties window in order to view this).
To test out the control, add a GroupBox control to Form1 and populate it with the RadioButton controls (Figure 6).
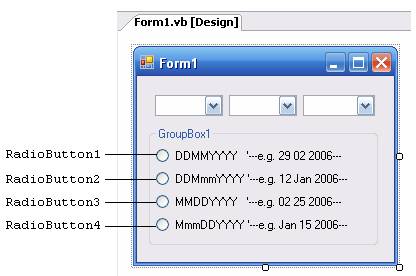
Code the various RadioButton controls as follows (Listing 12).
Listing 13 shows some examples of how you can programmatically configure the DateControl user control.
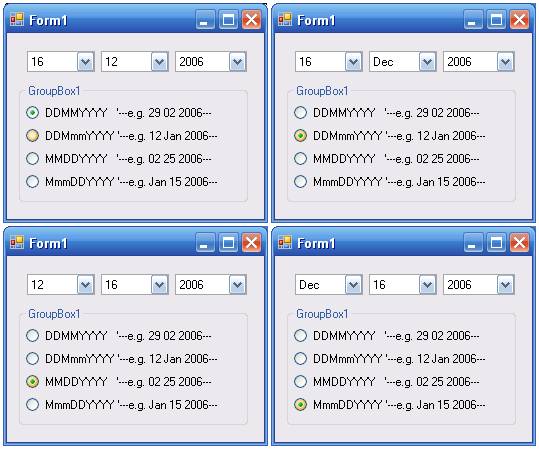
Press F5 to debug the Windows application. Figure 7 shows the various view of the DateControl user control.
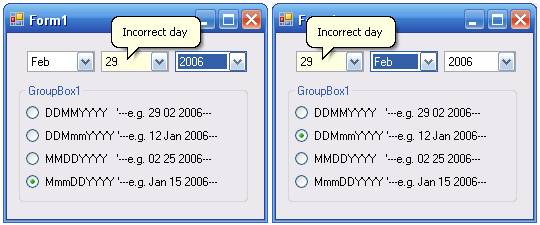
If you select an invalid date, the control will display a balloon (Figure 8).
Adding Smart Tags
Now that you have built your user control, it is time to add a smart tag to the control. Adding a smart tag to the control allows commonly used properties of the control to be configured easily without needing to do so via the Properties window.
The first step is to add a reference to the System.Design.dll assembly to the CustomDateControl project. Right-click the CustomDateControl project name in Solution Explorer and select Add Reference…. In the .NET tab, select the System.Design component and click OK.
Next, add the System.ComponentModel.Design namespace to UserControl1.vb:
Imports System.ComponentModel
Imports System.ComponentModel.Design
Creating the Control Designer
Add a new class definition to the UserControl1.vb file and name the class DateControlDesigner. This class will inherit from the System.Windows.Forms.Design.ControlDesigner class:
Public Class DateControlDesigner
    Inherits _
       System.Windows.Forms. _
       Design.ControlDesigner

End Class
You use the ControlDesigner class for extending the design mode behavior of the user controls. In this case, you will display a smart tag for the user control. Add the following member variables and property (Listing 14).
The DateControlDesigner class contains a member variable called lists that contains a list of DesignerActionList objects. The DesignerActionList class provides the base class for types that define a list of items used to create a smart tag panel. This variable will contain a list of items that will eventually appear in the smart tag. You do this by creating an instance of the DateControlActionList class (which I will define next).
Creating the Designer Action List
Define the DateControlActionList class as follows (add the new class definition to UserControl1.vb) (Listing 15).
The DateControlActionList class will create the list of designer action items available in the smart tag.
Create the constructor for the class. The constructor accepts a single argument, which is a reference to the user control:
Public Sub New(ByVal component As _
   IComponent)
    MyBase.New(component)
    Me.myDateControl = component

    Me.designerActionSvc = _
       CType(GetService(GetType( _
       DesignerActionUIService)), _
       DesignerActionUIService)
End Sub
Add a function named GetPropertyByName() to retrieve the various properties of the user control (Listing 16).
Next, declare the various action list items in the smart tag as properties (Listing 17).
To display all these properties as items in the smart tag, you will need to add them to the DesignerActionItemCollection object. You accomplish this by using the GetSortedActionItems() function, which you need to override in this class. The GetSortedActionItems() function will populate the smart tag with the list of designer action items and arrange them in the order that you specify within this function (Listing 18).
Note that for the DisplayTodayDate property, setting a value will cause the smart tag to refresh. Specifically you will hide the Date designer action item if the DisplayTodayDate property is set to True and display it when the DisplayTodayDate property is false.
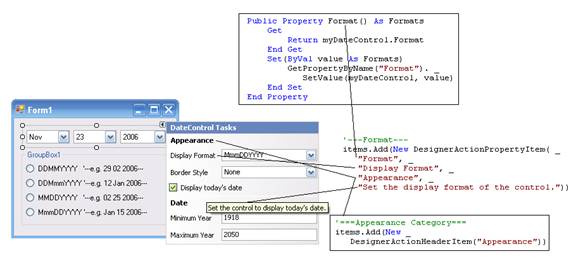
Figure 9 shows the various items in the smart tag and the relationships with their corresponding properties.
Finally, to associate the user control with the control designer, you need to add the Designer attribute to the DateControl class:
<DefaultEvent("Err"),
  Designer(GetType(
  DateControlDesigner))> _
Public Class DateControl
Viewing the Smart Tag
To view the updated control, you need to rebuild the CustomDateControl project. Right-click the CustomDateControl project in Solution Explorer and select Rebuild. When you now examine the DateControl in Form1 (from the SmartTag project), you can now click the arrow located on the top-right corner to display the smart tag (Figure 10).
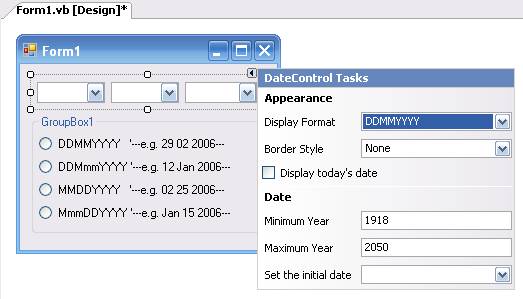
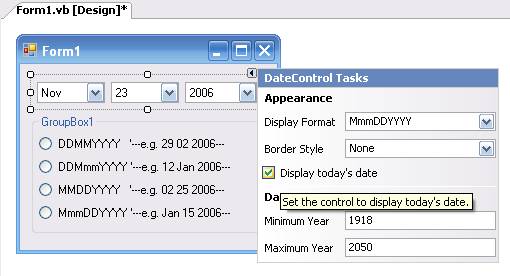
You can now set the various properties of the controls in the smart tag. Observe that if you check the Display today’s date check box, the Set the initial date item will disappear (Figure 11).
Summary
In this article you learned about the various classes to define in order to associate a smart tag with a user control. If you are a control developer, it is useful to utilize smart tags to improve the usefulness of your control.